Ben and the boys love fish (me, not so much). I used to make fish on an outdoor grill, but we do not have a grill at the new apartment. However, I found an easy way to make it: the air fryer! It doesn’t take very long and the boys seem to enjoy it every time.
You will need:
Salmon filet(s)
Olive oil
Paprika
Salt
Pepper
Lemon juice
Any other seasonings you enjoy (I like to sprinkle a little Cajun)
Pastry brush
Optional: non-stick spray
Directions:
Using a pastry brush, gently spread a thin layer olive oil over the filet. Season with paprika, ground pepper, salt, and any other seasonings you like on your fish. Sprinkle with lemon juice.
Cut filet into smaller sections to fit in the air fryer. (I normally cut ours into about 6-7 inch wide sections).
Oil the basket tray of the air fryer using a non-stick spray or the olive oil.
Place a filet in the air fryer and cook at 390℉ for 7 minutes.
Check to make sure fish is done and enjoy! (Repeat cooking steps for each filet.)
We bought Ben a car a few weeks after we got back to Ohio. Between school starting soon (with no busing) and him having to go physically into work, we needed two cars. I drove the truck as my vehicle. However, with diesel prices high and the truck not having the greatest fuel mileage for short distances/city driving, we decided to sell it. We were on the lookout for larger sized car that we could still take road trips in comfortably. We were leaning towards an SUV and narrowed it down between a Jeep Grand Cherokee and a Subaru Ascent. We looked on Facebook, Autotrader, and Carvana for our new (to us) car. I am sure everyone has heard by now but used car prices are inflated and there is a chip shortage for new cars, so cars were going fast and for higher-than-normal used car prices. However, after spending over $200 in one month for diesel with just local driving, we wanted to get a more fuel efficient car.
CARVANA PURCHASING:
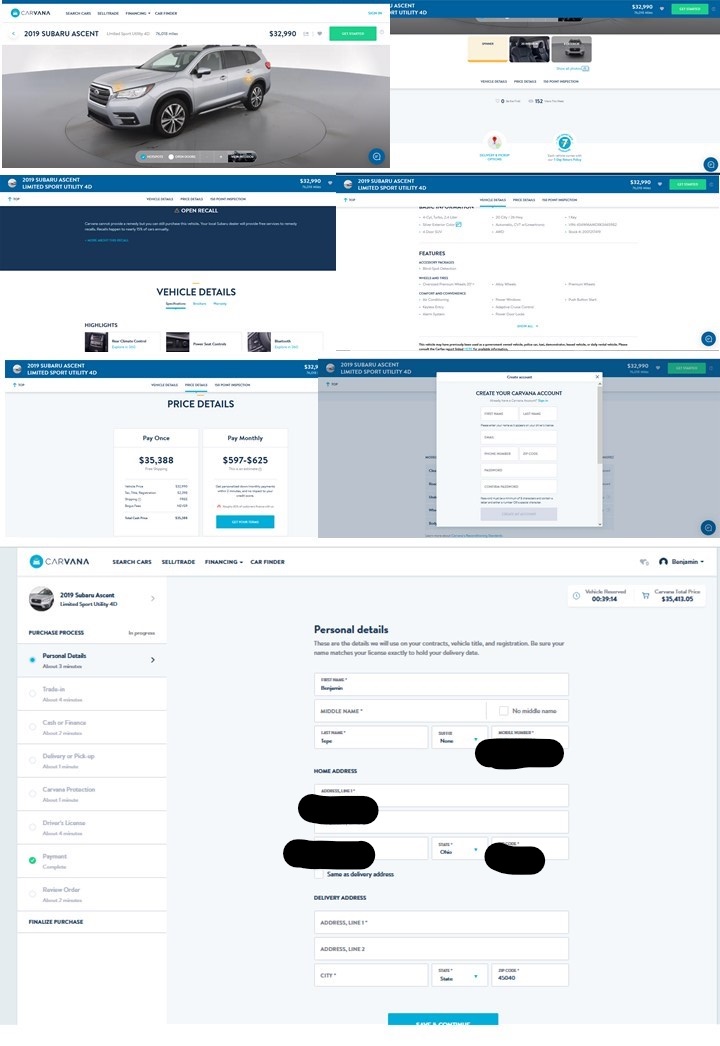
SEARCHING FOR YOUR CAR: We had never bought a car online, much less sight unseen. Carvana’s site allows you to search for your car by price, make/model, type, year/mileage, and features. Some cars have free delivery, while others have a delivery fee. There are several pictures of the cars, including any chips or “imperfections”. A detailed list of the car’s features and a Carfax report are provided as well. After searching for a while, we finally found a car that we both liked, a blue Subaru Ascent. There were a couple paint chips and a scratch listed, but they didn’t look too bad. We placed the order and were eagerly awaiting our delivery.
Click to Enlarge
PURCHASING: After you find a car you like, you can then start the process of buying the car by clicking the green “Get Started” button. This will hold your car for 30 minutes while you complete the account registration, trade-in options, payment information (cash/Carvana financing/3rd party financing), delivery/pickup (date/time), driver’s license information, and optional items (gap insurance, etc.). After those steps are completed, there are a few more things that need to be done. If you pay with cash, your bank has to verify the funds either through a 3-way call between you/Carvana/bank, or thorough a third-party called PLAID. To use the third-party verification, you need to give them your account information, including password. We picked the 3-way call, as I was not comfortable giving someone my bank log-in information. Your bank funds will be verified, but will not be withdrawn until you accept delivery of the car. There were a few online forms to complete before delivery as well. Buying a car unseen was a little worrisome; however, there is a 7 day return period for a full refund with Carvana, if you decide not to keep the car.
Purchase Example: Click To Enlarge
DELIVERY:
The day of delivery, we received a phone call that they were finishing detailing the car and should be there by our appointment time. We had to send (via text) a selfie with our driver’s license, the back of the driver’s license, and proof that the car had been added to our insurance. Your insurance information has to say the name/VIN of the new car in order for them to release the car to you! Even though I had always been told that any car we bought was covered as long as our insurance was up to date, I called and let our insurance know to start it on the date of delivery. Because delivery was on a Saturday, my insurance agent also sent a confirmation letter in case there was a delay of any kind with the electronic card updating.
The car ended up being about a half hour late, but the driver did communicate delays through text message. It was fun to watch the car being unloaded. (VIDEO link here) Once the car was unloaded, we had the opportunity to take it for a test drive. We drove down a few exits on the highway and then stopped in a parking lot to look it over. There were a few more paint chips than were disclosed on the listing, as well as scratches to the interior roof material (which were not disclosed at all). The car drove really well and was comfortable, so we decided to accept delivery. The car came with 1 key fob and a Carvana key chain.
Just like buying a car at a dealer, there was some paperwork involved but there were only a few forms that we had to sign. The car came with temporary tags and Carvana will mail you the permanent plates so you do not have to go to the DMV. I have to say, not dealing with a car salesman and the DMV was really nice. Once we accepted the delivery, we were also given the Temporary Tag application, a Limited Power of Attorney for Vehicle Registration, and an Application for Dealer Assessment that needed to be signed, notarized, and mailed back in the provided FedEx envelope. Our driver was not a notary and we had not been told ahead of time that we would need one to finish the car’s paperwork. We hurried over to my bank with 10 minutes to spare. Unfortunately, she would not notarize the paperwork. She claimed it was because she couldn’t notarize something that gave someone else power of attorney to take out a loan in our name. We read it carefully and the paperwork stated clearly that it was for the purpose of “applying for a certificate of title, to register, transfer title”, so I am not sure why the bank teller would not notarize it. We then rushed over to the UPS store near us that had a notary on staff. It only cost $5 for the notary service. I still would have liked to have known about needing a notary ahead of time. We probably would have moved the delivery time up so that we would have been able to contact the bank(s) and make sure they were available and could/would notarize it.
POST PURCHASE:
Because the car only came with one key fob, I wanted to buy another one so that we would each have one. Batteries Plus will cut and program car keys for you. When we stopped in to get a new key fob, it was going to be over $200 for the fob and programing if we bought the key through them. It was cheaper to buy the fob on eBay and then take it to Batteries Plus to program it. Some Ace Hardware stores will also program car keys. Your car does have to be present to program the new key fob. It was $85 for the key fob on ebay and $60 for Batteries Plus to cut/program it. (Check for coupons, Batteries Plus runs anywhere from $60-$70 for programming.)
The key fob that came with the car started dying after 3 days. It seems like the battery was just getting low, but it wasn’t something I would necessarily expect after only having the car for 3 days.
I did send some feedback to Carvana about the missed “imperfections”, the key fob, and the lack of knowledge about needing a notary. They were nice and gave back a standard “we’ll pass it on” message and told me we could always return the car if we were unhappy since our 7 day window was not over yet.
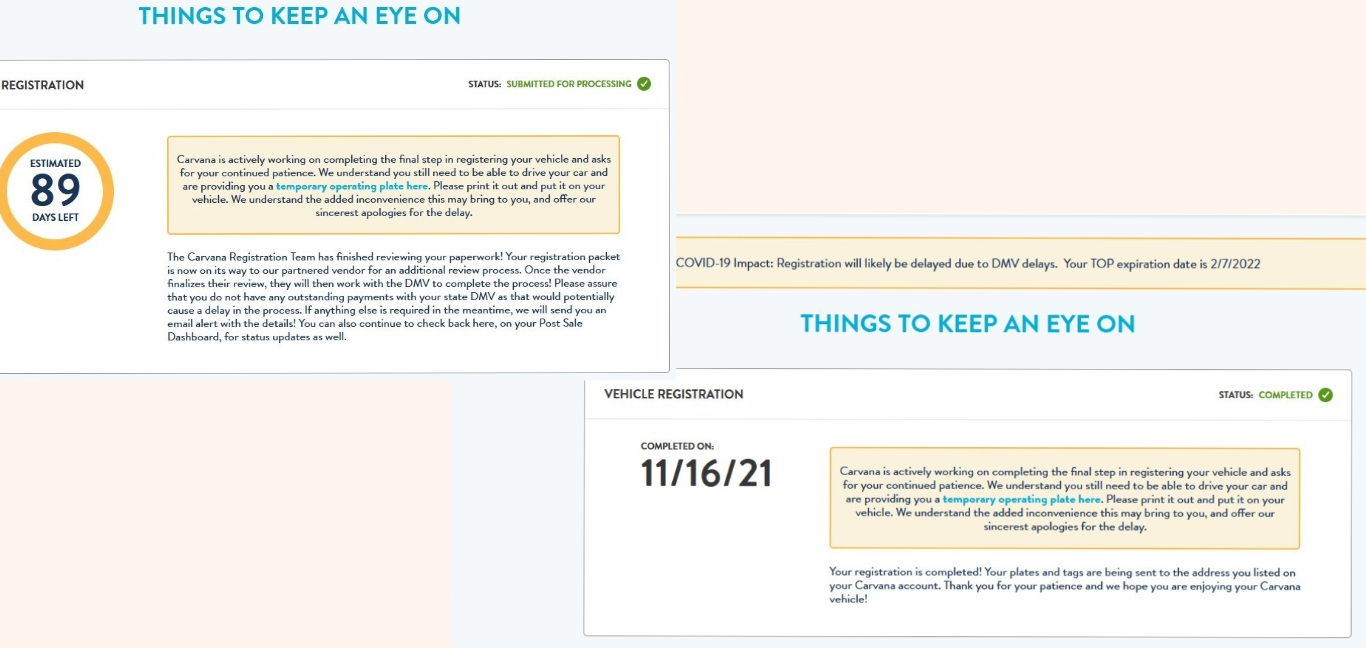
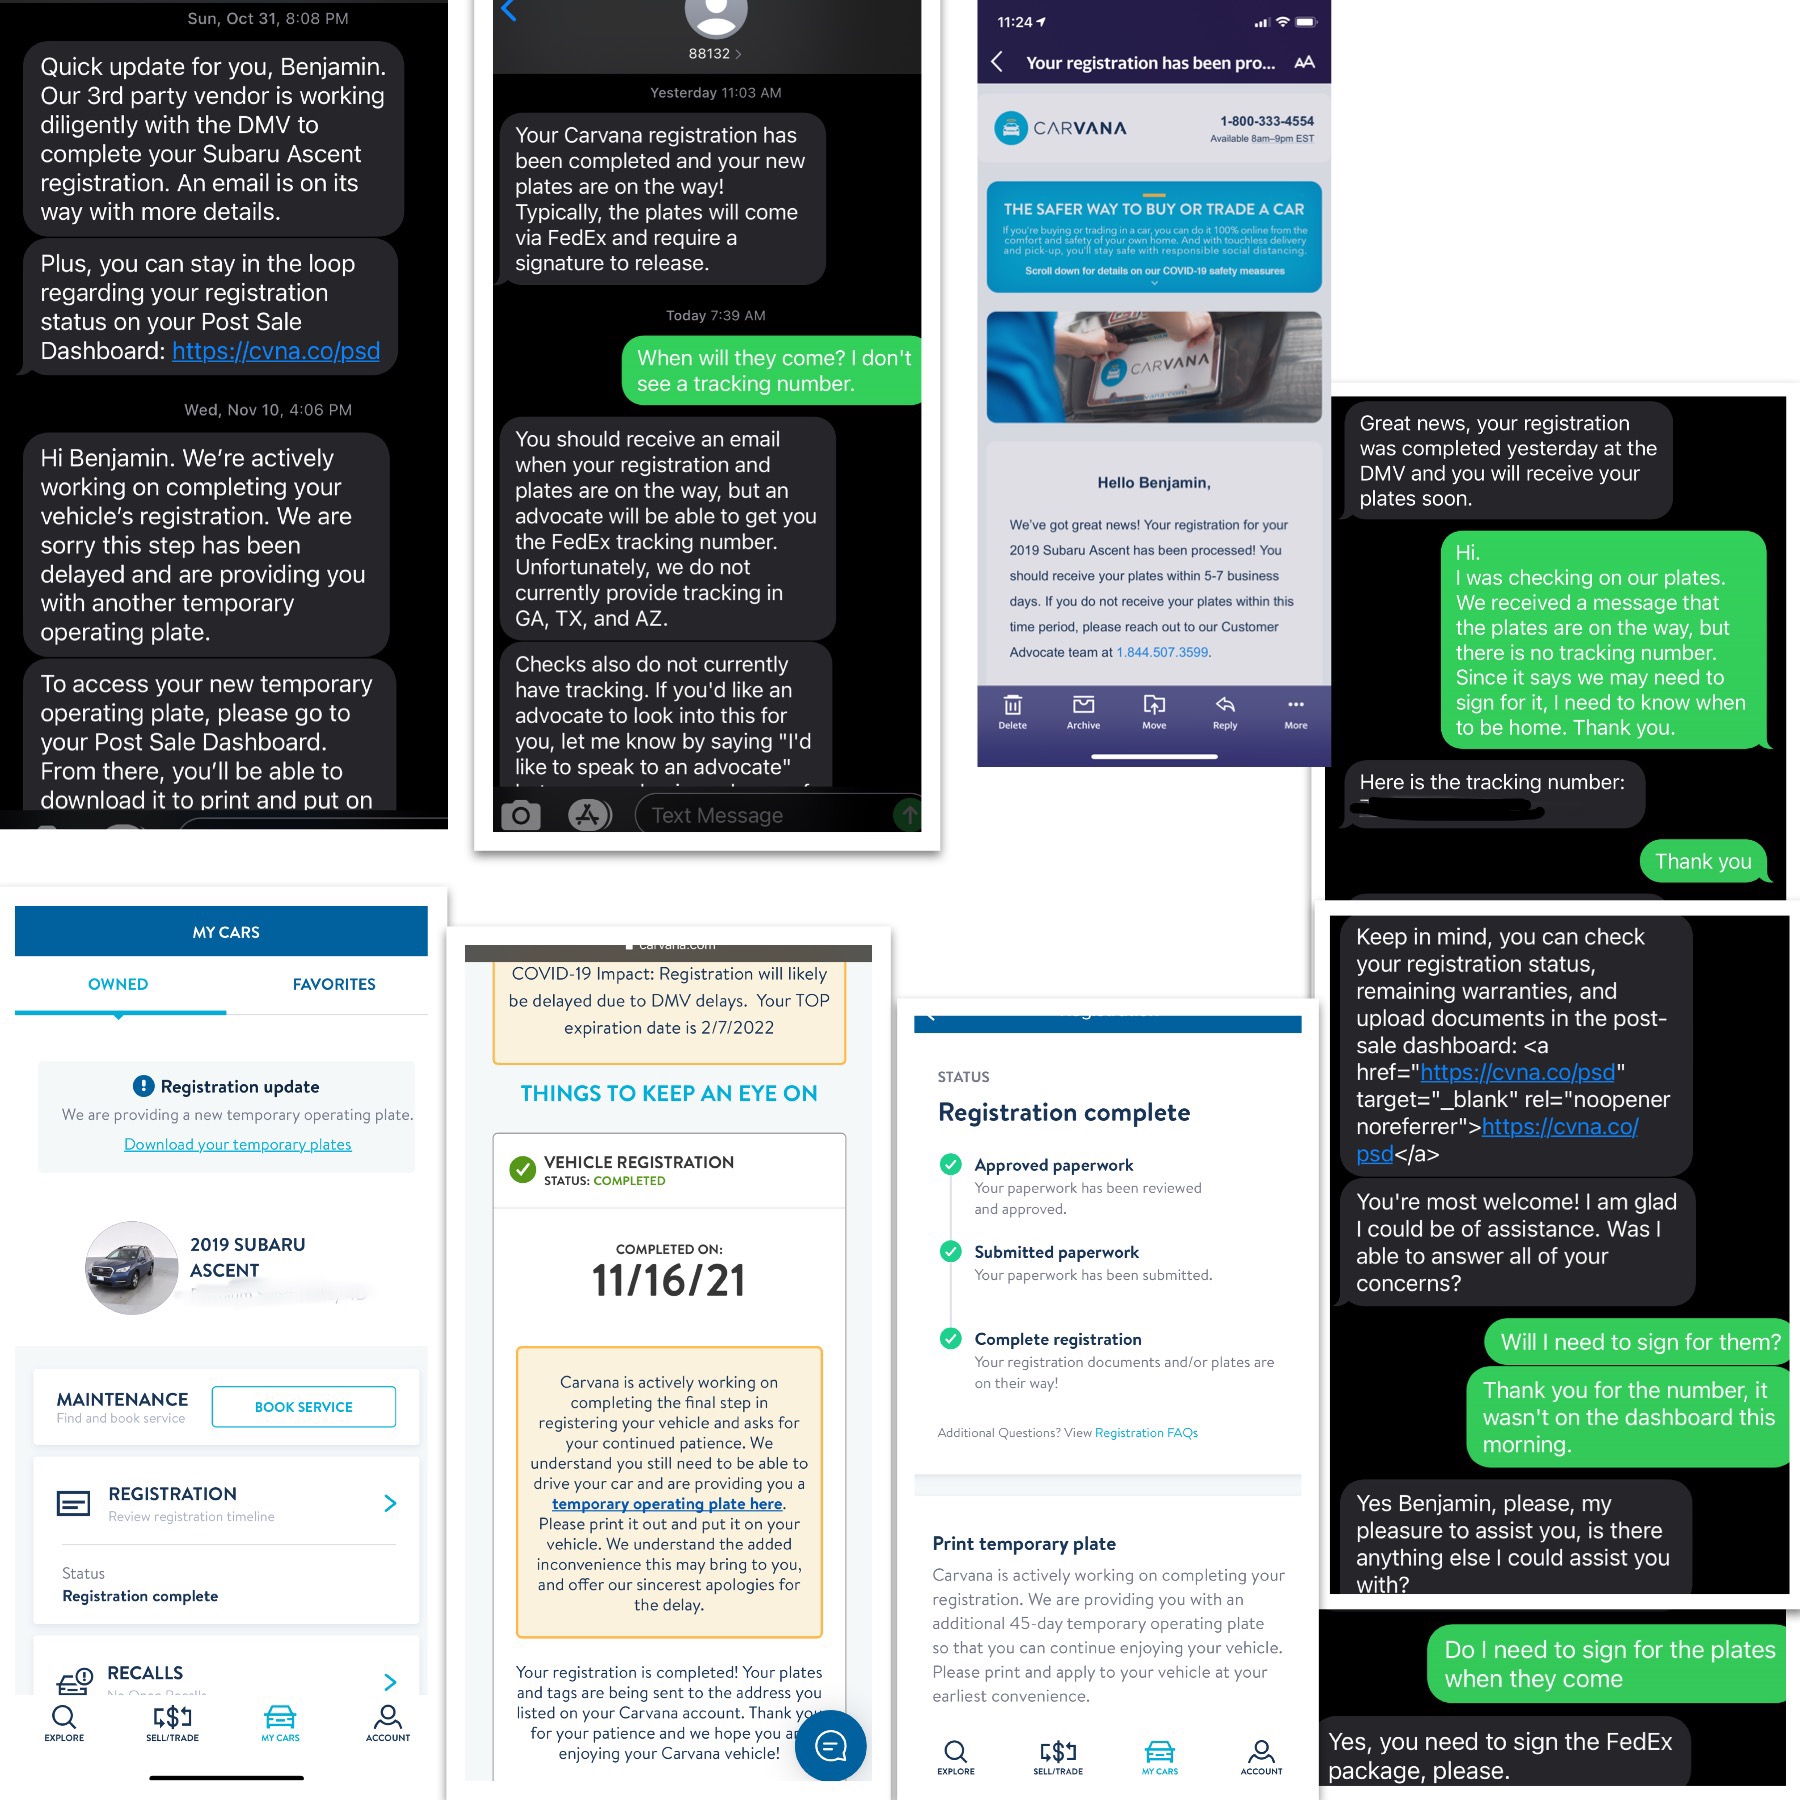
My temp tags were set to expire on 11/23/21. On 11/10, we got an email saying processing had been delayed and that new temp tags were available in my online Post Sale Dashboard. I had to print out the new tags, as they were active beginning 11/10/21 and were a different plate number. The reason given was “Covid”. It seems to be a reoccurring theme; as Ben likes to say, “Covid did it”. At this point, I could have made an appointment with our local DMV faster. On 11/16/21, I received a text saying that the registration was complete and the plates were on the way. It also stated that the plates required a signature from FedEx. I contacted Carvana on 11/17, as the app and online post-sale dashboard did not have a tracking number. I’m glad I contacted them, because they were due to arrive on 11/17. Although it stated I needed to sign for them, and I was home, FedEx just rang the doorbell and left the package on the porch.
Click To Enlarge
CARVANA, The Pluses:
No negotiating. The listed price is the price (plus any delivery fees/taxes, which are disclosed pretty clearly during the process). There is no sitting for hours negotiating over the price or if the floor mats are included. Not dealing with a car dealership was great.
Getting the car delivered on our time table. Granted, they ran late and we had to change a few things around, but it was still amazing to get it delivered right to us.
Not dealing with the DMV/BMV. No long lines for us! Carvana takes care of getting the permanent plates mailed to you.
Updates. We got several updates during the process via text messages (from online forms needing to be completed to the status of our plates).
CARVANA, The Negatives:
Lack of communication. Some things Carvana was great at with communication: the driver letting us know the schedule changes, online paperwork needing to be signed. However, not knowing that we would have to find and pay for a notary was a big miss in my mind. It would be simple enough to add that to the information given to you during the online buying/closing process. Not being provided a tracking number for the new plates would also be an easy fix. Although customer service told me it should be online, I could not find the tracking number in my account.
Accuracy. The car was in good shape, but there were more chips and scratches than advertised. The interior roof scratches are hard to miss if anyone had actually cared to look. We would have potentially looked at another Ascent, but this one was already here and we did need a car.
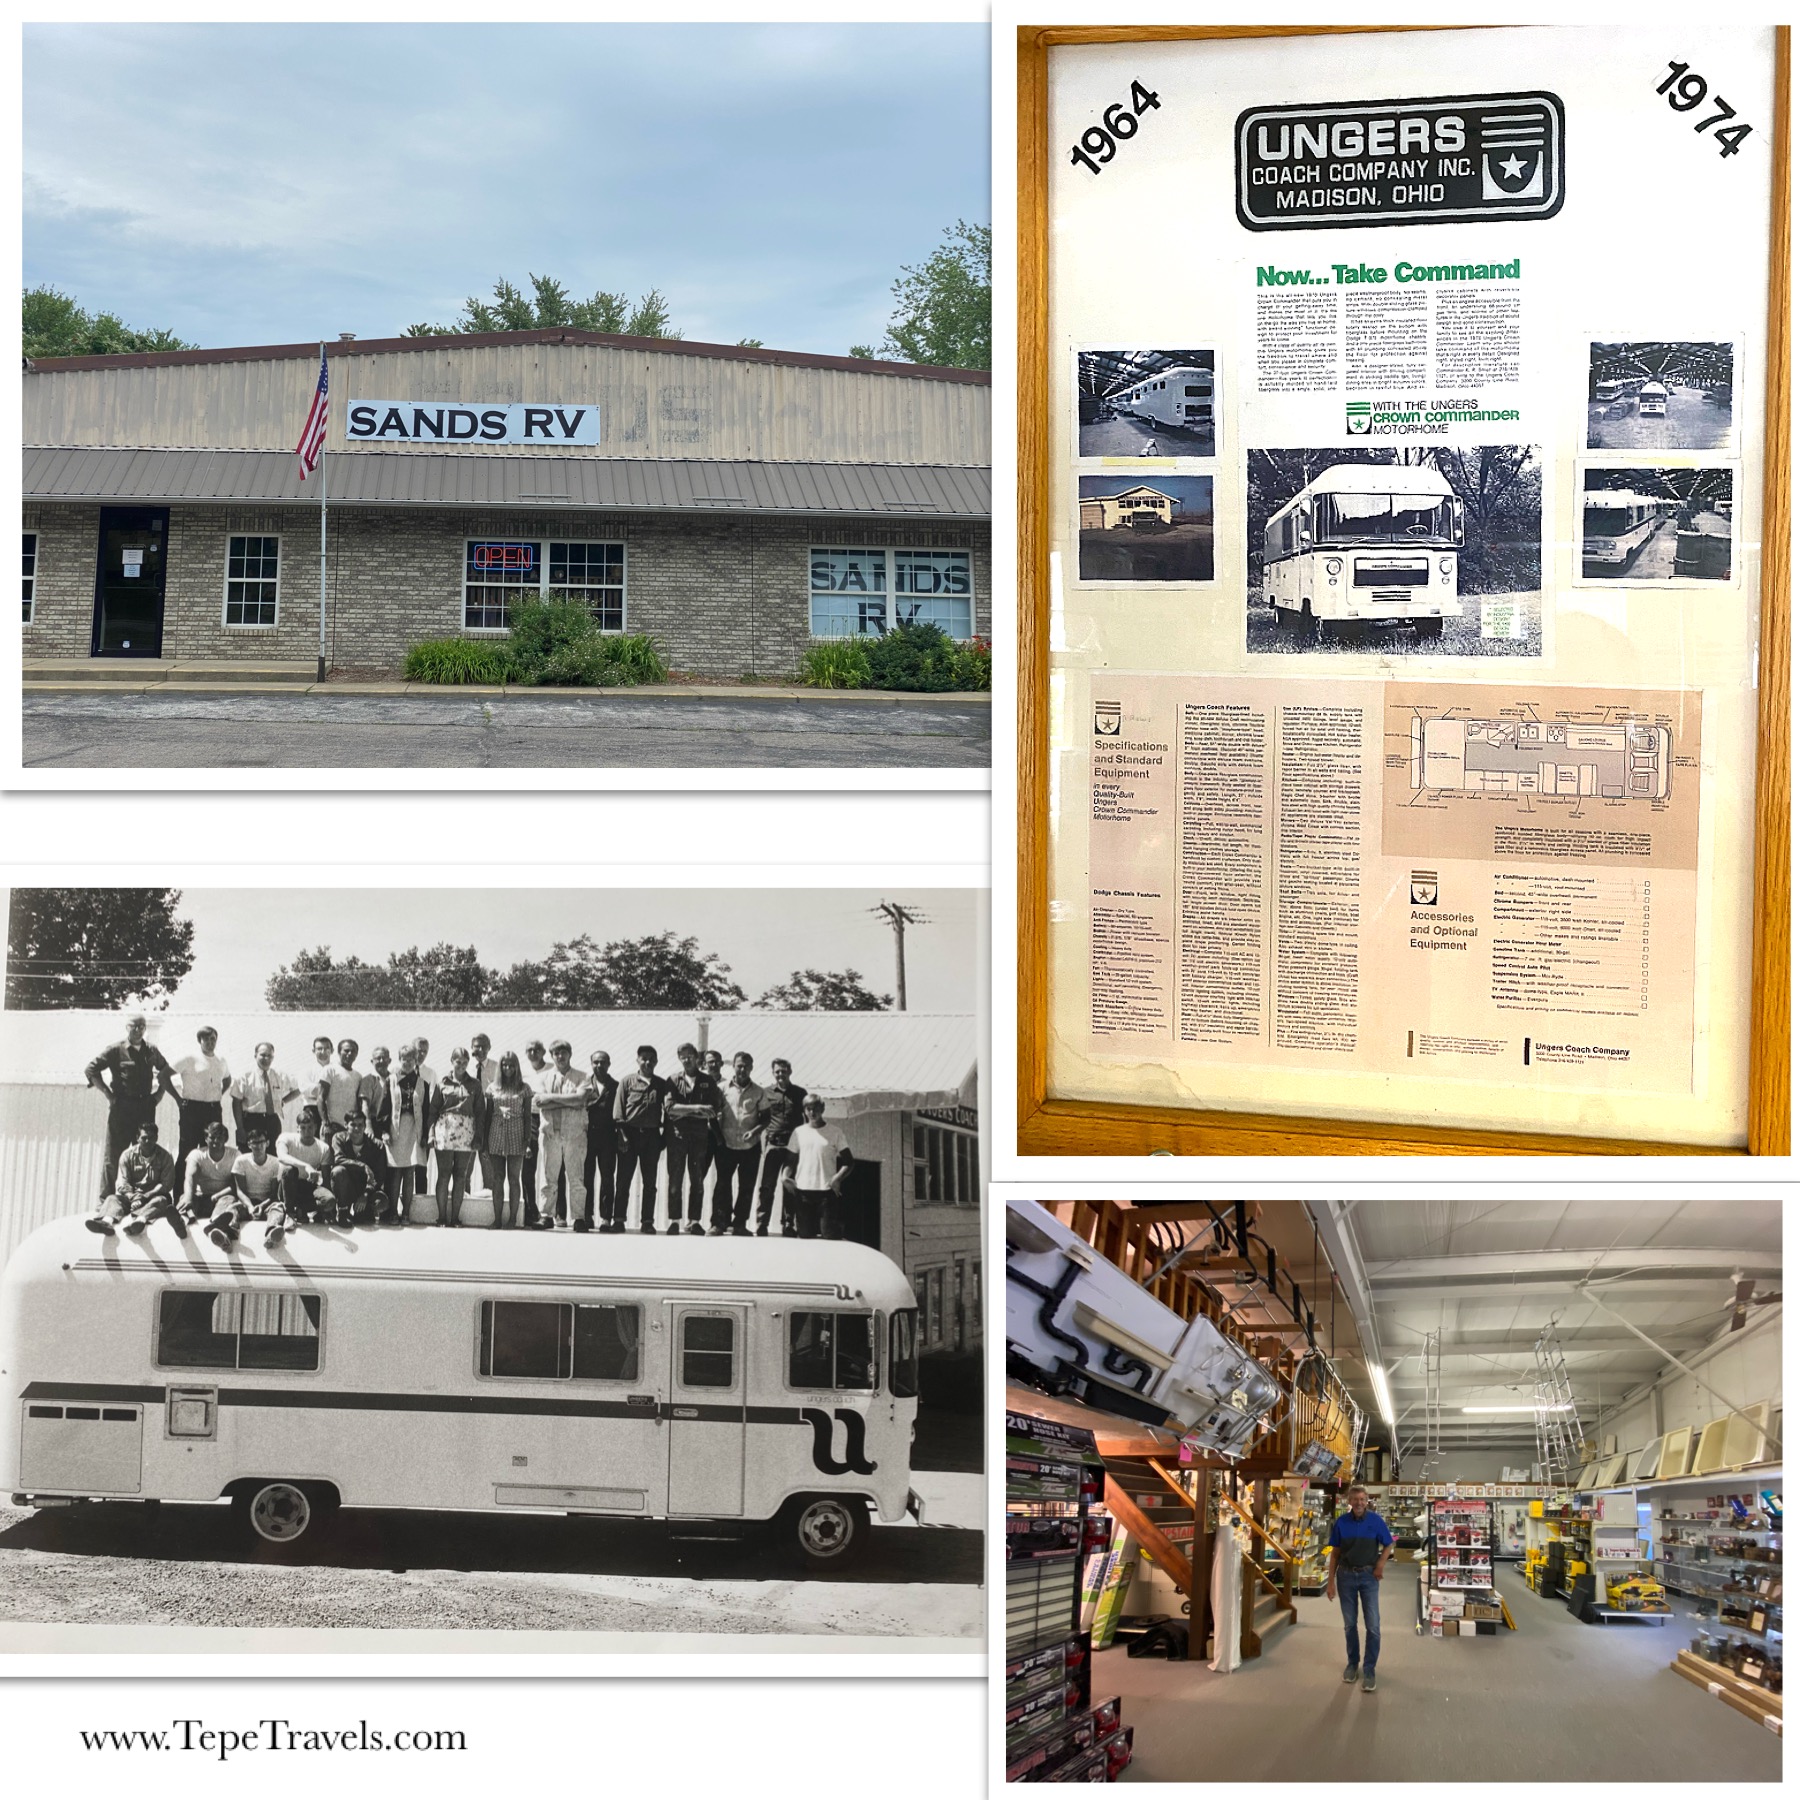
We were finally able to get our bathroom fan repaired. MaxxAir had sent us a computer board and a motor, as either one of those items could have broken. We were able to find a mobile RV Tech who came out and replaced the computer board for us. As we were talking, he recommended a RV shop that he thought we might like: Sands RV.
We stopped in a couple of days later. This store was really neat! It had a little bit of everything: curtains, furniture, toilets, fenders…
The store was owned by Bob, who also worked on the Ungers RVs. The picture below was 1968 and Bob is the one on the far right.
Click to enlarge
As we were leaving, they also gave us a flame color changing stick for the fire. The boys got a big kick out of it at our next camp fire. It did work really well and lasted a long time (much better than the packet we had bought at a campground store).
We had a great time exploring the store. Everyone was very friendly. If you are in the area, I would definitely check out this store. It was like a RV treasure chest with something for everyone! We did a quick video walk through of the store (link here).
On our move day to Vermont, it had been going pretty well. The sun was out, the kids were occupied, I had some music playing. I’ve made it a habit to check the truck and the RV TPMS sensors during our drives.
We were about two hours from our campground when I noticed the rear passenger tire was at a lower pressure than the others. It was in the shade, so at first I was hopeful it was just the sun making a difference (which it has before). I kept my eye on it and noticed it was slowly, but steadily losing pressure.
The shoulder of the highway was pretty narrow and we really didn’t want to pull off on the side of the road. We managed to find a nearby exit that had a Bass Pro with a larger parking lot. It even had a Walmart next door. Ben was amazing and was able to change the tire with the jack from the truck, our separate scissor jack, and our trusty Lynx orange leveling blocks*.
Once we were in Vermont, I brought the tire to a tire store to get checked out. We didn’t want to drive to our next campground without a spare tire. When I called the store, they had one matching tire in stock and would hold it for us. The boys and I headed over. Once we arrived at the store (Tire Warehouse), they checked the old tire first to see if it could be fixed. It turned out that the rim was the problem! You couldn’t see anything wrong looking at the tire/rim, but when a soapy solution was applied, you could see bubbles forming on the rim itself. They did not have the right sized rim in stock, but were able to get one for us. It was a white rim, but it was more important for us to have a spare than to have them match.
As it happened 1 day after our year anniversary of buying the RV (bought 6/4/20 and tire happened 6/5/21), the dealer said it was not covered under their warranty. I was told to contact Keystone and they told me to contact the tire company (Load Star) to see if it was covered under their warranty. I’m still in process of dealing with the tire company to figure this out.
We bought our TPMS sensors through TechoRV.com. I would really recommend having these sensors for your RV!
So, good news…we didn’t have any other leaks after tightening the toilet…at least for a while.
Bad news, now it will sometimes keep running and unlike some home toilets, there is no overflow system, so it just gets into the RV. Based on online searches and a call into the manufacturer, we think it is the water valve. There have been a few times lately where there was water at the base too, but it wasn’t from the kids.
Unfortunately, you have to take the whole toilet off to replace the water valve. Will was my assistant for this project. The tight bathroom space did not make it any easier. It seems like there a lot of YouTube videos that are on replacing/repairing the toilets, but it took a little while to find our toilet. We have a Thetford Magic Style II, which used the valve replacement part #42049. There is a serial number in your toilet and if you call the manufacturer they can tell you which part you need.
I finally found a video that was really helpful. The parts did come with written directions, but I found the diagrams less than helpful.
It took some doing, but we finally got it out back together. The test run didn’t have any leaking, so fingers crossed this solves the problem. We also managed to get the pin put back in the toilet seat lid, so that was fixed as well.
Below is a rough outline of the steps to replacing our water valve. Each toilet and set up are different, so please read your instructions. I really found the YouTube video helpful as well.
Turn off water and flush toilet to drain as much water as possible. Place rags around the water line for drips.
Disconnect water line. For our toilet, standing over it looking down, I had to turn the connector to the right to disconnect the water line from the toilet.
Remove bolt covers and bolts.
Remove toilet and set on a garbage bag.
Remove existing/old seal.
Clean toilet. (Yes, this is gross.)
Follow directions on replacement kit. (Make sure to test foot pedal at the end before reinstalling toilet! My first attempt had the pedal falling off because it wasn’t clamped on all the way.)
Place on new seal.
Place toilet back on screws
Thread on bolts and tighten down. To help it seat, sit on the toilet. Check the bolts to see if it needs to be tightened again.
Reconnect water line. Leave rags in place around toilet.
As crazy as pulling into a campground can be, leaving can be just as bad depending on the campground layout.
Some campgrounds have a very specific exit path that is well marked, while others have it as a free for all. We like to walk the campground the night before we leave to scope out our path. If we are leaving later in the morning or early afternoon, we will walk it again in the morning. Campgrounds change frequently; you may have gotten some late arrival new neighbors, someone may have parked too close to the street, a toy hauler’s balcony may be overhanging into the street and you will not fit by them. (All of which have happened.)
Campground map with exit route marked by campground
I would recommend having an A and a B exit plan. Sometimes your first choice doesn’t work out. For example, at our last campground, we had the route planned the night before with us turning to the left at the end of our row to get out of the campground. However, our neighbor parked really close to the corner with their car and there was just no way I was going to make that turn unless they moved their car. It was early in the morning and I didn’t want to wake them, so we ended up going right. The boys ran ahead and checked the rows for me to make sure they were clear. There were a couple of spots where the trees made it a little snug, but we made it out safely.
Our exit plans
Above is an example of our planned exit from the last campground. Plan A was the red line. The turns near the office could be tight, but there were empty sites we could cut through to make it an easier turn. Plan B was the yellow line, which would be great as long as there were not a lot of cars parked in the side lot by the office. However, the morning of, our neighbor in C1 parked really close to the road and we ended up taking the purple route, which wasn’t even in our original planned options.
When we first started this adventure, we didn’t plan our departure route, but now it has become part of our routine. I would not worry about planning it until the night before (and double check it in the morning), as you just never know who could have arrived (or left) really late and how it could affect your route.
We sent one of the kids out to empty the grey tank, as we routinely do. The other one* decided to close it (*nameless to protect the guilty). I’m not sure what happened exactly, but the handle cracked. It didn’t break off, so we duct taped it together.
Ben started the drive out to Camping World to see what was available for repairs. I was online searching for help thinking, “great, now I have to replace the valve section”. Our owner’s book didn’t really describe how to repair a broken handle. However, one of our neighbors saw me staring at our valves and asked what was wrong. He informed me that most of the time, you can just replace the handle! Yay! I called Camping World to make sure they had one in stock since Ben was already on the way. (Spoiler: They did.)
The valve handle does screw off; however, to remove the handle, you have to use pliers to hold the metal shaft in place, otherwise it will just spin. They also recommended using a thin cloth between the shaft and the pliers. Ben bought the metal replacement (similar to this one*), hoping that it will last longer. He also applied a little bit of Loctite to it (do NOT use this on plastic).
It didn’t take much time, other than driving to get the part, to get it replaced. I am so thankful that we didn’t have to replace the whole valve piece, just the handle, that I thought I would share our newfound knowledge in case anyone else has that problem.
There are a ton of campgrounds out there and it can be overwhelming trying to find the “best” one to call home! They range from independent places, chains (like KOA and Thousand Trails), city owned, state owned, and federally owned. Some only accept military/retired military, some only accept Class A’s, and some have age limits on the RVs or the people they let in. A lot of places also have dog restrictions based on breed.
We have a few things that we always look for in a campground: location to sightseeing, internet, full hook-ups, and a laundry room. Our biggest one is a good internet connection for school and work. There are a few different websites that I visit to check reviews: campgroundreviews.com, GoodSam, and Campendium are my first ones. After those, I will go to Yelp/Google Map reviews (make sure to type RV Campground or RV Resort, not just campground as you will get results that will not work with RVs or may not have hook-ups), and then to Facebook for the RV groups to see if anyone has stayed there before.
Our favorite RV Campground Review Sites
I always check multiple review sites, especially for internet issues, but sometimes you still don’t get it right. For example, the Garden of the Gods RV review stated that our 3 providers worked. However, when we checked in, there was a note with our paperwork saying AT&T did not work in the park. This wasn’t mentioned on the campground’s website at the time. (This is just one of the reasons why we have three internet providers!)
I also try to read about the general campground conditions (sites, roads, etc.). If a lot of reviews with bigger RVs say that sites or internal roads were tight or not well maintained, I will pass on that campground. We’ve even double checked the reviews on the way to a campground and changed our plans last minute based on the current conditions. Conditions of campgrounds can change frequently. For example, when we booked one Texas site, it had decent reviews. On the drive there, we were reading the reviews from the last week and it was filled with reports of sewage problems throughout the campground (eww!), so we frantically searched and found a new campground to stay in. The most recent one was a change due to a review saying the T-Mobile signals were weak. T-Mobile is where most of our working internet comes through. We have some hotspot data through our cell phones, but the T-Mobile hotspot is the workhorse.
Campground amenities can also be a big indicator for the nicety of a park, although not always. There doesn’t seem to be a regulation on who can call themselves a RV Resort vs a campground, so reading reviews are important! We had one Thousand Trails claim to be a resort and they only had a laundry room and a walking trail. Nothing else was available or was broken and the sites and roads needed some upkeep. On the other hand, we had a Thousand Trails in Orlando that lived up to the resort title with many amenities and things to do.
An on-site laundry is also a requirement for us, as we do not have a washer/dryer on our travel trailer.
We have learned to always check (recent) reviews across the different review sites. It can be worth spending the extra money to get a nicer campground, especially for longer stays.
Nope, these weren’t bodily problems, but the bathroom decided to kick up a little fuss this past week.
First a quick rundown on RV toilets. Turns out most RV toilets are gravity flushed: there is a foot pedal to open the slide, which when pressed will open the slide and a small amount of water is released to help gravity do its thing and slide everything down the pipe to the black tank. (Hence why we have a water jug in the bathroom. Sometimes with a lot of paper, you need to add more water to encourage things along. It also helps with the black tank not getting clogged with poop pyramids and it helps things dissolve well in the holding tank.)
RV Gravity Fed Toilet
It started with the toilet overflowing. A small amount of paper had not gone down all the way and kept the slide from closing all the way, so the water kept continuously running. However, that same toilet paper also kept the water from draining and it overflowed onto the floor and spread to bathroom wall, the hallway, and then our room. Luckily, it was just water and had only made it a couple of inches into our room and we were able to clean everything up.
Several days later, we noticed water around the base of the toilet. It hadn’t overflowed, the boys hadn’t missed as it was just water. It didn’t look like it was leaking from the water connection points, but it could very slightly be wiggled. From what I read, it turns out that there is a gasket holding the toilet to the floor. It is mostly pressure fitted, so we took the screw covers off and tightened it down. No more wiggling! I’m hoping this solves the problem, since I really don’t want to have to replace a toilet. NOTE: Ours used a 1/2″ nut.
Then, as I was getting ready for bed, I noticed the shower floor was wet. No one had been in the shower since the morning, so it should have been dry. There was a small drip in the bottom left corner near the handles. Great. We did some research and took the handles plate off. We had to be pretty careful, since it is directly connected to the water supply pipes (which did not look like they had a good access panel to get to). Our shower is pretty small to start with, so it was a bit of a challenge to get to anything. I was able to reach in and tighten the hot water connection. I then had to remove and replace all the caulk and add the screws back in.
We get a lot of questions when we talk to people, so we thought we would address some of them! If you have any questions, please feel free to email them to us (tepetravels@gmail.com) and you might just get your answer!
I picked laundry as our first topic, as it happens weekly and is something everyone has to deal with. I will say that one of the things I miss the most is having my own washer and dryer. Some of the Class A’s and 5th Wheels have a washer/dryer combo installed. Our travel trailer did not come with the built in hook-ups for a washer/dryer unit and we didn’t think we had the room to store a portable washing machine*.
WHERE: When I book a campground, I do look to see if they have a laundry room listed. I also check to make sure it is open. Due to COVID, we have come across a campground or two that have closed their laundry facilities; however, almost all of the campgrounds we have stayed at have been open. Most of the campgrounds have had laundry rooms, although we have gone to a couple of laundromats as well. You never really know what you are going to get with campground laundry rooms. We’ve had some with really old machines that were a little rusty and broken (that’s when we go to the laundromat). We’ve also stayed at places that have had really nice high-end machines. Most of the places have taken quarters (which was fun during a national coin shortage), although some have only accepted credit cards or tried to push an app on your phone.
HOW MUCH: The costing of the washers and dryers have varied, sometimes significantly. It may seem like $0.50 isn’t a lot, but we normally have 2-3 loads a week and that difference really adds up. The cheapest we have had were $1.25/load for washers and $1/load for dryers and the most expensive were $3.25/load washers and $2.50/load dryers. I would say it averages around $2 per load. I’ve learned to always keep my quarters with me because you never know when the dryer won’t actually dry the clothes, or the laundry pod will not dissolve, or the washer will kick the pod onto the door frame and the detergent pod won’t actually go through the wash with the clothes and get the laundry clean. TIP: I would buy your roll of quarters when you are able to, whether it is at a bank or the campground. Some of the campgrounds do not have change machine or will not sell quarters.
LIQUID DETERGENT VS PODS: At home we always used the liquid detergent. However, with a tiny space and a weight limit, I switched to the pods for a while. For the most part they worked great. When we moved down South, the pods started not dissolving all the way during the wash cycle. I thought it was the campground, but it happened at 3 different ones. Maybe we got a bad batch of pods? We switched over to the liquid again when we found a smaller bottle. We were tired of finding pieces of laundry pods stuck on our clothes. There are also laundry sheets* that some people rave about, but they are pretty expensive (per load of laundry vs other detergent) so I haven’t tried them yet.
So far, we have spent about $300 in laundry (on average $10/week), not including detergent or dryer sheets. We were very lucky that we had a washing machine that we could use for free in Florida for several weeks!