This was the last National Park on our current route. The name of the park seems sweet, but it is a horribly sad tale. I read two different versions. A mother and her cubs are forced to flee from wildfire into the Lake and have to swim to the other side. The cubs do not make it. The mother bear lays down waiting for her cubs. The other version is that there was a food shortage, and to keep from starving they had to cross the lake. The cubs do not make it. The two small islands pop up as monuments for the cubs.
The main visitor center, Phillip A Hart Visitor Center, was located in Empire, Michigan. It was not in the park. The park boundaries are actually made of 3 sections of land with towns in between and 2 islands. We drove around the park in a few locations, but only saw a ticket/pass booth at the Dune Climb parking lot.
On our first visit, we drove the Pierce Stocking Scenic Dr. I’m sure it had wonderful views, but all we could see was fog! (It hadn’t been foggy at our campground, about 30 minutes away). There was a small covered bridge that was fun to see.
There were several hiking and bike trails in the park, along with beach areas.
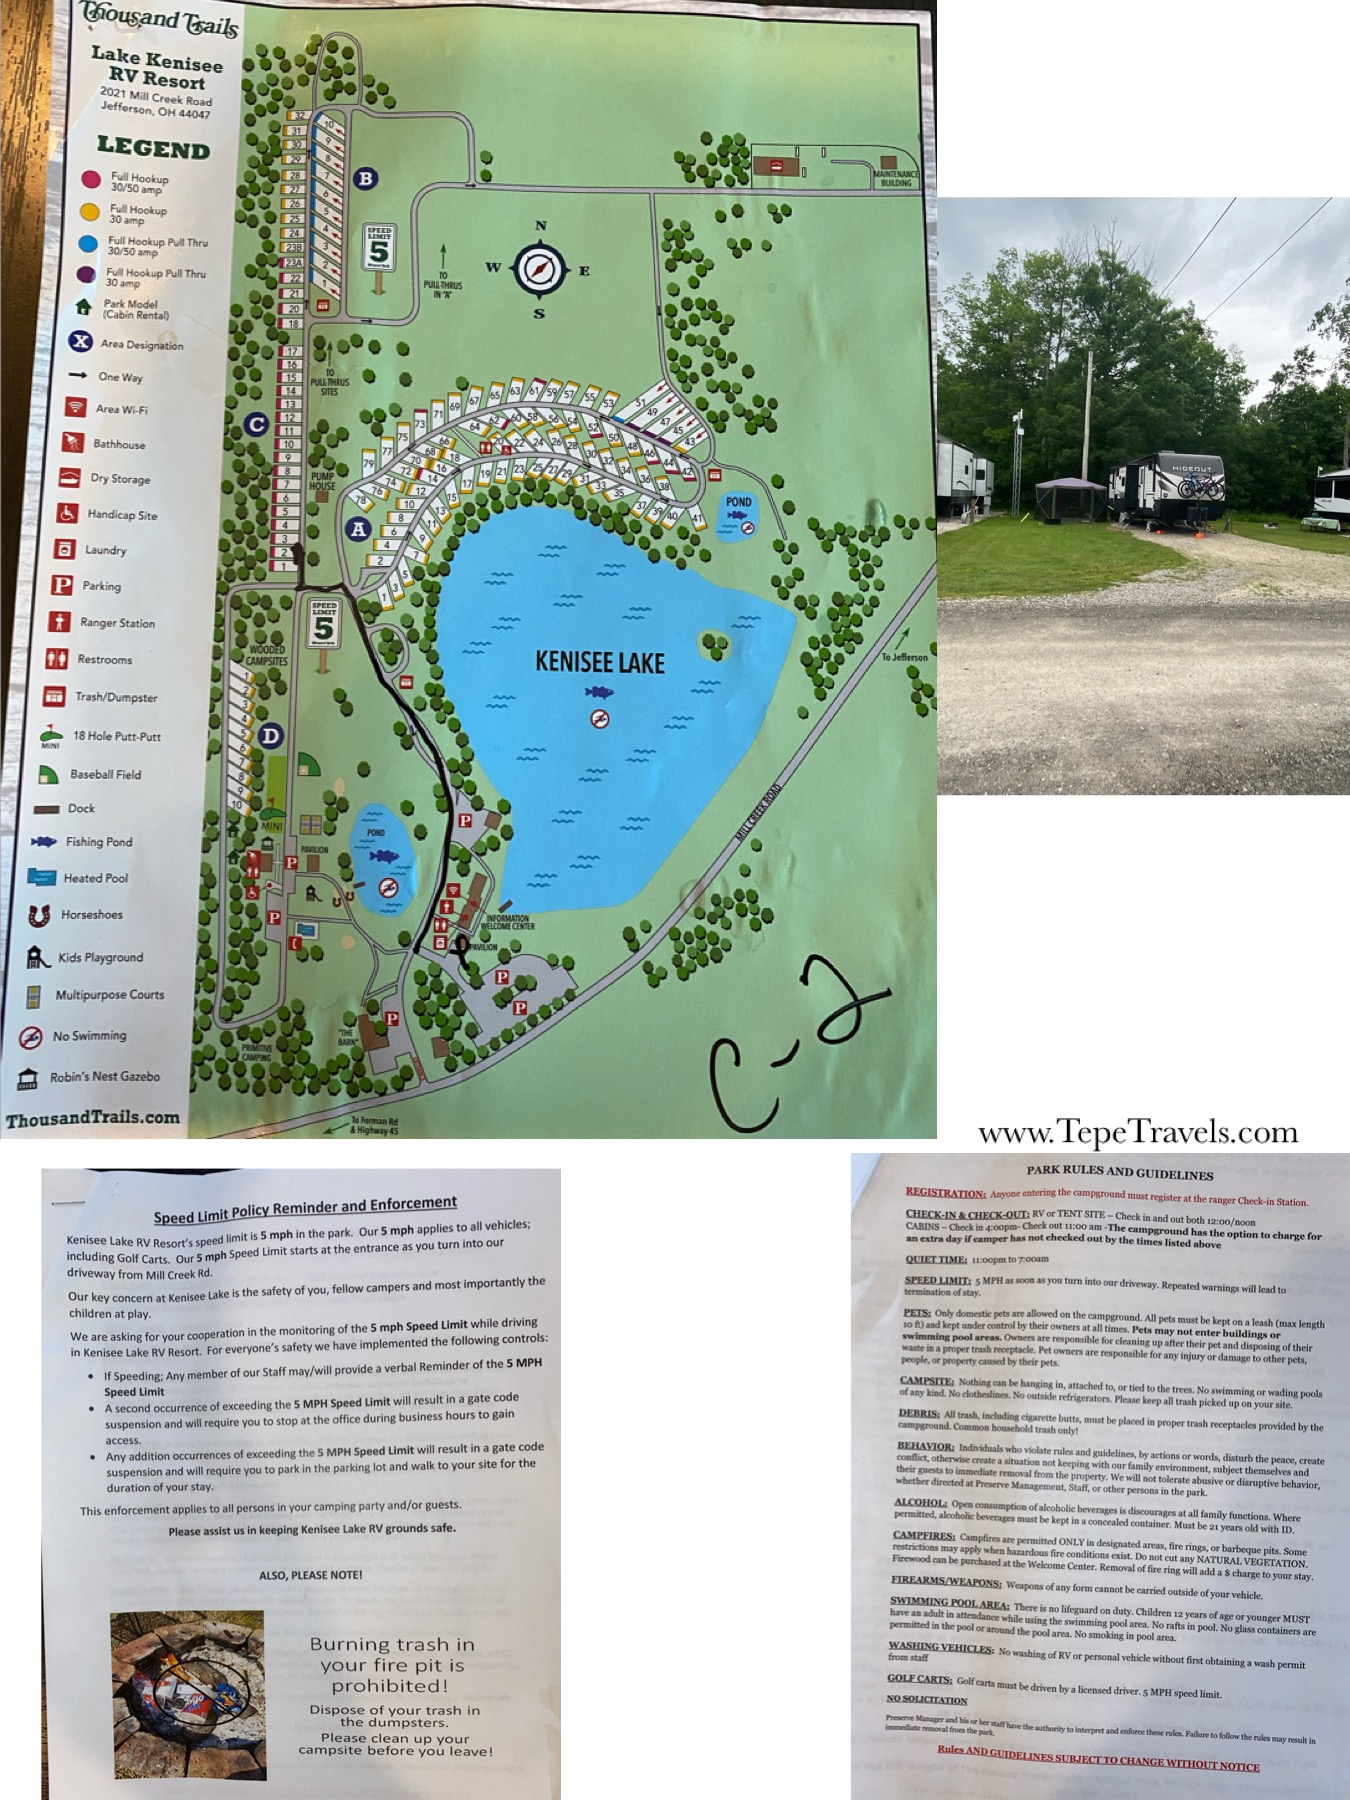
The check-in area was not well laid out for larger RVs. It looks like you used to be able to pull straight forward, but now they have you turn into a parking lot. It has not been redesigned for larger RVs. The campground itself has a pond and a lake. There was a laundry room, a few planned activities, a basketball hoop, Snack Shack, putt-putt, playground, and a pool. Fishing was allowed in the pond and lake, but no swimming. The lake by the office had boats available for use. There were also horseshoes and a small baseball diamond.
Office building, snack signs at office window, laundry room
The laundry room had a lot of machines. There was no change machine, but I was able to get change at the office. Washers were $1.75/load, dryers were $1.50.
The Snack Shack had some ice cream products, shaved ice, and some drinks. It was only open on the weekends when we were there.
Our hotspot and phones worked…kind of. If it was cloudy we lost a lot of reception on all 3 networks. Some spots were better than others in the park for getting a signal. We ended up buying the campground WiFi for the week ($19.95). Phone calls seemed ok for the most part, but internet was definitely spotty.
The campground did have a lot of nice amenities. The boys really enjoyed the putt putt and basketball hoop. It was a nice destination campground and there were grocery stores within a 20-30 minute drive. Cleveland was about an hour drive and Cuyahoga Valley National Park was also about an hour drive.
NOTE: The campground was included in our Thousand Trails membership, but charged us a 50 amp fee at check-in (not stated ahead of time).
Our rating: 2.5 out of 5 hitches. Great amenities, but farther out and bad internet signal. Would be good for destination camping if you do not need reliable internet.
Cell Phone Reception: AT&T, Verizon, T-Mobile. All were spotty. We ended up buying WiFi.
Laundry: Yes
Bathrooms/Showers: Yes
RV Sites: A few Pull Through, mostly Back-in (grass)
Pop Up Tents/Gazebos/Outdoor Rugs On-Site: Yes
Amenities: picnic table/fire pit at site, playground, pool, snack bar, putt-putt, basketball, baseball, horseshoes, pavilion
Cabins: 2
Tent Camping: Yes
Full Hook-ups: Yes
Amps: 20/30/50
Pool: Yes
Food On-Site: No
Camp Store: Yes, very limited. Office was closed, you have to ask if they have items at the walk-up window.
WiFi: Free at office and pool, otherwise pay for internet
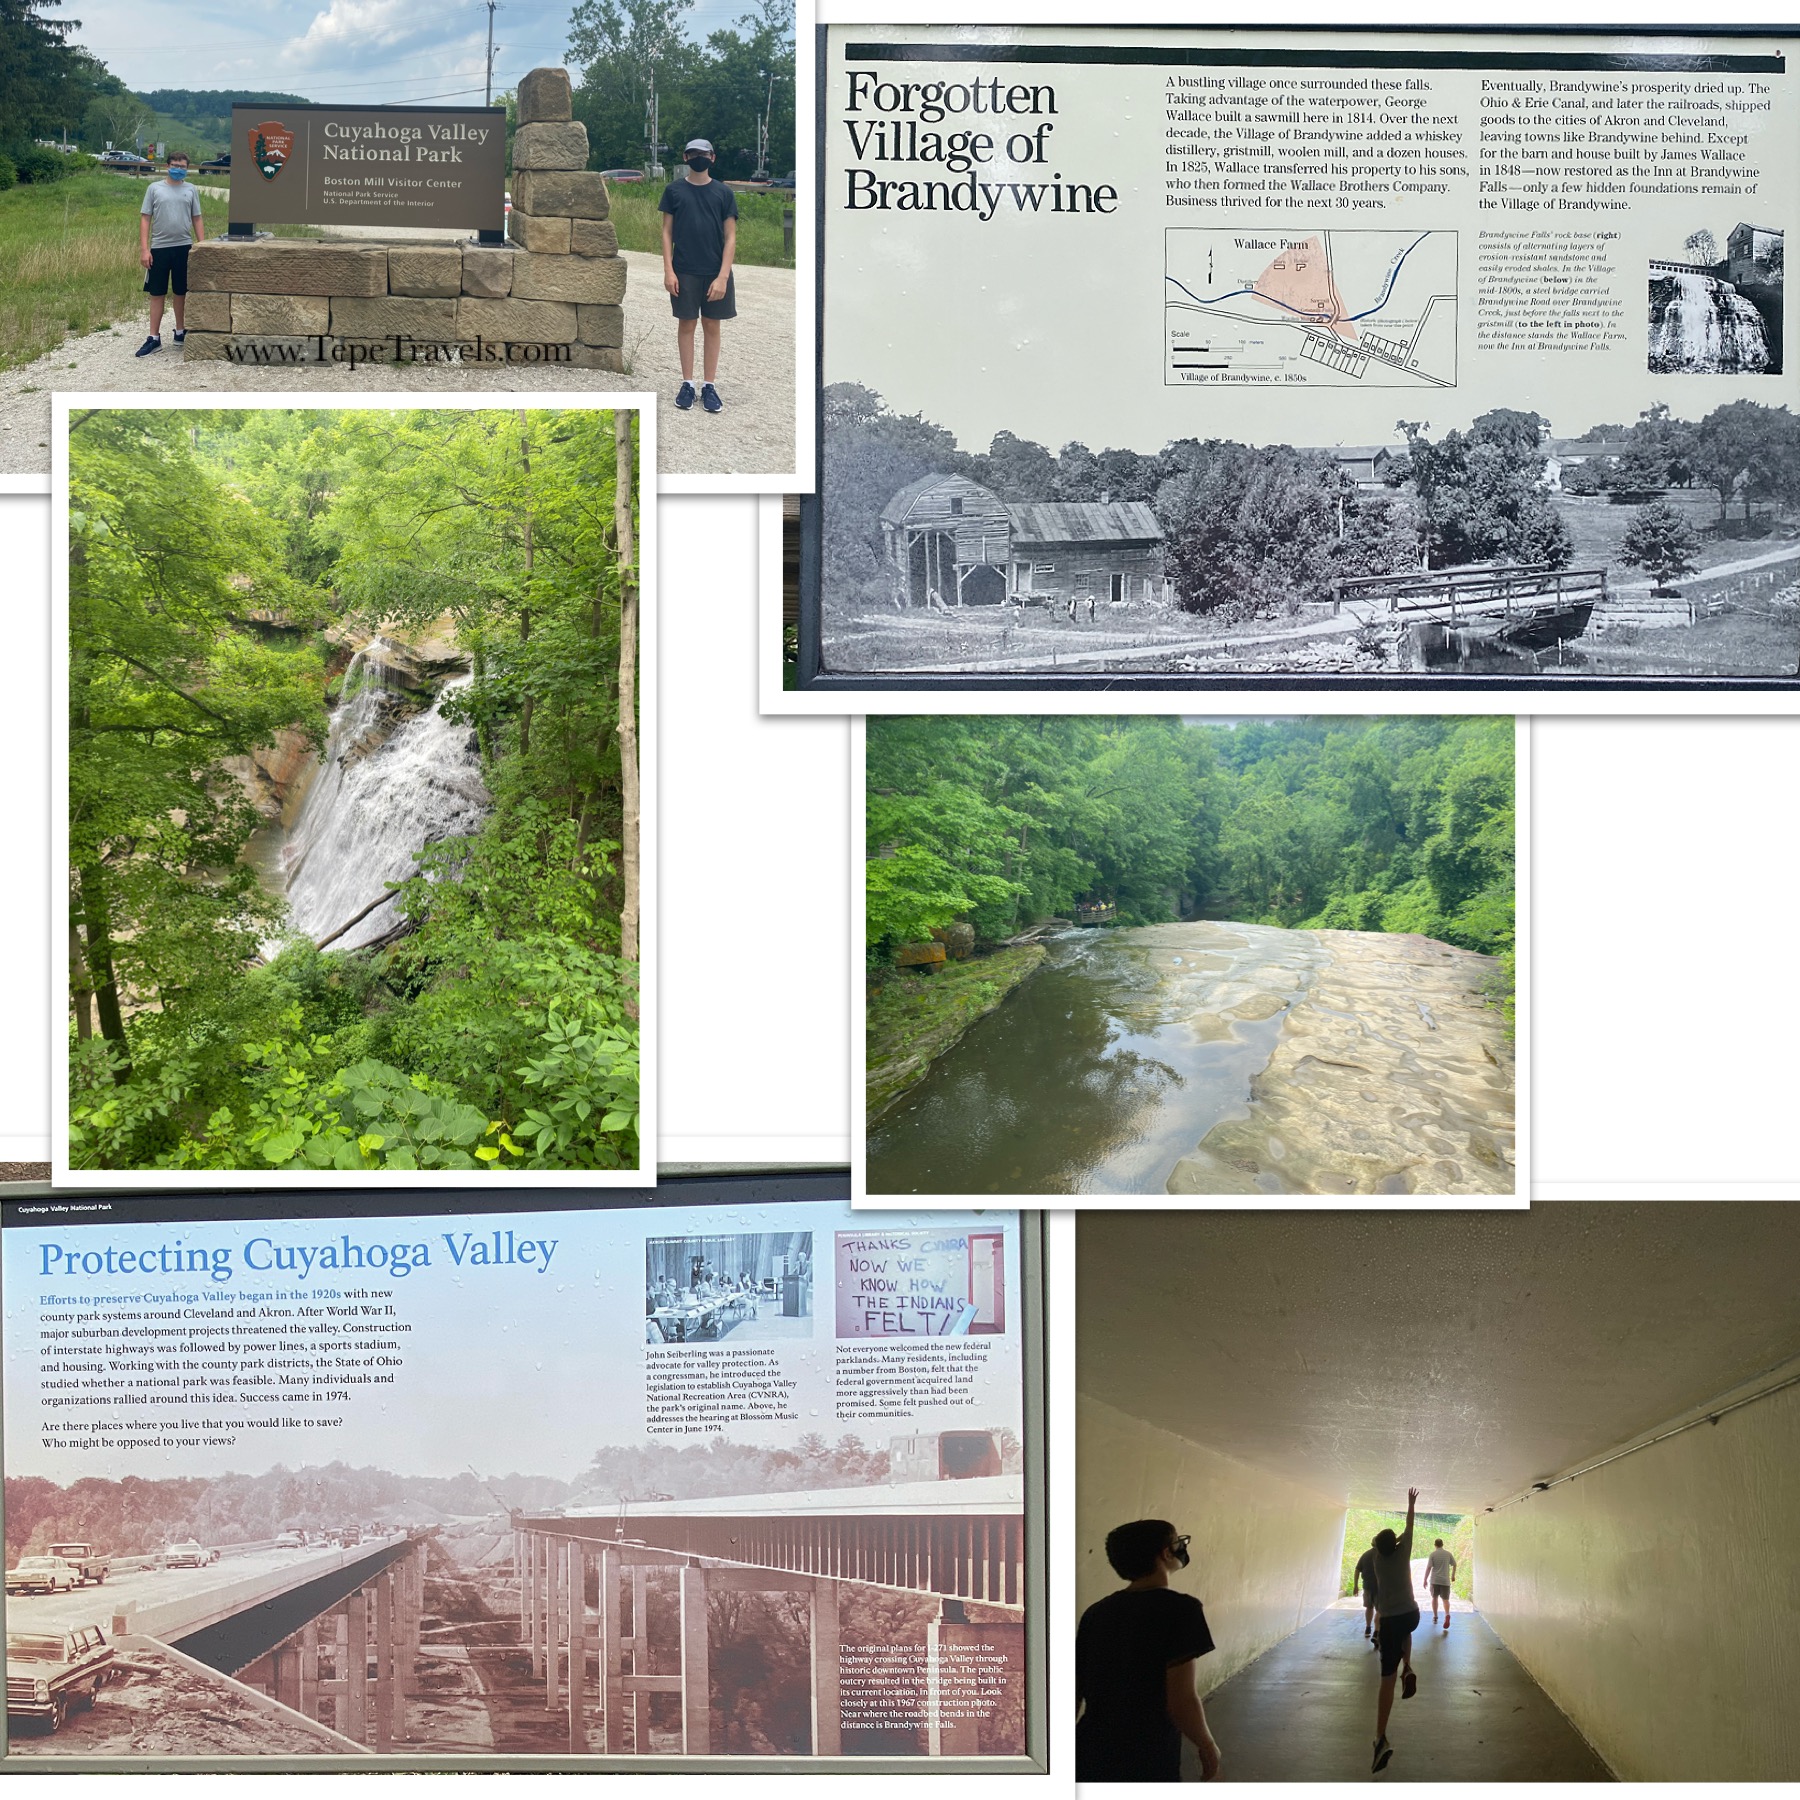
During our first stay back in Ohio in a year, we stayed up north near Cleveland. We visited the Cuyahoga Valley National Park. After the scenic train ride, we drove around for a little bit and stopped at the Boston Mill Visitor Center. This was a nice Visitor Center and the boys picked up their Junior Ranger books.
Maps via Google and NPS
Cuyahoga Valley is a little bit weird in its shape. It is a long, narrow park that exists around private property and state parks.
click to enlarge
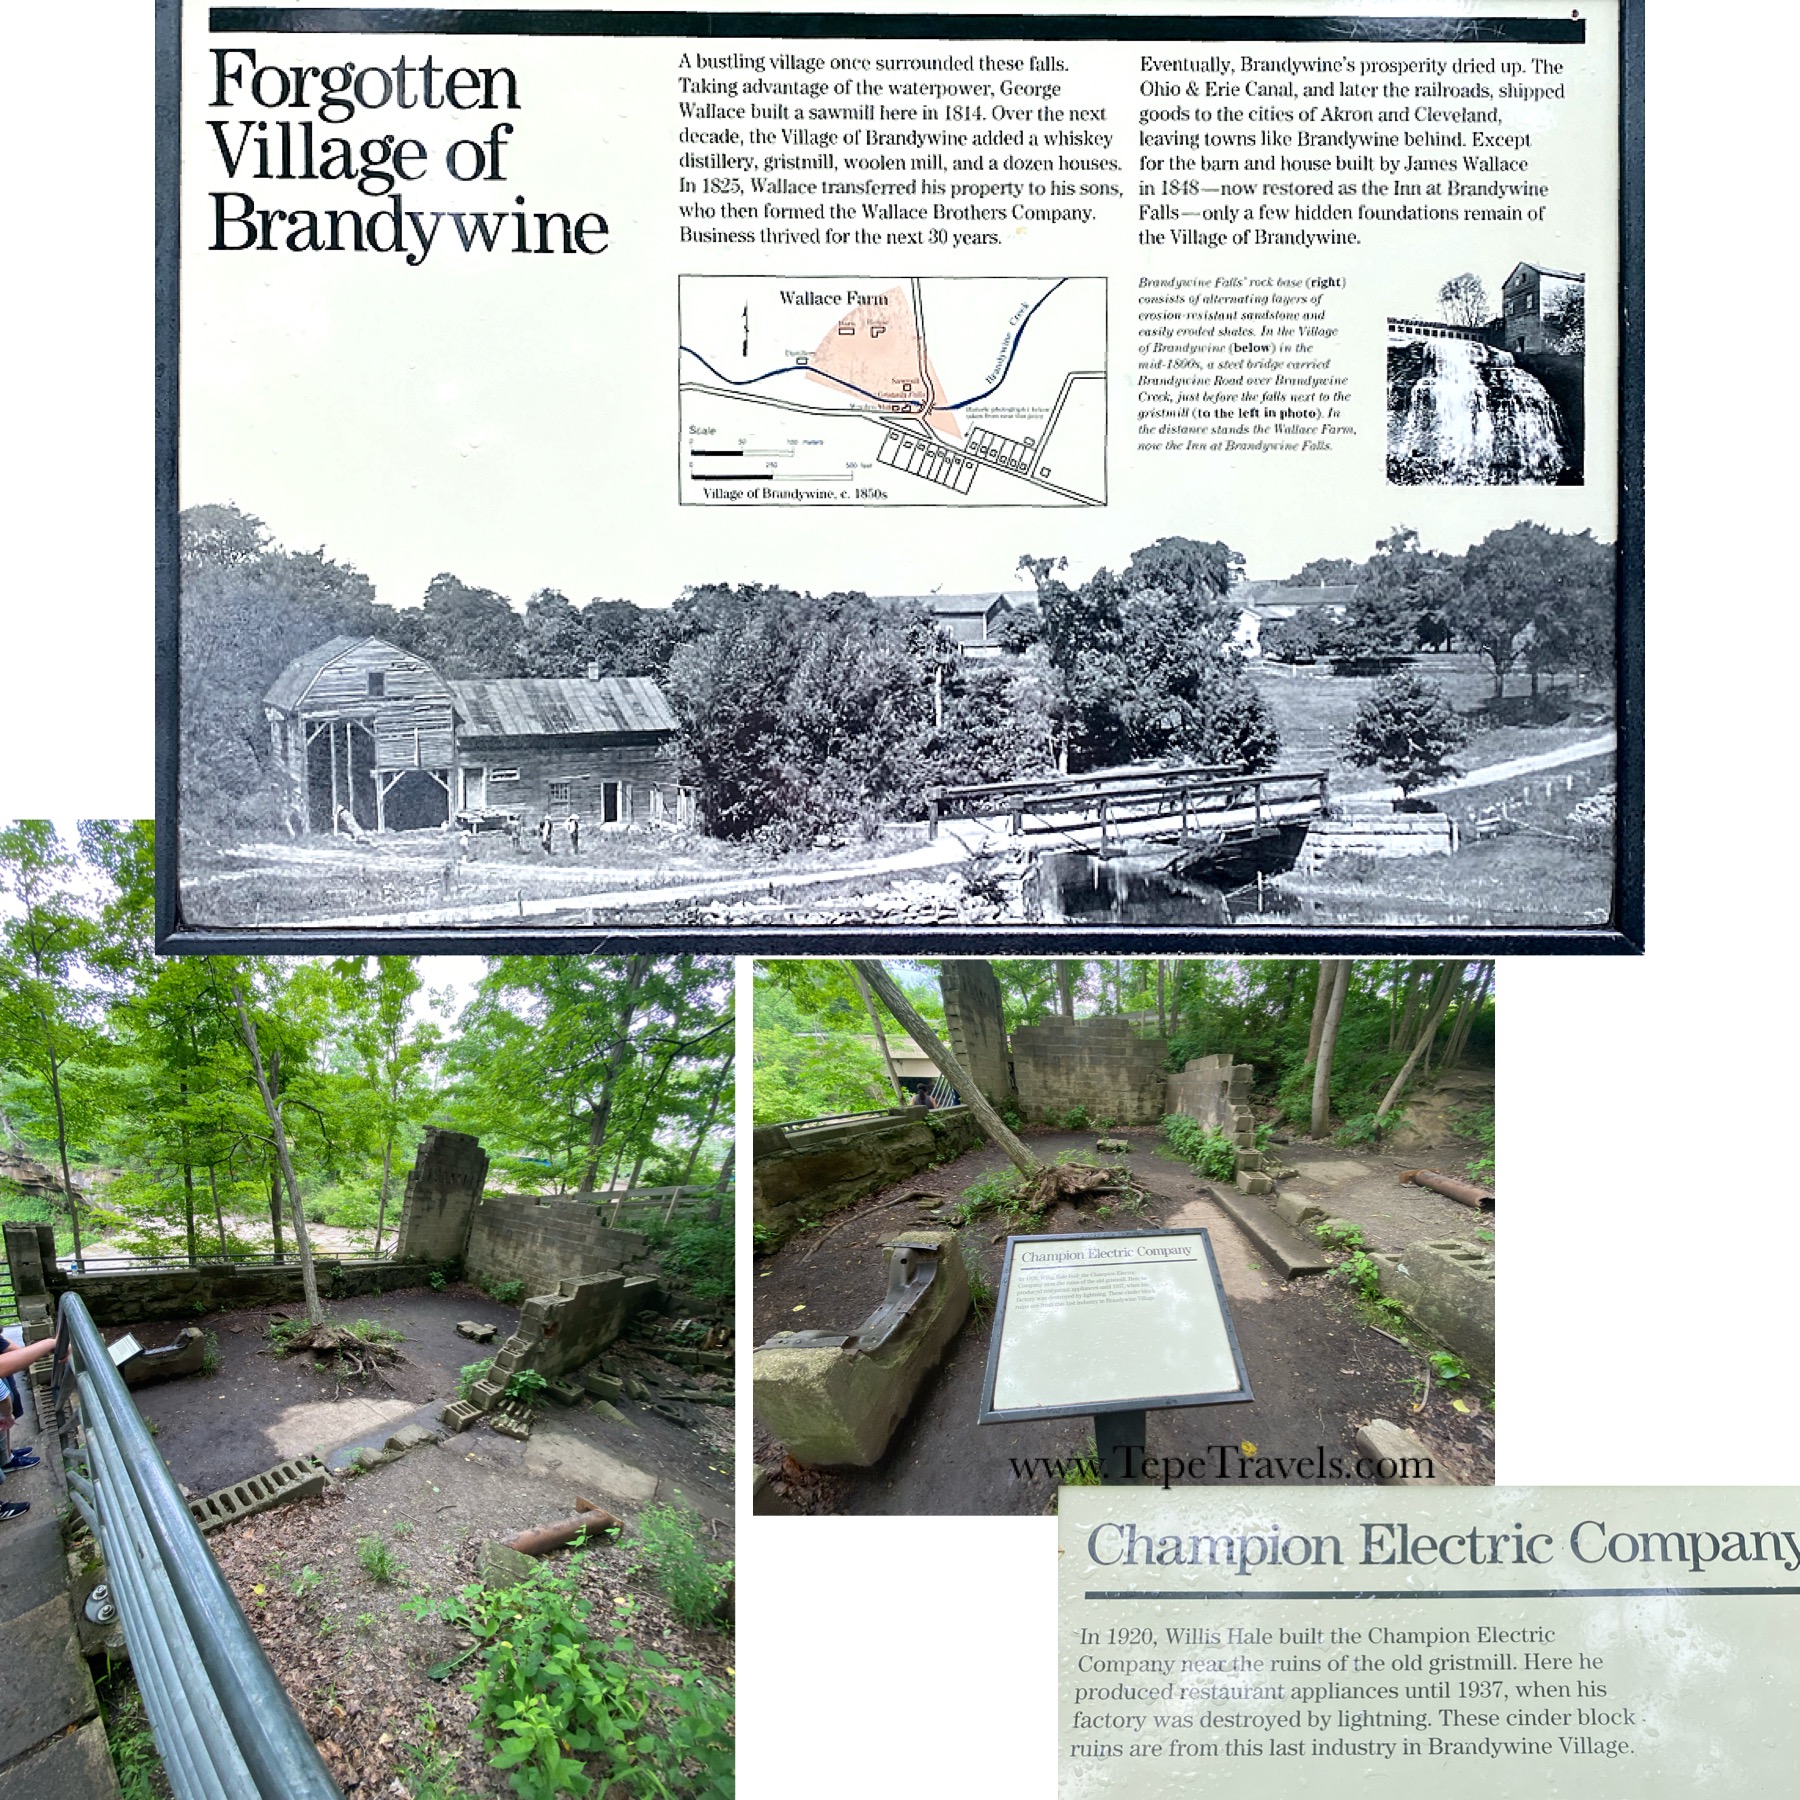
We went to the Brandywine Falls and managed to find a parking spot in the lot. We walked the boardwalk to the Falls. It was a beautiful area and you could see the remains of a small power plant. It was mostly just the foundations, but still neat to read about.
click to enlarge
It started to rain on us, so we head back home.
DETAILS:*
TICKETS: Free. Some activities have a fee. COVID Restrictions: masks required if not vaccinated
HOURS: Open daily
PARKING: Yes
BATHROOM: Yes
TIME RECOMMENDED: 1-3 hours
*Details correct at the time of posting, but please double check before you go.
One of things we never do back home is wake up early to catch the sunrise. Apparently, this the thing to do when near Acadia! The sun rises a bit earlier here, so we woke up at 3:30 am to make it up to Cadillac Mountain in Acadia National Park. (Starting 5/26, you will need to buy a car pass ($6) to access Cadillac Mountain.)
The parking lot was already pretty full, but we did find a spot. We walked across the rocky top and found a spot to watch Mother Nature’s show. It was an amazing view overlooking the city, the islands, and the bay/ocean. When the sun peaked over the edge, the pinks and reds were reflected in the water.
I probably will not make a habit of watching the sunrise often, but it was definitely worth getting up early for.
We were actually driving around trying to find a post office with a package drop box when we realized we were close to Fort Moultrie and decided to stop and check it out.
The fort we saw was actually the 3rd one on the site. The first was constructed of palmetto trees and sand and was used during the Revolutionary War.
This is not how I pictured Peter Parker (aka Spider-Man)!
The fort was later rebuilt and was ultimately destroyed by a hurricane. The third fort was constructed and end up being used during the Civil War. This fort seemed to have a lot of it built into the ground. The Union forces stationed at Moultrie left to go to Sumter, as it had better defenses. Moultrie was defended against sea attacks, but not very well defended for a land attack. Of course, then the Confederates used Moultrie to attack Sumter and force the Union troops out. There was a battery to the left of the fort that was added later, but it was closed while we were there. There were a couple of the interior hall paths that went underground, although a couple were closed or very muddy when we were there.
There was some interesting information and we also got to drive by Sullivan’s Island Lighthouse, but I would not recommend this one unless you are nearby or really into Civil War history and/or forts. It was a little boring compared to the others.
The Junior Ranger Program booklets were available at the entrance, as well as a park map. Nick was excited he got to complete another badge.
DETAILS:*
TICKETS: $10/ages 16+, free ages 0-15, or included in America The Beautiful Pass. COVID Restrictions: masks required. Due to COVID, no cash is accepted at the Fort and the Visitor Center is closed. Tickets must be purchased online.
HOURS: Fort is open Friday to Sunday 9:00 am to 5:00 pm. Grounds and parking open 9:00 am to 5:00 daily.
PARKING: Yes, has its own parking
BATHROOM: Yes
TIME RECOMMENDED: 1hour
*Details correct at the time of posting, but please double check before you go.
There were a few reasons we stayed in Arizona. One: To help break up the long, long, long, drive across the bottom of the country. (Seriously, you see it on a map, but until we were driving and there was literally nothing for a hundred+ miles, it doesn’t quite sink in just how much land this country has.) Two: To see the cacti. We went to Saguaro National Park, which was about a half hour drive from our campsite. Saguaro actually has two sections to the park: East and West. They are not connected! (See map below.) Although each side had the saguaro cactus that the park was named for, they did offer different things to see. We went to see Saguaro West, because I wanted to see the petroglyphs.
The Visitor Center looked like a nice building (but had closed by the time we got there). It had some nice informational signs with desert life information. There was not a ranger booth/ticket booth like in many of the other National Parks we had been to. Instead, you paid at the Visitor Center. There was also an outside payment box if the Visitor Center was closed. ($25/car for 7 days or $45 for a Saguaro annual pass. It is $80 for the America The Beautiful pass that lets you into all National Parks, Monuments, etc.)
We drove the Bajada Loop (aka Hohokam Rd.) It was really neat to see, but I would recommend going in a truck, SUV, or a car that sits up higher. The highway and road to the Visitor Center was paved. However, the scenic loop road was not! While, the end of the road was nice and flat, there were sections along the rest of the road that were definitely bumpy and had some ruts. (See Video: Drive Through Saguaro National Park West) We only saw a few people in the whole park, maybe 10 people besides us.
There were a few spots to pull off and hike. It was a warm day, 90 degrees F, so we just stuck with easy short trails. We ended up doing 3 trails: Valley View, Signal Hill (petroglyphs), and Desert Discovery Nature Trail (paved). In total, about 2 miles of hiking, so it was a light day.
Valley View offered a great view at the end of the trail over the valley below. There were just cacti as far as the eye could see. It also offered a few interesting plant information plaques along the way. It must be amazing when the cacti are in bloom.
We only saw 1 lizard (looked like a small whiptail like we have been seeing out West) and a few birds. We did see a web on the ground that covered a good amount of space, but no spider to go with it.
Catci look really weird when they die. Especially the Saguaro cactus.
Signal Hill was a short trail at the Signal Hill Picnic Area. There were several great grill areas and benches around for picnics. At the top of the trail was what looked like a pile of rocks. There were a bunch of petroglyphs on these rocks, some you can see from the bottom of the trail looking up, some you can see right next to the trail. If you enjoy petroglyphs, I would definitely take this trail (it’s only a .3 mile trail according to the park).
We ended the day with the Desert Discovery Nature Trail. It was an easy paved path. There were several informational signs around the trail. The sun was beginning to set, which gave the cacti a really neat backdrop. We saw a roadrunner running through the bushes near the parking lot. (Contrary to what TV taught me, there was no coyote chasing it. We didn’t see any ACME products either. They were fast, but didn’t say “Beep Beep”.)
For our time in Hurricane, Utah, we stayed at WillowWind RV Park. They offer mostly back-in sites, some pull-throughs, as well as a few teepees to sleep in. They offer 20/30/50 amps, WIFI, cable (if you bring your own coaxial cable), laundry, and a clubhouse. Their rates were for 2 people and you have to pay for any others over two. When we booked, they were still cheaper, even with having to pay for the kids, than other campgrounds available in the area.
It is close to grocery stores, restaurants, and the post office. They do sell ice, although they did tell me at check-in that it was cheaper at the local grocery store. There were a few times that we walked to the grocery store, Wendy’s, and the post office since they were only a couple of blocks away. There are even more options for restaurants and shopping (Target, Costco, Walmart, etc.) in St. George, which is about 15-20 minutes away.
Office, fire pit by office, laundry room by office, and gym
There are two laundry rooms: one by the office and one by the rear bath bathrooms/shower house. We used the laundry by the office. Both were close to us, but once the loads were started, we would go to the clubhouse and the boys could play pool. The laundry room had plenty of machines, a single use detergent vending machine, and a table for folding. The cost per load of laundry varied. They had regular sized washers for $2.00/load and the dryer $1/load. The laundry room by the office had a mega washer that could hold up to 5 loads. This washer was $4.25/load and the neighboring commercial sized dryer cost $0.25/8 minutes.
Back shower/bath house. The second laundry room is the middle door, with bathrooms/showers on either side. The outdoor dog wash is the green tub on the side of the building.
The campground was dog friendly (had a dog fenced in area by office, outdoor dog wash tub by rear bathhouse, a walking area in back). There was a small gym, a clubhouse (offered books, puzzles, a kitchen, and a pool table), community fire pits (located by the office and rear bathhouse), and a horseshoe pit in the back. Individual sites did not have picnic tables, firepits, or grills. I did see a few charcoal grills around (one by the teepees, a few by a lane of RVs). There also wasn’t a swimming pool, which in the 100+ degrees, would have been nice.
Clubhouse
The sites were paved, had grass, and trees for shade. They did have sprinklers for the grass that went off every day. One of the sprinklers seemed to be awfully close to our electric box. Several long term residents had sprinkler guards (similar to these*) set up to protect their electric where it plugs in at the box. We used an empty plastic bin to keep the water off and it seemed to work. The campground seemed to be a mix of travelers and long term residents. Everything was well maintained. Our neighbor to the right had a large collection of outdoor plants on an amazing set of shelves. I was totally jealous of all her green. We only brought Nick’s Venus fly traps! I do miss having more plants, but we just don’t have the room for them.
There were several state parks and National Parks nearby. The three closest National Parks were Zion (25-35 minutes), Bryce (2.15 hrs), and the Grand Canyon (2.5 hrs to North Rim). Of course, our definition of close is changing the longer we are on this trip. Two hours would have been an entire day trip before, but now it’s like “well, that’s pretty close, let’s go for a few hours”!
I have new posts coming, I just ran a little behind!
However, I got an email this morning from the National Parks about free days coming up! Mark your calendars for 9/26 and 11/11! These are the last two days this year with entrance fees waived to the National Parks.
We have loved each of our adventures so far at the National Parks. We received our America The Beautiful annual pass as a gift before leaving on our adventure (Thanks, Mom!). Even if we had to purchase it ($80), it would have been totally been worth it. It pays for itself in about 2.5/3 visits. (For example, Yellowstone is $35 for a week pass/$70 for annual pass to just Yellowstone. Rocky Mountain is $25 for a day pass/$70 for annual pass to just Rocky Mountain. Rocky Mountain is requiring daily time reservations for entry, so they are not selling a week pass right now.)
Our passes weren’t until 11:00, so we packed up some snacks and lots of water. Everyone dressed in wicking clothes so we would dry off faster. We headed towards Zion a little early because I was worried about parking. The Visitor Lot fills up really quickly and although you can park in the town of Springdale and take their shuttle to Zion, I really wanted to park inside the park. I figured that after hiking we would be tired and would want to be able to leave as soon as possible.
We picked up our hiking gear (Zion Guru) and went into the park. I would say we got there around 9:45/10:00 am and the lot was half to 3/4 full. We had already put on our socks and boots at the store. Zion’s Visitor Center was closed (COVID), but they had lots of informational signs outside. We read those for a while and then attended a Ranger Program at 10:30. It was about mountain lions and was pretty interesting. Did you know they can leap 45 feet?!
A little before 11:00 we boarded the shuttle and headed in. We were going to do the Narrows hike that does not require a permit (Bottom-Up), the one that starts at the end of Riverside Trail (stop 9 on the shuttle). It is listed as a moderate to strenuous trail; how hard the hike is depends on water depth and flow.
The start of The Narrows Trail at the end of Riverside Trail.
It was surprisingly busy. The river was pretty shallow at the entrance point here, although it is still cold. You could probably walk here with just sandals on. The farther in you go, there are sections that got up to upper thigh on me. (Later in the hike, we heard other people talking that it was chest high farther down. The man was at least 6 foot tall, so I’m glad we didn’t get that far!)
Some spots in the river were clear and you could see the rocks and judge your path. Some spots were murky, I’m not sure if it was the crowd that stirred it up or the algae, but you couldn’t see the bottom. We were so glad to have the hiking poles to test the depth in front of us.
We saw plants growing from the walls, lots of different sizes and colors of rocks, Mystery Falls (a waterfall), Wall Street (narrowest part), and the Floating Rock (boulder in the middle of the river). We made it a little past the floating rock and decided to turn around. The Narrows is an in-and-out hike, and we were already tired. Everyone, except Will, had fallen at least once.
On our way back, Nick fell several more times in a row. We stopped and made sure he ate some peanut butter crackers and drank more water. After resting a few minutes, we started back again.
Ben jarred his back when he stepped in a hole. I tripped on a rock I couldn’t see and fell face first into the water. I will say I am glad we had on the water shoes that went above the ankle. I am sure I would have twisted something if I was in gym shoes. Will was still the winner at the end of the trail and had not fallen once!
We were exhausted when we were done. The shuttle line was long, and I would say we waited 45-60 minutes. We did see some deer and wild turkey while we waited. (YouTube video of walking the line for the shuttles.)
We returned our gear and headed home to take showers.
It was a once in a lifetime experience and really neat! If you were to hike the Narrows, I would definitely recommend renting equipment. The neoprene socks helped with the cold water and not having wet cotton socks rubbing on our feet was definitely a plus. The water shoes/boots were surprisingly helpful. Even the broom handle-ish walking stick seemed better suited than our normal walking sticks.
Zion is only 25-35 minutes away from our campground. We couldn’t get Zion Shuttle passes for our first couple of days there. In Zion during the main season, you need to park at the Visitor Center and take a shuttle along the Scenic Drive, the main road through the park. The shuttle passes have to be bought ($1/each) on recreation.gov. They go on sale each morning at 9:00 am MT for the next day. The morning and early afternoon passes go super fast, so get on right away to get the best time. If you are going in October, they are sold a little more in advance according to the website.
However, there is another way to see Zion if you can’t get passes right away! If you enter on the South Entrance, you enter through the Park Gates (they do check for passes/admission), and come to a split in the road. One goes to Scenic Drive (shuttle only right now) and the other goes on to the Zion-Mt. Caramel Highway, which you can drive on in your own vehicle. (If you enter on the East Entrance, you also pass through park gates and are already on this road. I believe it is also State Route 9.) You can find several trails and parking pull-outs along the road. You also drive through an awesome tunnel made in 1930. It is a mile long with windows cut out of the mountain. The windows were created for air, but also offer nice scenic views as you drive by. There are height restrictions though.
About the tunnel. You can see one of the windows in the mountain side.
The drive is worth it just for this tunnel! 🙂 There is another smaller tunnel along the road as well.
On the other side of the tunnel, you will find various trails and pull-outs. The landscape is really neat. The rock looks like it is layered. Ben called is phyllo dough rock, which is what it looked like!
We stopped at a pull-out to look at Checkerboard Mesa, which Will had just learned about in class! There was also someone painting in the parking lot.
It was towards the end of the day, so we didn’t do any hiking, but I did find a trail there that I want to do before we leave.