Posted in: Animal Sightings, Campground Review, Exploring Kentucky, Hiking, National Park, Sightseeing, YouTube Video Link

Treehouse Living

While we stayed at the Horse Cave KOA, we stayed our second night in a Treehouse! (It was really more like a cabin on pillars made to look like a tree trunk/branches.)

We really enjoyed our stay here. It had a nice firepit and seating underneath the cabin. Inside hosted a queen bedroom, a full kitchen (with plates, cups, utensils, and cooking pans/pots), couches, TV, fireplace, and a loft with two queen beds. The back porch had a nice table, views, and grill. The best part was the full bathroom!

It was definitely a nice space to relax in and we really enjoyed the back deck. The kitchen table was more like a folding table and chairs, so we ate on the porch most of the time. It was a good space to spread out and have our own areas.

(YouTube video link)

Posted in: Animal Sightings, Exploring Kentucky, Sightseeing

Big Mo

We stopped at Big Mike’s after exploring Mammoth Cave.

(click to enlarge)

The property hosts a really neat rock shop, gift shop, and a large statue of a mosasaur. They had a fossil of Big Mo, a mosasaur skull. It was located on the second floor of the gift shop. There was an information sign, as well as a pamphlet near the checkout counter.

If you are in the area, I would stop by! They had lots of unique things, both in the rock shop and the gift shop areas.

(click to enlarge)

There is also a Mystery House owned by Big Mike’s, but we did not stop in there.

Posted in: Animal Sightings, Exploring Kentucky, Museums & Tours, National Park, National Parks, Parks, Sightseeing

Mammoth Cave

Ben and I had been to Mammoth Cave in Kentucky when we were both kids. It is the world’s longest cave system (currently 420 miles mapped) and we thought the kids would enjoy seeing it.

The Mammoth Cave National Park has a nice Visitor Center with bathrooms, ticket booths, a gift shop, and a book shop (basically another version of a gift shop). There is another smaller gift shop in a trailer outside. There are spots to eat lunch outside as well.

MAMMOTH CAVE TOUR

We booked tickets for the extended historic tour ($92 for 4 tickets). Book your tickets early and online! When we went, there was only 1 tour that wasn’t completely sold out (over the course of two days).

Will is our history buff, so we thought he would enjoy the history tour. We got to see the old mining equipment that had been left there for saltpeter and a house that was part of an experimental tuberculosis hospital.

The tour is listed as moderate, but we found the 2-hour tour to be pretty easy. There was some stooping and bending with a tight squeeze in Fat Man’s Misery, but it was a relatively slow walk (Ben’s watch said it was a 42-minute/mile pace). There was some uneven ground, which could be tricky in the low light if you have bad ankles/knees or balance issues. There were also some stairs. Ben’s note: At 5’10” and 260 Fat Man’s Misery (narrowest part) was more fun than scary. I found this and Tall Man’s Misery the best part of the tour as you felt like you were actually caving.

The black writing on the ceilings is old-school graffiti, made from candle smoke. There was a bathroom down in the cave, but it is a while to get to it, so I would definitely recommend going before your tour (some tours do not go by the bathroom!).

It was pretty, but I found Carlsbad Cavern a much better experience overall. I felt rushed during Mammoth; the tour guide pretty much said this wasn’t a picture-taking tour and he would not be stopping for long. Without being able to use the flash (to preserve the cave and its creatures), taking pictures can take a little bit of time. I didn’t want to hold up the group, so I did not get very many. Carlsbad had an audio self-guided tour, so we could go more at our own pace and were able to take more pictures. The monochromatic interior of Mammoth Cave and the lack of copious Stalagmites and Stalagtites left me wanting more. The main plus is that Carlsbad is very desolate and tough to get to, whereas Mammoth Cave is fairly close for many visitors and has a more built-up infrastructure around it. We did see a cave cricket and a bat in Mammoth though, whereas we didn’t see any at Carlsbad (we were a month too late for the bats). Now, to be clear, we saw pictures of different cave features that are supposed to be in Mammoth Cave on postcards and posters, so it may have just been the tour we were on that lacked a lot of cave features.

SAND CAVE HIKE

Mammoth Cave Rating: 3 stars out of 5 (Will liked it the most.)

Posted in: Campground Review, Exploring Kentucky, Food, Sightseeing, YouTube Video Link

Oregon Trail, Here We Come!

After the Red River Gorge, we traveled over to the Mammoth Cave area. We stayed at the Horse Cave KOA. When Ben and I saw that they had a certain type of cabin, we knew we needed to stay at least one night in it. Growing up, we were part of the Oregon Trail generation so, of course, we decided to stay in the Covered Wagon cabin!

(click to enlarge)

It was definitely an experience. The wagon was temperature controlled and had an air conditioner unit. The space slept 4 people: one queen-sized bed and a set of bunk beds. As you climb the stairs and open the door, you have the bunkbeds to the left and a small table, and two chairs to the right. There were a couple of stairs to get to the queen bed area. There was a small nightstand area on either side of the bed with outlets to charge your phone.

In front of the bunk beds, there was a mini fridge and a microwave. The space also had an outdoor fire pit with chairs and a propane grill.

(click to enlarge)

There was a grocery store within a 20-30 minute drive, so we were able to go to the store and make dinner on the grill. It was nice to have the mini-fridge so we could have groceries to make our own food. For dessert, we of course had s’mores!

It was nice sitting out and enjoying the night. There was a farm in front of us, so we watched the cows for a while, and saw some bats flying around once it was night.

The downside to the covered wagon cabin was the lack of a bathroom. We weren’t too far away, but it is a downside when you get up during the night and have to leave the cabin to use the bathrooms.

(Covered Wagon Walkthrough: YouTube video link)

Posted in: Campground Review, Exploring Kentucky, Sightseeing

Container Home Rental (Stanton, Kentucky)

For our vacation this year, we wanted to stay in some unique homes. Something that would really stand out in our memories. Our first stop was in a container home. Ben had played with this idea for a tiny home for a while now. I was pleasantly surprised when we arrived; it actually had a nice layout and use of space. (YouTube video link)

The house was pretty private. You could hear some road noise and neighbor’s music, but couldn’t see them through the leaves. It was a pretty short drive to the park, a little under 20 minutes. The house was a comfortable space, seemed just like a cabin. It had a great fire pit area with wood holder and hatchet, bag chairs for fire pit, deck with chairs and a small table, a wooded lot with a few trees that worked for hammocking, propane grill, plates/cups/grill tools, AC, washer/dryer, a couple of games and a fun puzzle. The cabin also had WiFi and cable. There was a Kroger grocery store and a liquor store within about a 20-minute drive. There were several places nearby that sold firewood.

(click to enlarge)

The drive was pretty easy, but at the end, it is a narrow road that has a few hills. The driveway itself was off of a sharp right turn. The owners did a nice job explaining how to get there though and even had a fun alligator sign to mark the correct turn. The very last bit up to the parking area was a pretty short steep climb. The cabin only had one thin blanket per bed. We could have used more blankets, but luckily we still had our soccer game day blanket in the car. The owner did say to bring additional if you get cold easily, but we didn’t think there would only be two. There were only a couple of blinds in the bedrooms. The bedroom Ben and I stayed in only had blinds on one window, the one closest to the street (at the head of the bed) did not have any covering. If the trees were not as full of leaves, there may be a chance someone could see down into the room. Although the grill and firepit allowed for cooking, the kitchen itself only had a hotplate and a microwave for cooking. Bring bug spray! This is more for the entire area, but we all got bitten (even the one that is normally not bit). You may want to bring a flashlight, as it gets very dark at night around the cabin. This one is more specific to us, but there was poison ivy everywhere (cabin and general area). There was some right next to the cabin stairs, etc. The Red River Gorge area also has a plethora of poison ivy, so I would recommend long socks and/or pants if you are allergic.

Cost: $139/night (+taxes, cleaning fee, service fee). Listing on VRBO.

Rating: 3/5 hitches

Posted in: Animal Sightings, Exploring Kentucky, Food, Hiking, Parks, Sightseeing, YouTube Video Link

Experiencing Red River Gorge

It seems crazy the number of things in a three-hour radius from our home that we have not gone to yet. One of these was the Red River Gorge. We know people who had gone, people who had loved it, but we had never been there. As part of our quick summer vacation, we decided to stay a couple of days and see the Gorge.

One of the nice things about Red River Gorge is that is free to enter. There are of course things to spend your money on: local stores, souvenirs, the Sky Bridge, and adventures like rock climbing or kayaking.

Our first day there we drove through the park. Our pathway from our cabin took us through Nada Tunnel. It was a really neat tunnel, rough-hewed, single lane, without any lights. You could see water dripping. We stopped at the Gladie Visitor Center to check out the souvenirs and to get a park map. The Visitor Center had a nice selection of souvenirs, clean restrooms, friendly staff, and fun interactive exhibits. They had different animal pelts that you could touch, as well as a video of the park.

(NOTE: Click on images to enlarge.)

Nada Tunnel

We ended up at the Sky Bridge. It was a nice little hike. It had a couple of different sets of stairs, but a clearly defined path. It was a very hot and muggy day, but there was plenty of shade along the trails. We walked across Sky Bridge and then took the path that led us underneath the bridge. It was very neat to see it from a different perspective, as when you are up top, you don’t really notice the arch shape. There were several spots that had dripping water, which made a very cool and unique sound.

Day two of our Gorge adventure led us to the Sky Lift. It was $17 per adult for a round-trip ticket. Tickets could be bought in the gift shop. They had an interesting video and a pressed penny machine (Nick was very happy) in the outside booth. The ride up was enjoyable and we had a nice breeze. The steep uphill (or downhill for the return) can give you a jolt when you first see it). There is a nice trail nearby as well that gives you a nice overlook of the area. TIP: Secure your items! If they fall you will not get them back. Nick’s new pocket knife was lost to the wilderness as it fell out of his pocket halfway up to the top. (YouTube: link to video.)

From the top of the Sky Lift, we went to see the Natural Bridge. This was also a neat bridge that you couldn’t really see well unless you were underneath it. Nick and I decided to adventure through Fat Man’s Misery, a narrow gorge in the rock that leads you to the bottom of the Natural Bridge. Ben and Will stayed behind.

We stopped for some pizza at Miguel’s before driving up to Chimney Top for a picnic. The pizza was really good and they had so many different topping options! (Thank you for the recommendation, Mindy!) I froze when presented with so many options and went with a really boring pizza, but it all looked delicious as it came out. After lunch, we took another short hike and really enjoyed the views. There were several caution signs about not getting close to the edges. We watched the river and a hawk floating on the breeze.

The main attractions at Red River Gorge seem to be rock climbing, kayaking, and primitive camping. Due to Will’s restrictions from surgery this summer, we kept to the easier trails. It was pretty empty, as we were late in the summer vacation season. Compared to some other places we have been to, it was tough to tell it was a gorge due to the abundance of trees and other plants. It must be gorgeous in the fall. I’m glad we went, but as we are not rock climbers or really even kayakers, I don’t know that we would go back.

Red River Gorge Rating: 2/5 hitches (For us. If you love rock climbing and kayaking, I’m sure it would be amazing!)

Posted in: Exploring Ohio, Museums & Tours, National Park, School, Sightseeing

Carillon Historical Park

Will and I explored the Carillon Historical Park in Dayton, Ohio. Admission was $20 ($12/adult, $8 kids).

We ended up going on one of the hottest days so far this summer, complete with a heat warning. We paid for our admission and decided to do the outdoor area first before it got even warmer. Our first stop was the oldest house in Dayton. There were information signs throughout the downstairs (upstairs closed off), as well as a docent. The docent had some great information to tell us and was enthusiastic about the history.

There are a few other houses on the park grounds (the houses have been moved from their original locations). The one had a neat summer kitchen and we saw how they would make lots of candles at once (Would use a dipper with multiple strings. The dipper would hang on a rack for the was to set and then they would dip again. Rack held multiple dippers.)

If you follow the trail from the museum to the right, it is like a journey through Dayton’s history. After exploring the historical houses, we made it to the electrical era and manufacturing. I had no idea that Dayton, Ohio made cars!

The NCR, National Cash Register Company, was huge in Dayton. It was amazing to see the different things this company did, as well as the different types of cash registers. There were some beautiful ones on display in the museum building.

Because the area has several rivers nearby, flooding happens every few years. There are also the floods that are called 100-year floods as well, where there is a huge amount of water deposited and the flooding is extreme. Dayton’s major flood was in 1913, when the water got to 20 feet deep in some areas!

I was beat by the time we got up and down the tower due to the heat, but the views were pretty nice. The modern buildings (not historical buildings) did have air conditioning, so that did help keep us cool as we walked around the park.

We learned a lot of new things and enjoyed the park. We found a few things in the gift shop, got a pressed penny, and enjoyed the air conditioning while exploring the interior museum. There is a carousel inside the museum building/visitor center; it costs $1 to ride.

DETAILS:

  • WHERE:
  • HOURS: Monday to Saturday 9:30 am to 5:00 pm, Sunday 12:00 pm to 5:00 pm
  • COSTS: $12/adult, $8 child (3-17), $10/seniors
  • PARKING: Yes 
  • BATHROOM: Yes
  • TIME RECOMMENDED: 1.5 hours+
  • COVID RESTRICTIONS: N/A
  • Details correct at time of posting, please double-check before you go.
Posted in: Exploring Illiniois, Food, Hiking, Museums & Tours, Sightseeing

Exploring Chicago: Day 3

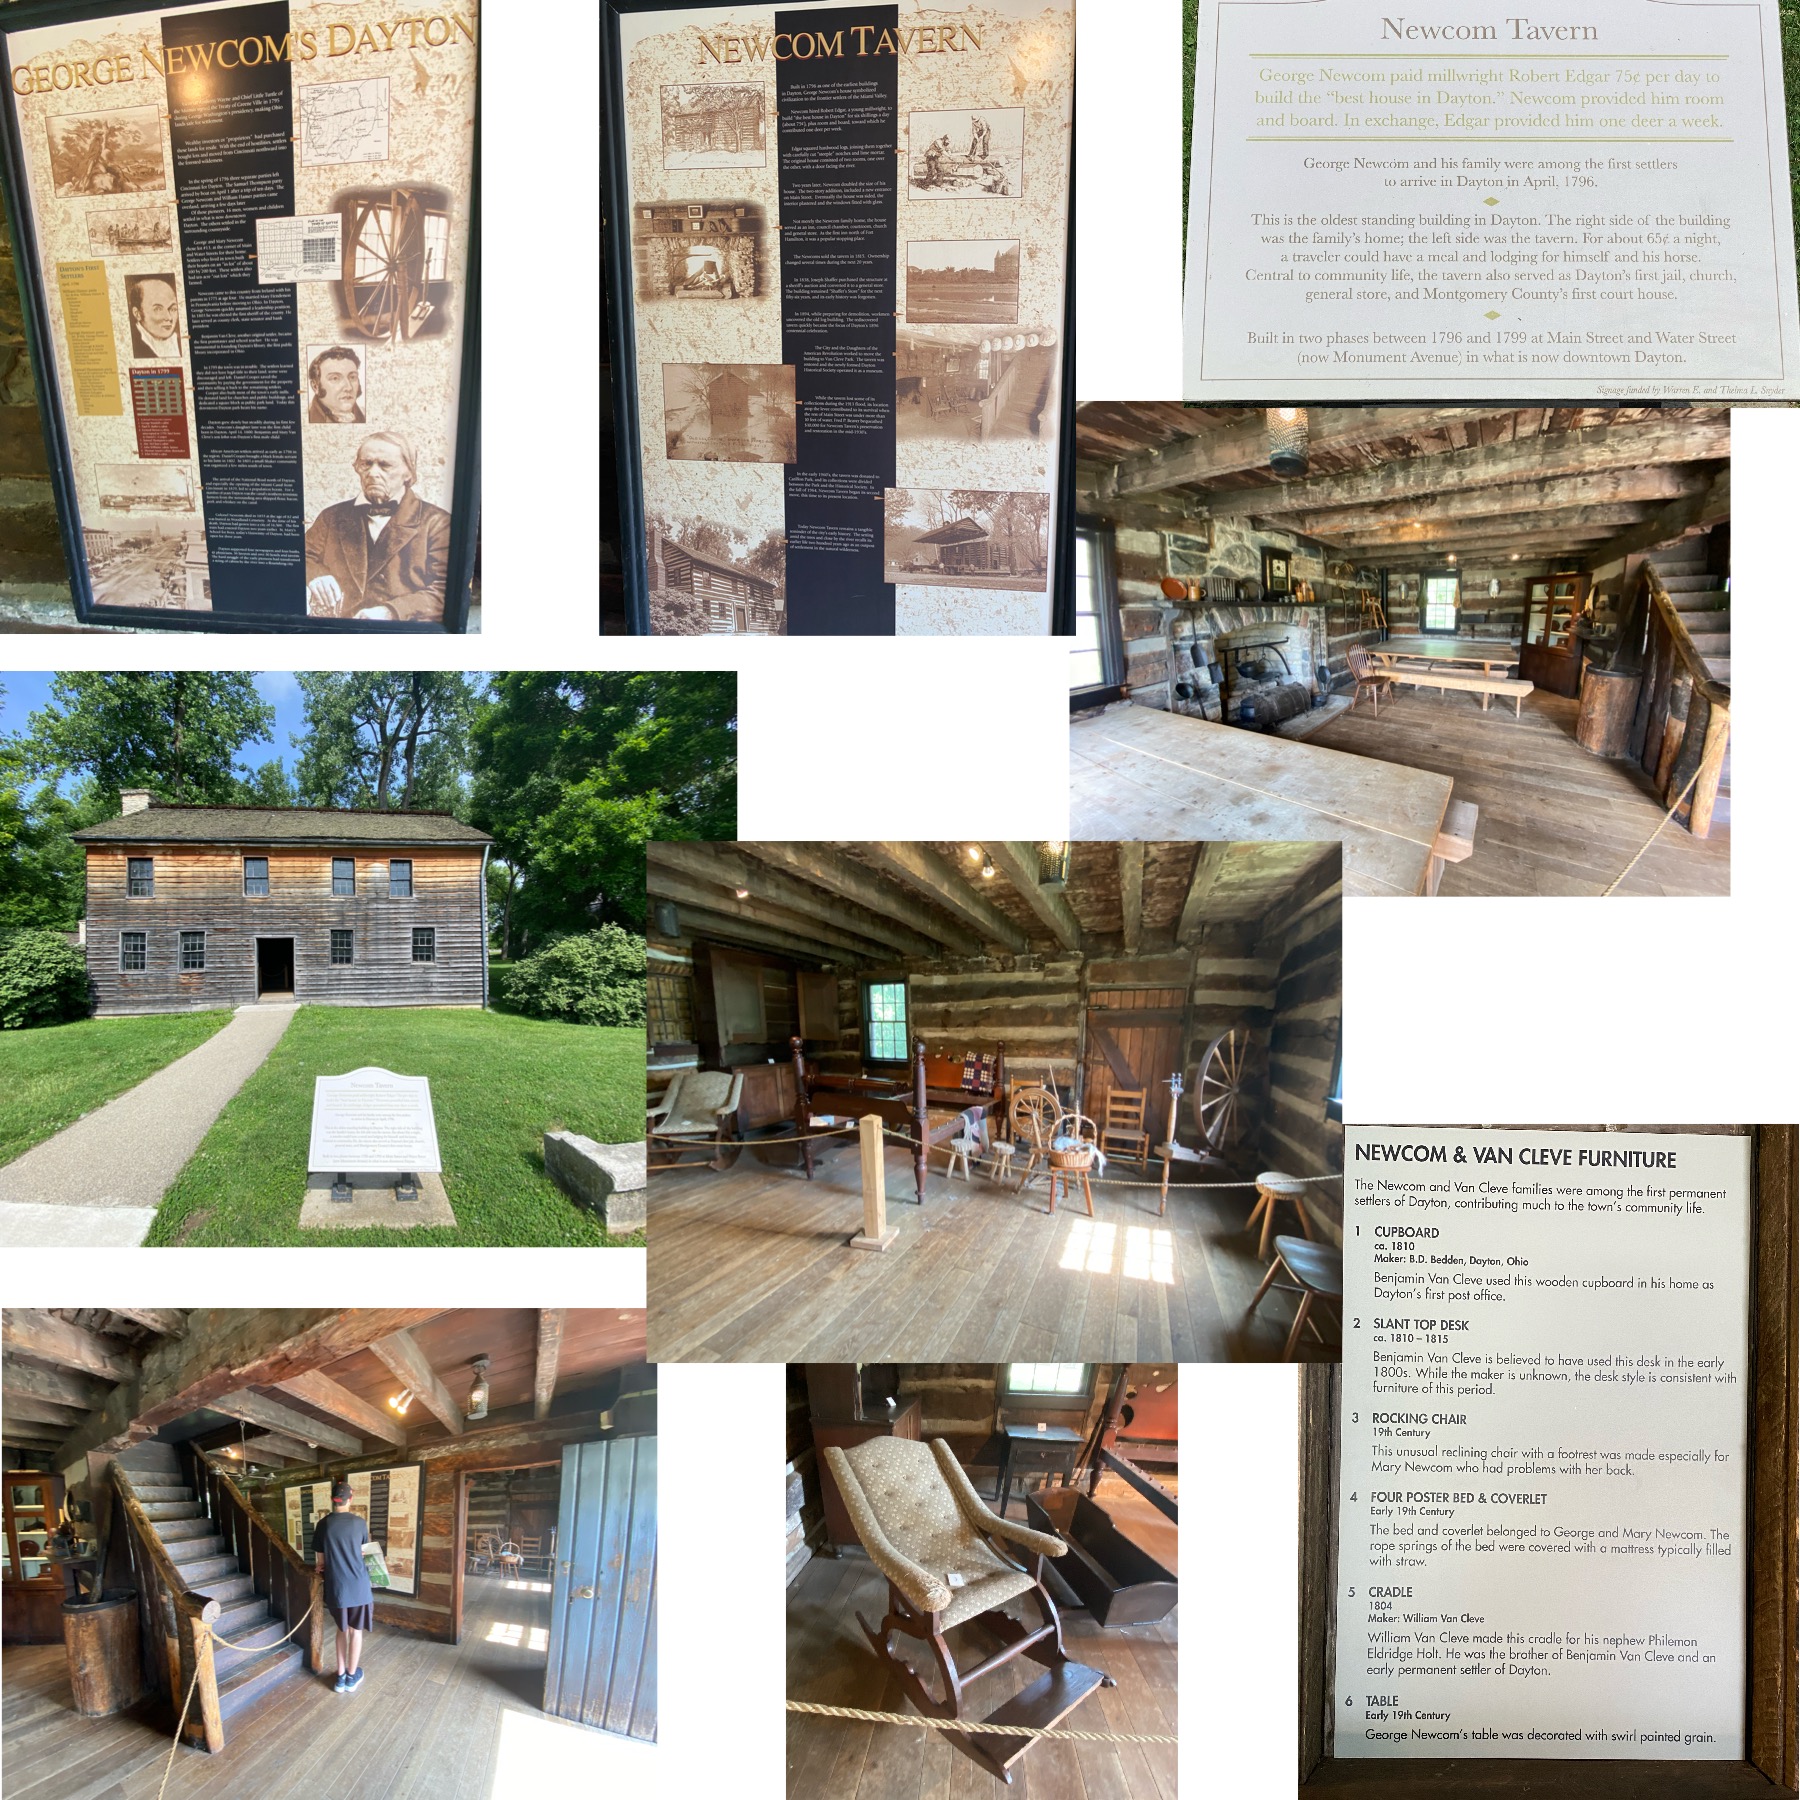
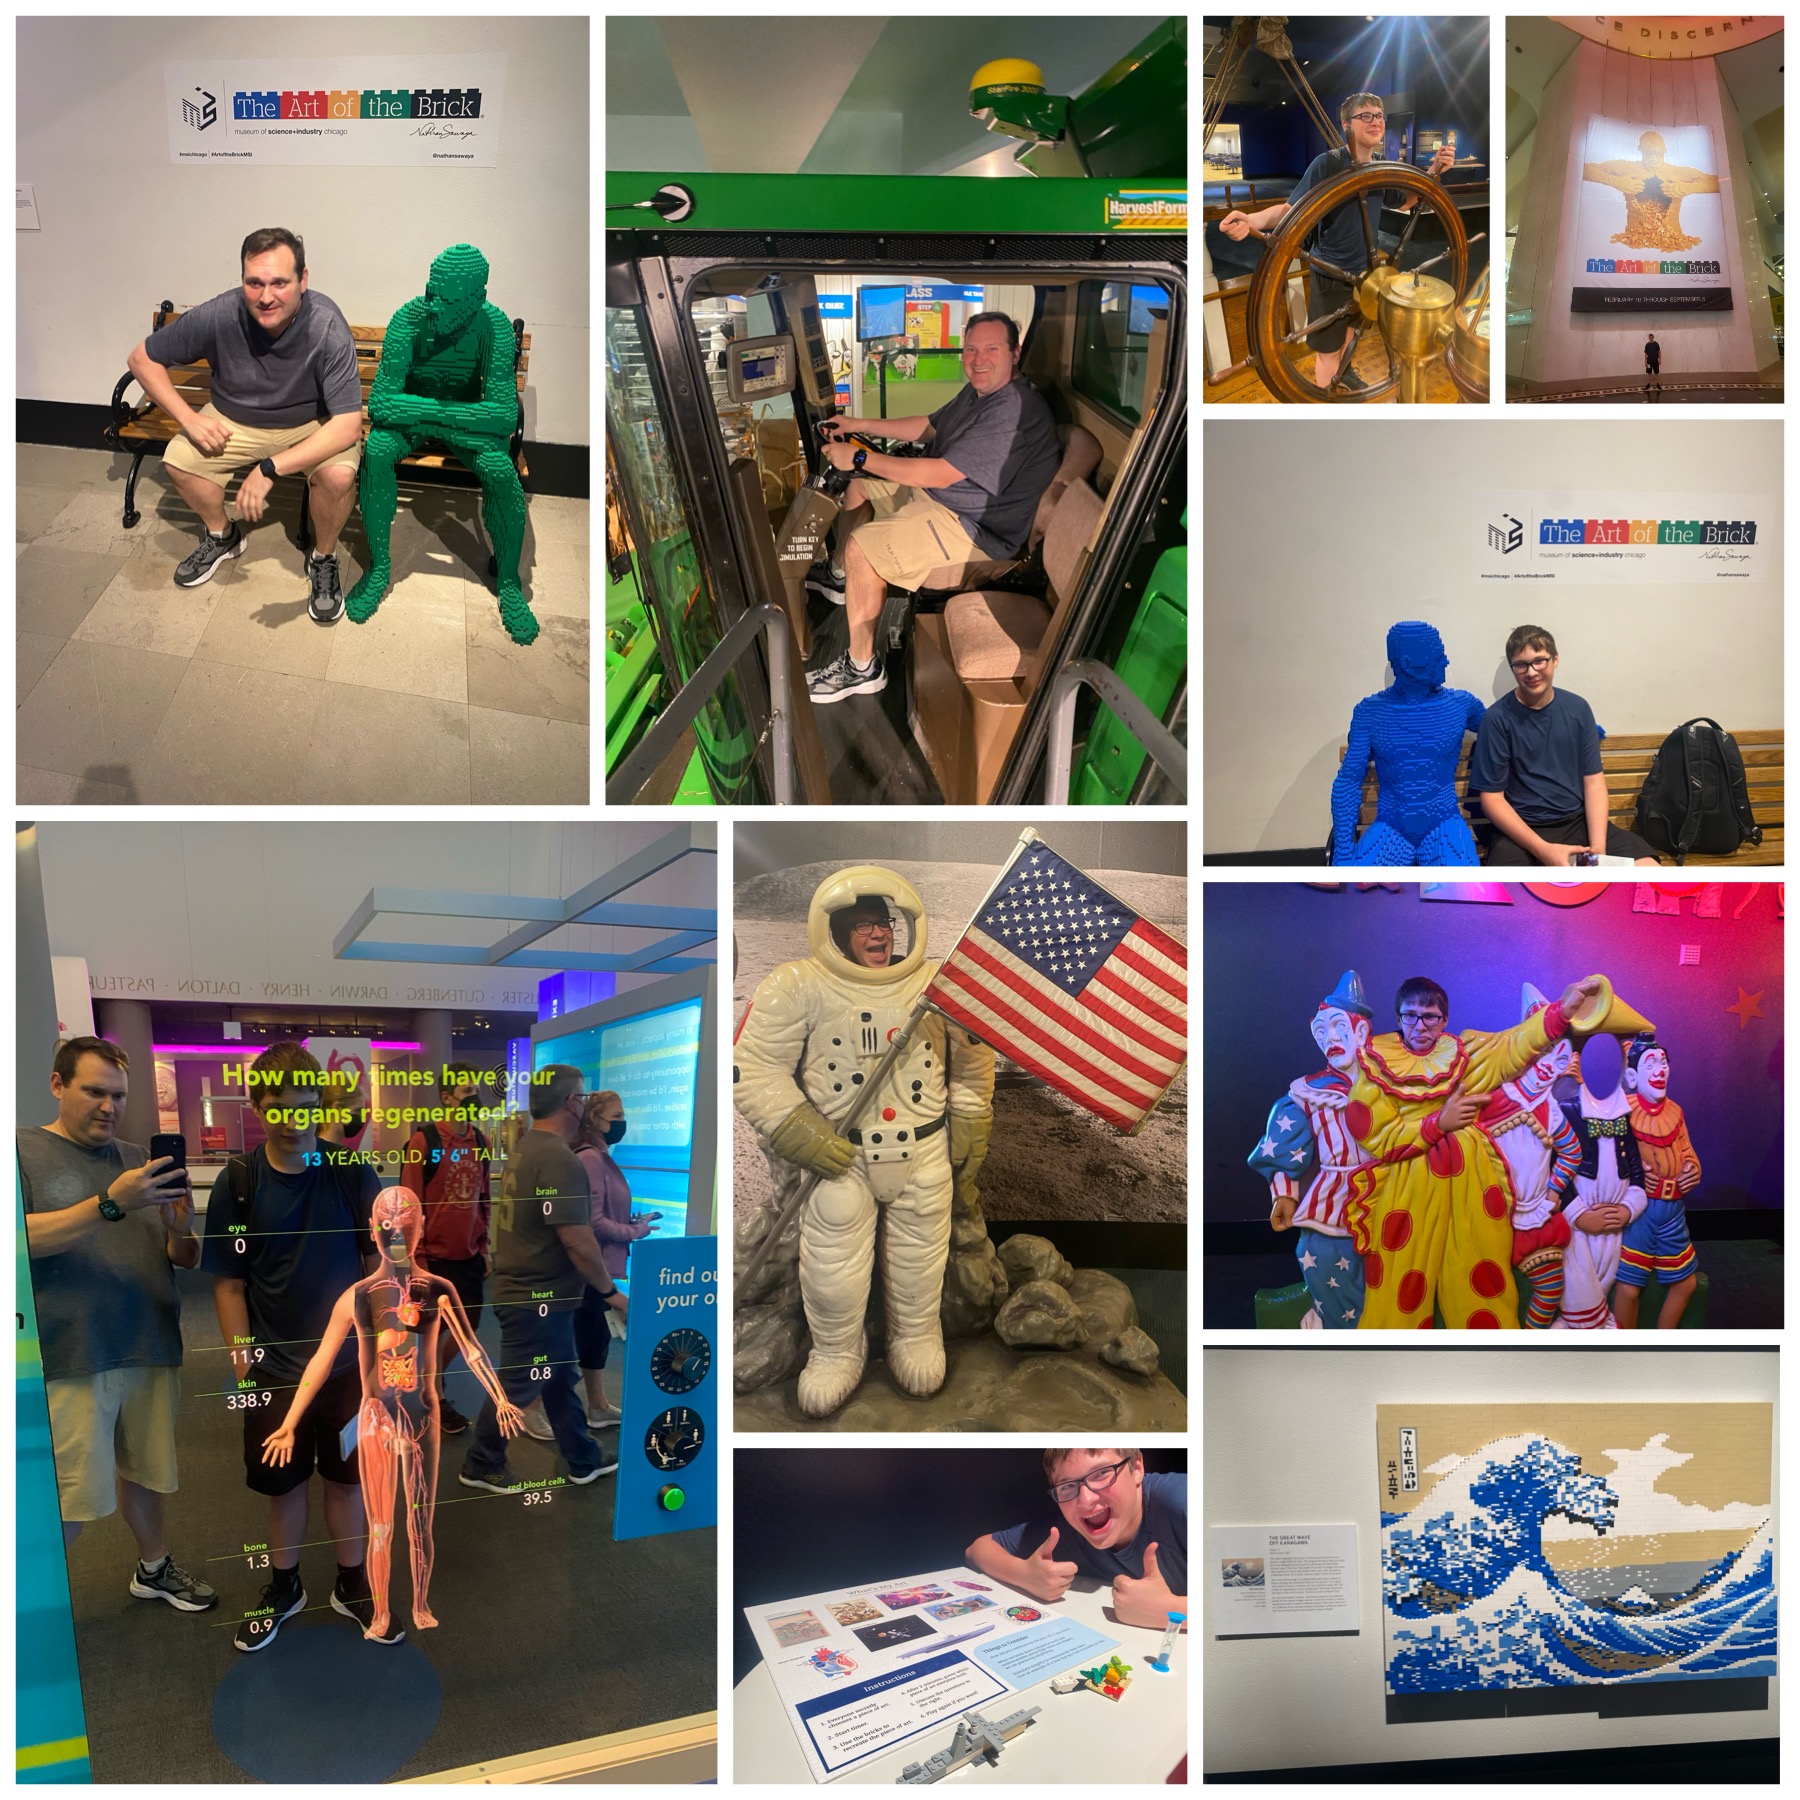
I gave Nick three options for today: Art Institute, Lincoln Park Zoo, and Museum of Science and Industry. He chose the Museum of Science and Industry which featured The Art of the Brick ($71 total for admission).

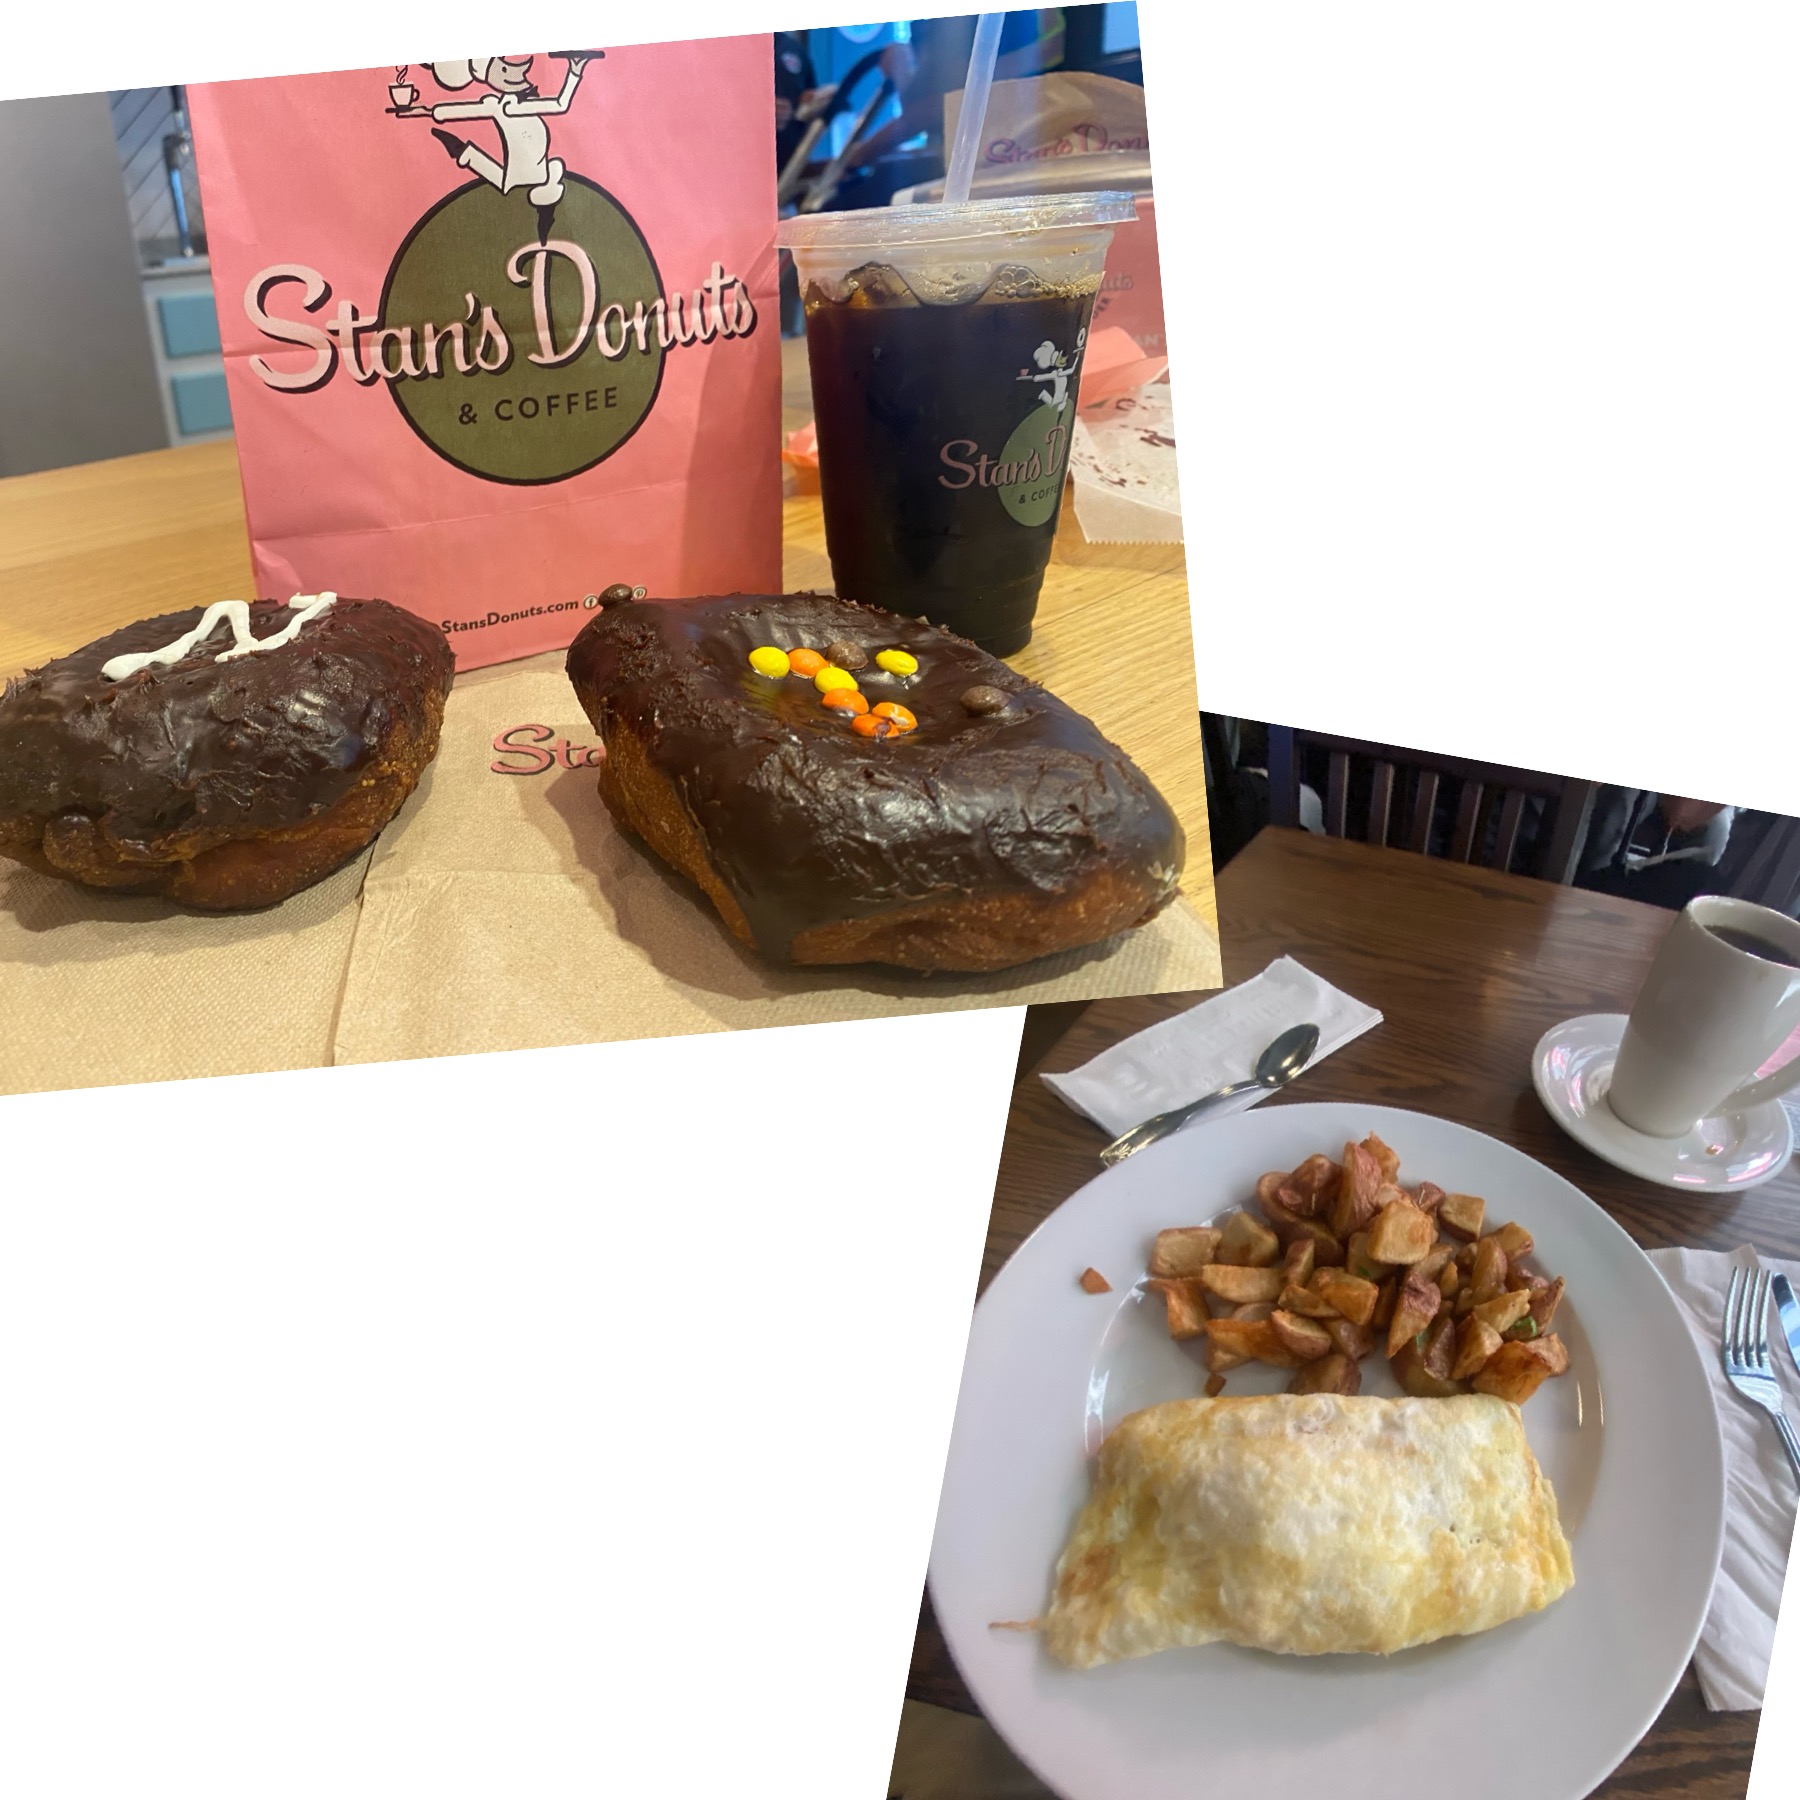
I had eaten an omelet while Nick slept in. On our way to explore the museum, we stopped at Stan’s donuts to get Nick some breakfast and to check it off my list. The donuts were crazy, very thick and full of decadence; it was like biting into a doughy candy bar. Too much sugar for me, but Nick seemed to like it. With an iced coffee for me, the total came to $15. Nothing seems cheap these days.

A quick Uber ride later and we made it to the Museum. The museum was amazing. I had such a great time teaching and learning. There is a reason I am an engineer. The Art of the Brick was a great exhibit. I took a bunch of pictures because what this artist does is so remarkable. That being said, the $14/person adder cost was steep. One of the best parts of this exhibit was the interactive Lego build I did with Nick. It’s fun to just play with him.

The museum also had a farming exhibit. I loved getting into the tractor and combine. It is clear why these pieces of equipment are very, very expensive. From sailing, to bicycles, to U-boats, to genetics, to Lego art, to Outer Space, to Chemistry, to farming, and even the circus, this museum covered a lot of ground. We went from 10:30 AM to 3:00 PM and were exhausted.

Lunch was disappointing as they are working on a new cafeteria space and only have vending.

We hit some peak Uber time on the way out of the museum, so I opted to try the Chicago bus. The native Chicagoans were very helpful in figuring out the route home. Although crowded and slow, the bus was a good experience for Nick and cut our travel cost from a $40 Uber ride to a $5 bus trip.

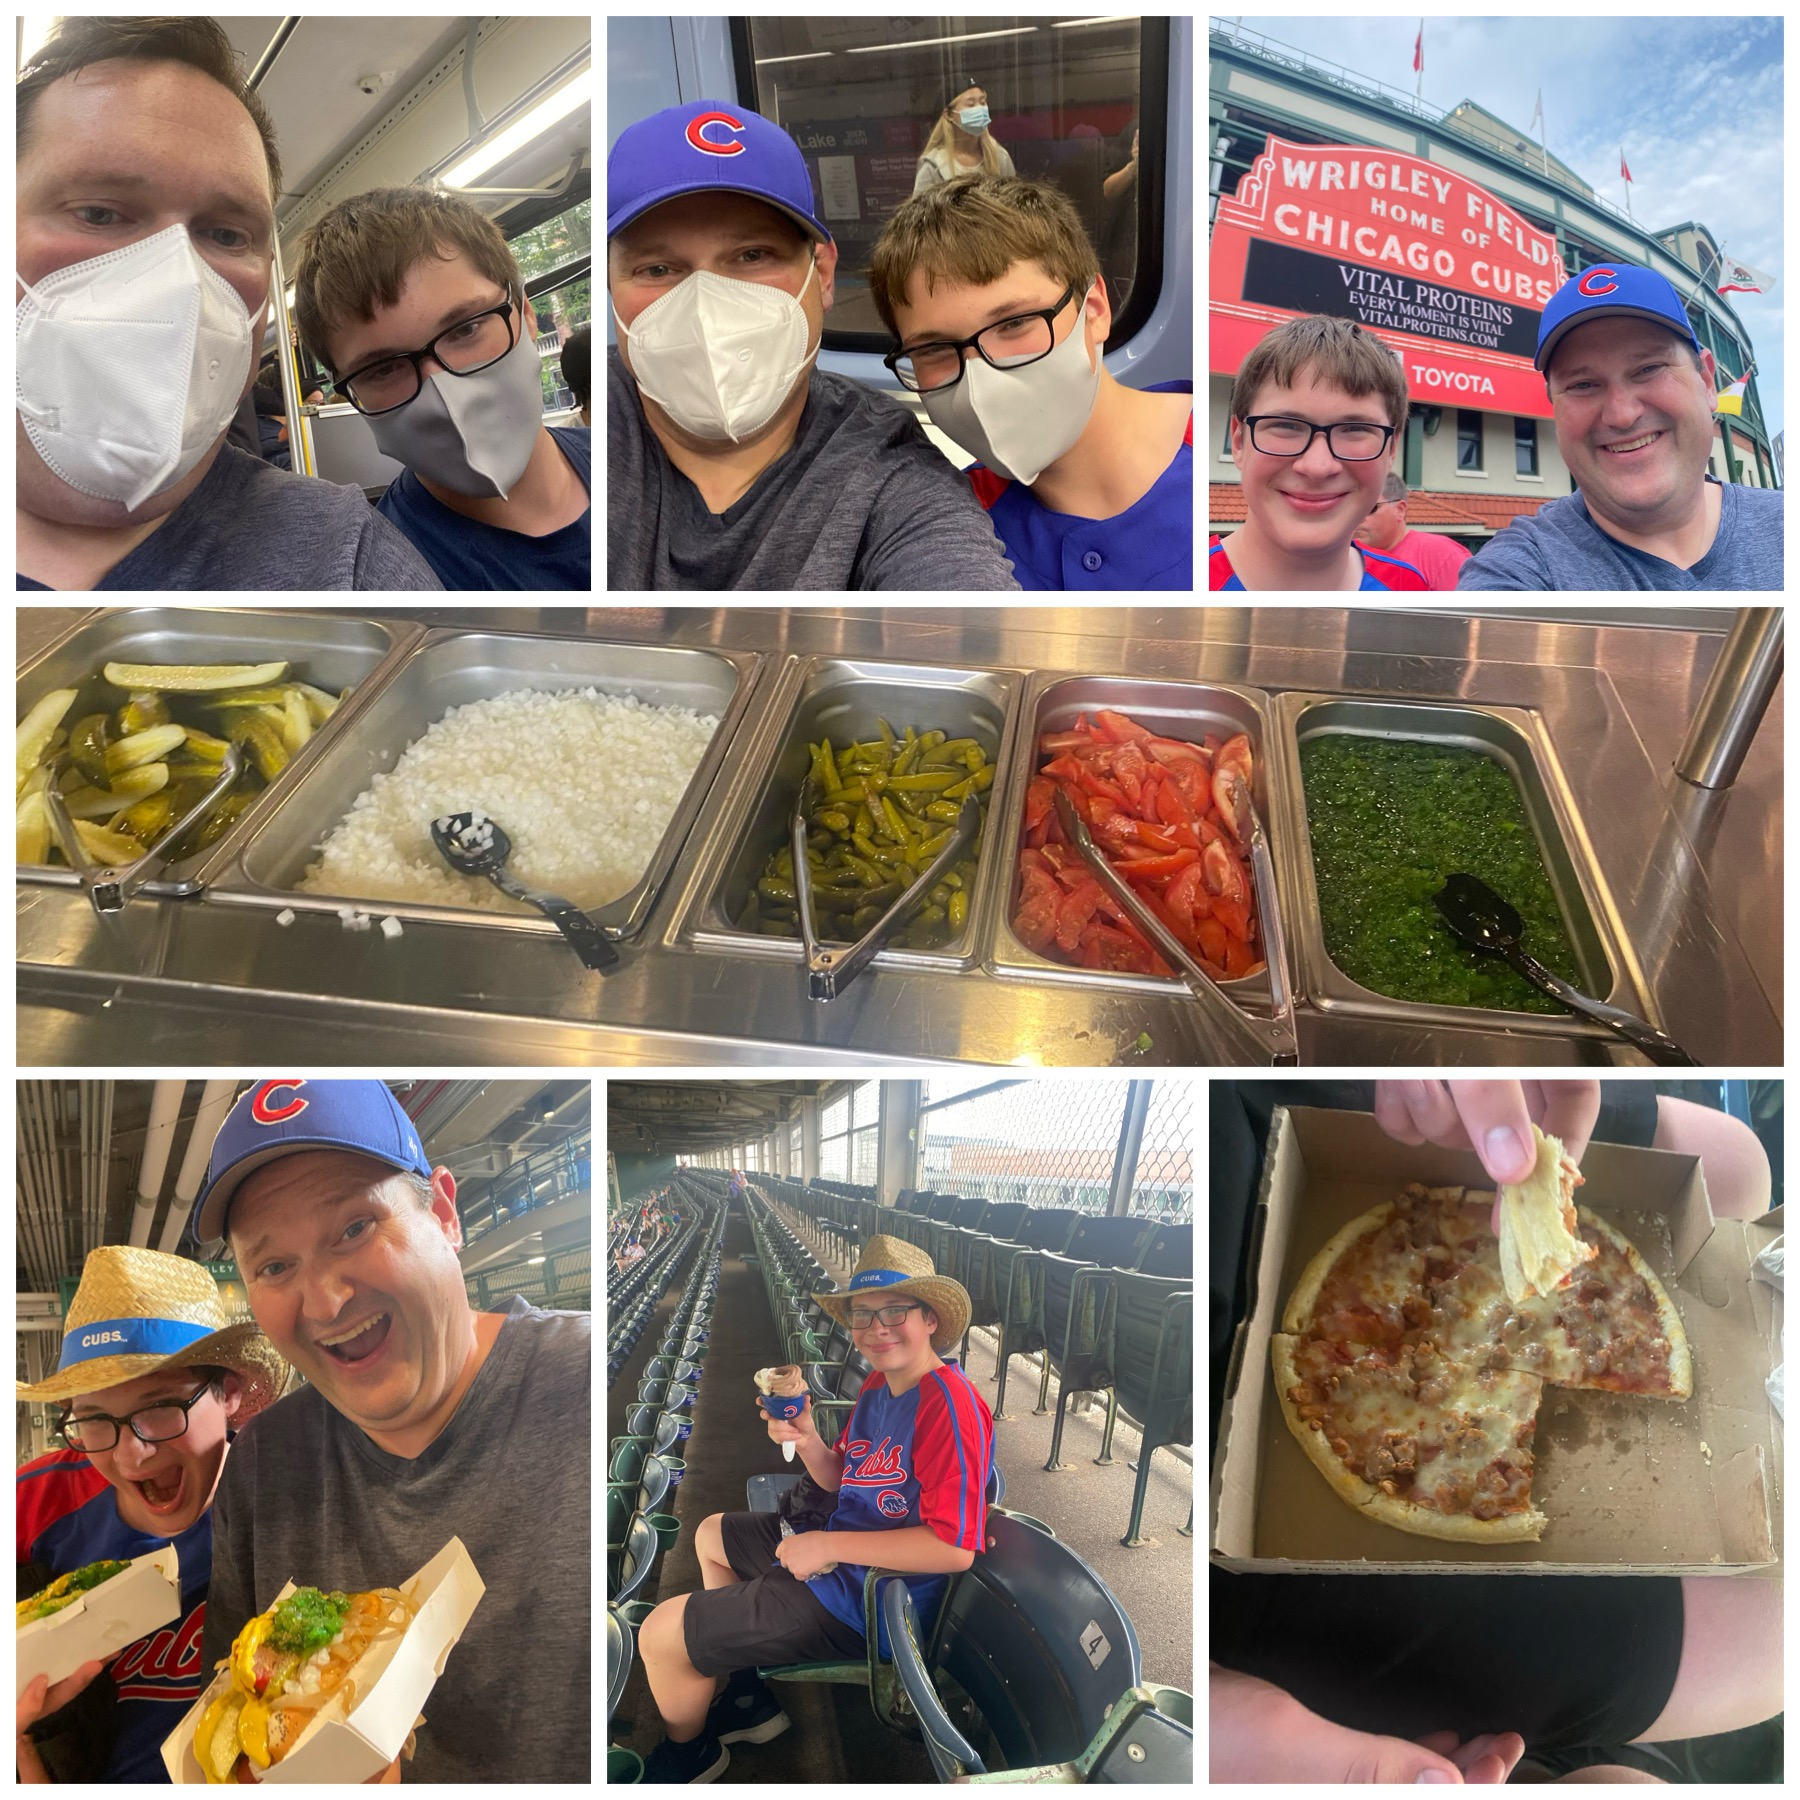
I had read about the Ventra card in preparation to take the L to Wrigley Field later in the night and opted to load $10 onto the new $5 card that I purchased ($15 total). This covered both trips. Based on the crowds, we wore masks on both the bus and the L.

Sarah helped us figure out that we couldn’t bring backpacks/bookbags into Wrigley Field, so we had a quick stop at the hotel to reorganize. We had bought Nick a Cubs jersey for the game that he needed to change into as well.

It was getting close to rush hour, so we decided to go early and make sure we got to the game in time. The L red line was close to the hotel and we got on with no problems. It was a fun experience to take the subway/elevated train.

We got to the stadium around 4:30 PM. The gates didn’t open until 5:00, so we grabbed some drinks from a close by 7-11, took the mandatory picture for 1st timers to Wrigley, and got in line.

It was free cowboy hat night for the first 10,000 attendees; since we were 2 hours early and likely the 20th attendee, we got a hat. It was sponsored by Jim Beam, so only ages 21+ received hats. Nick ended up wearing mine and looked great in it.

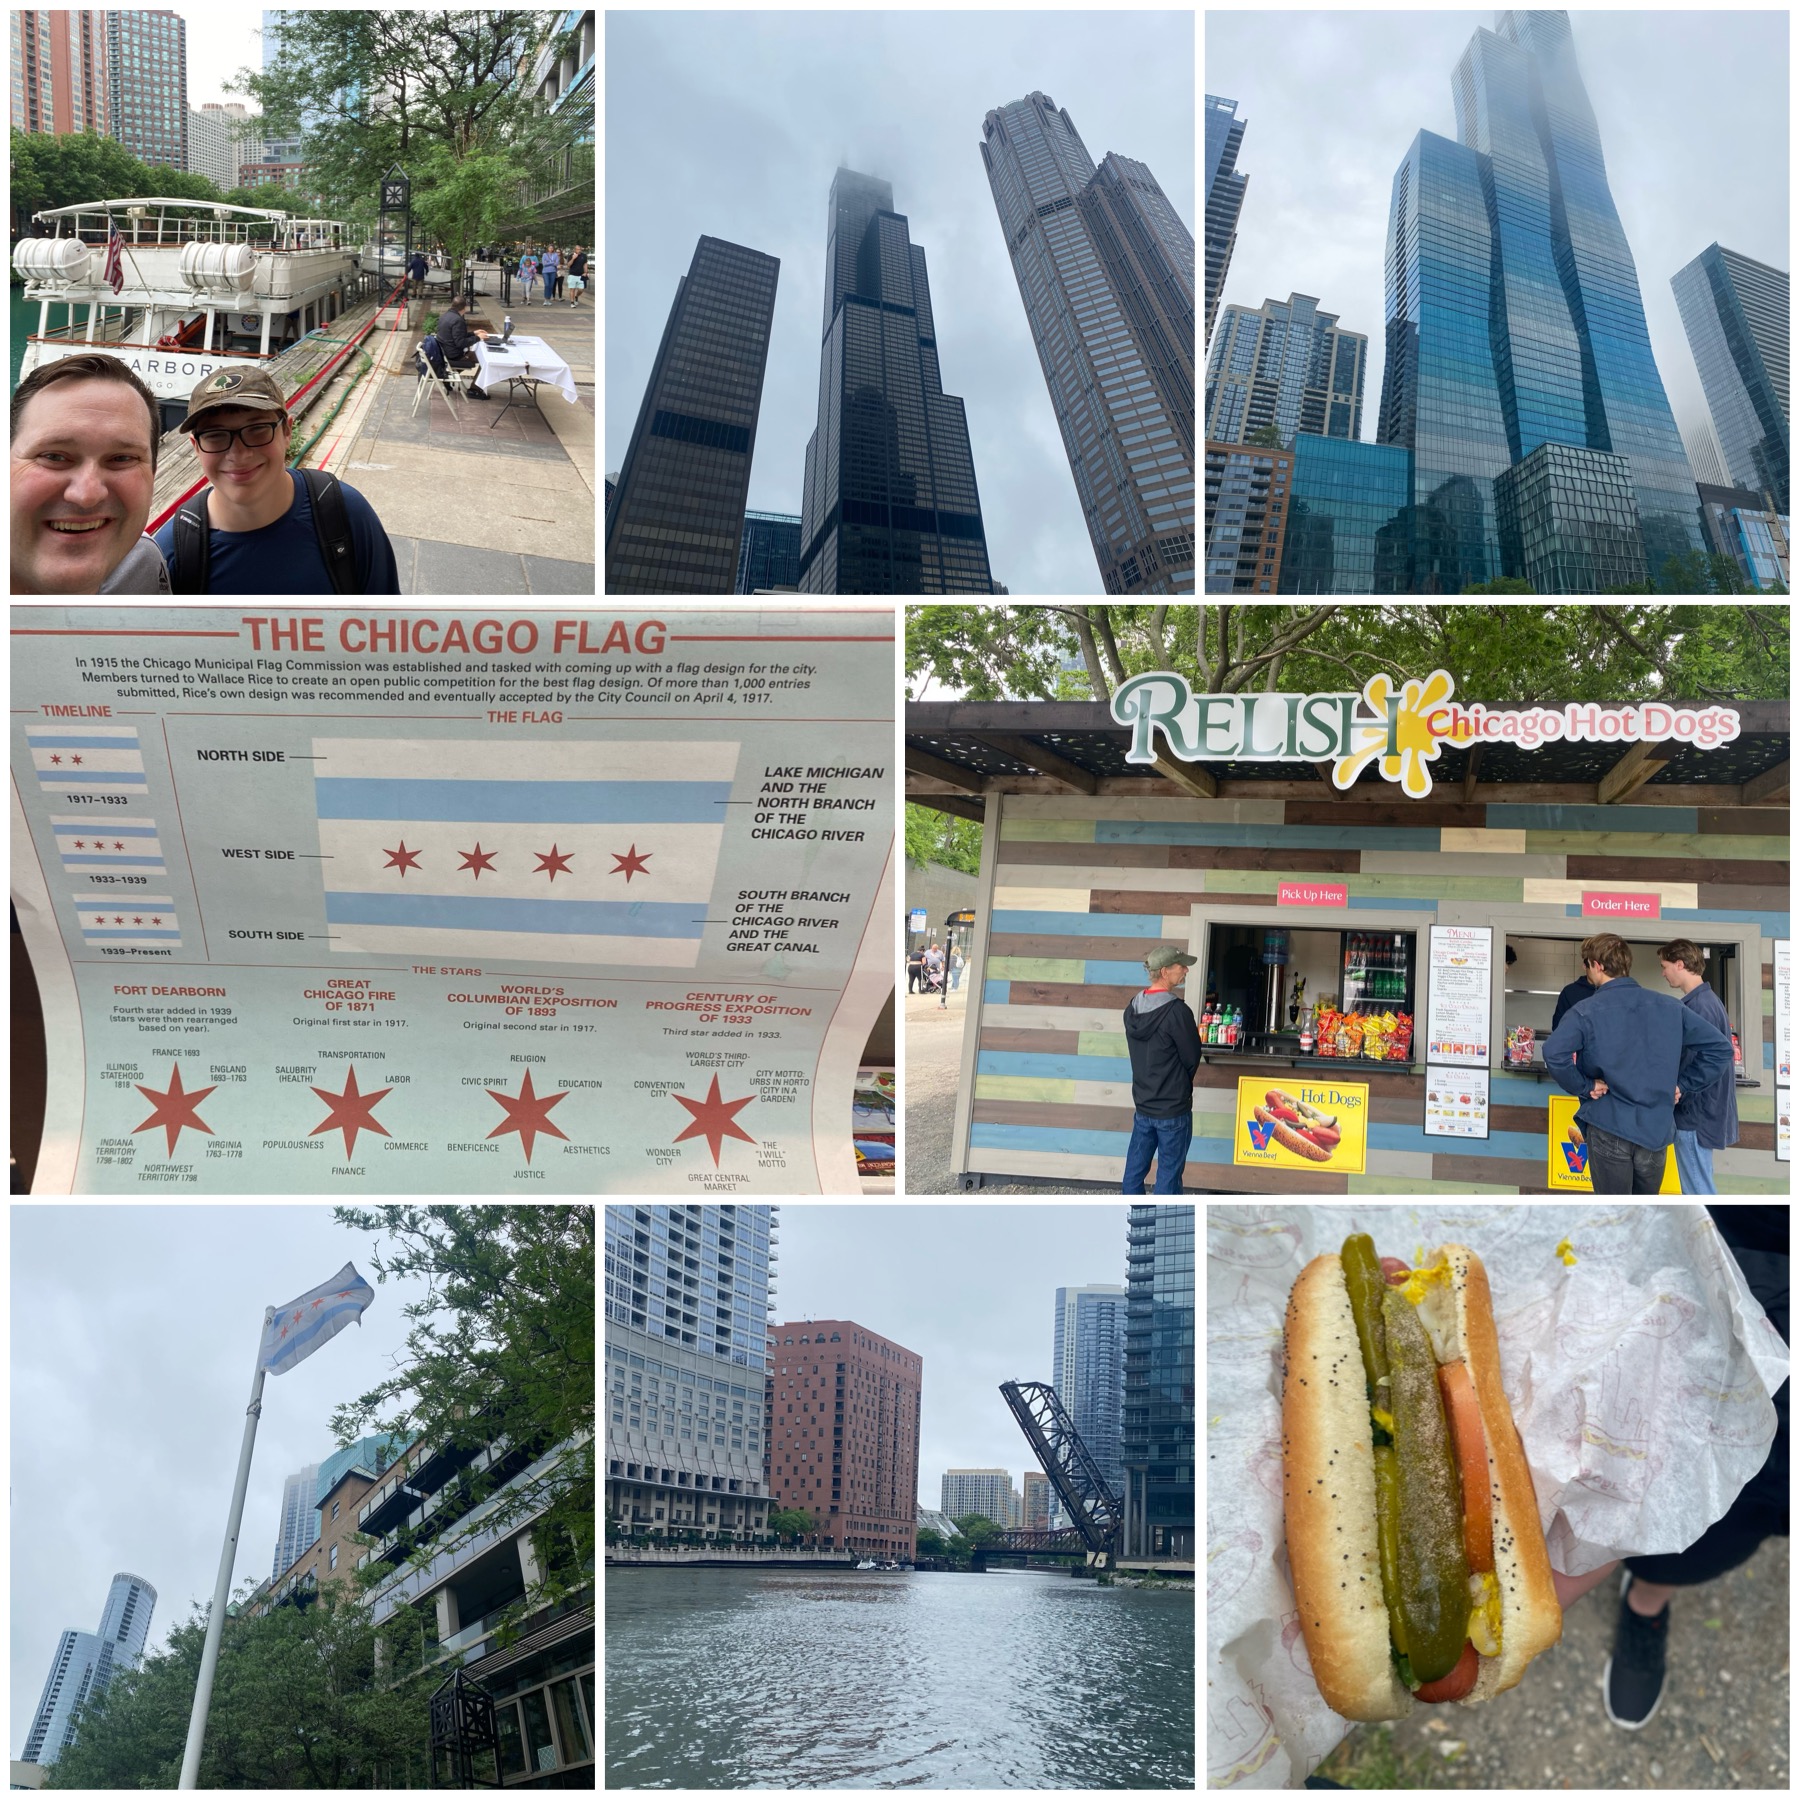
Our first stop in the stadium was for the Chicago dogs. This was not for the newbie as they gave you the basics and then had a fixings bar. If we hadn’t had one the day before and did our Chicago dog research, this would have been a disaster. As it was, it was just kind of a mess as both Nick and I went a little heavy on every possible topping, making these some sloppy dogs. Still delicious, but it required two fistfuls of napkins to manage and we still ended up having to hit the restroom to clean the mustard off Nick’s shorts. ($16 for two dogs). Side note: The bright green relish looked a little scary, but didn’t have much of a taste at all.

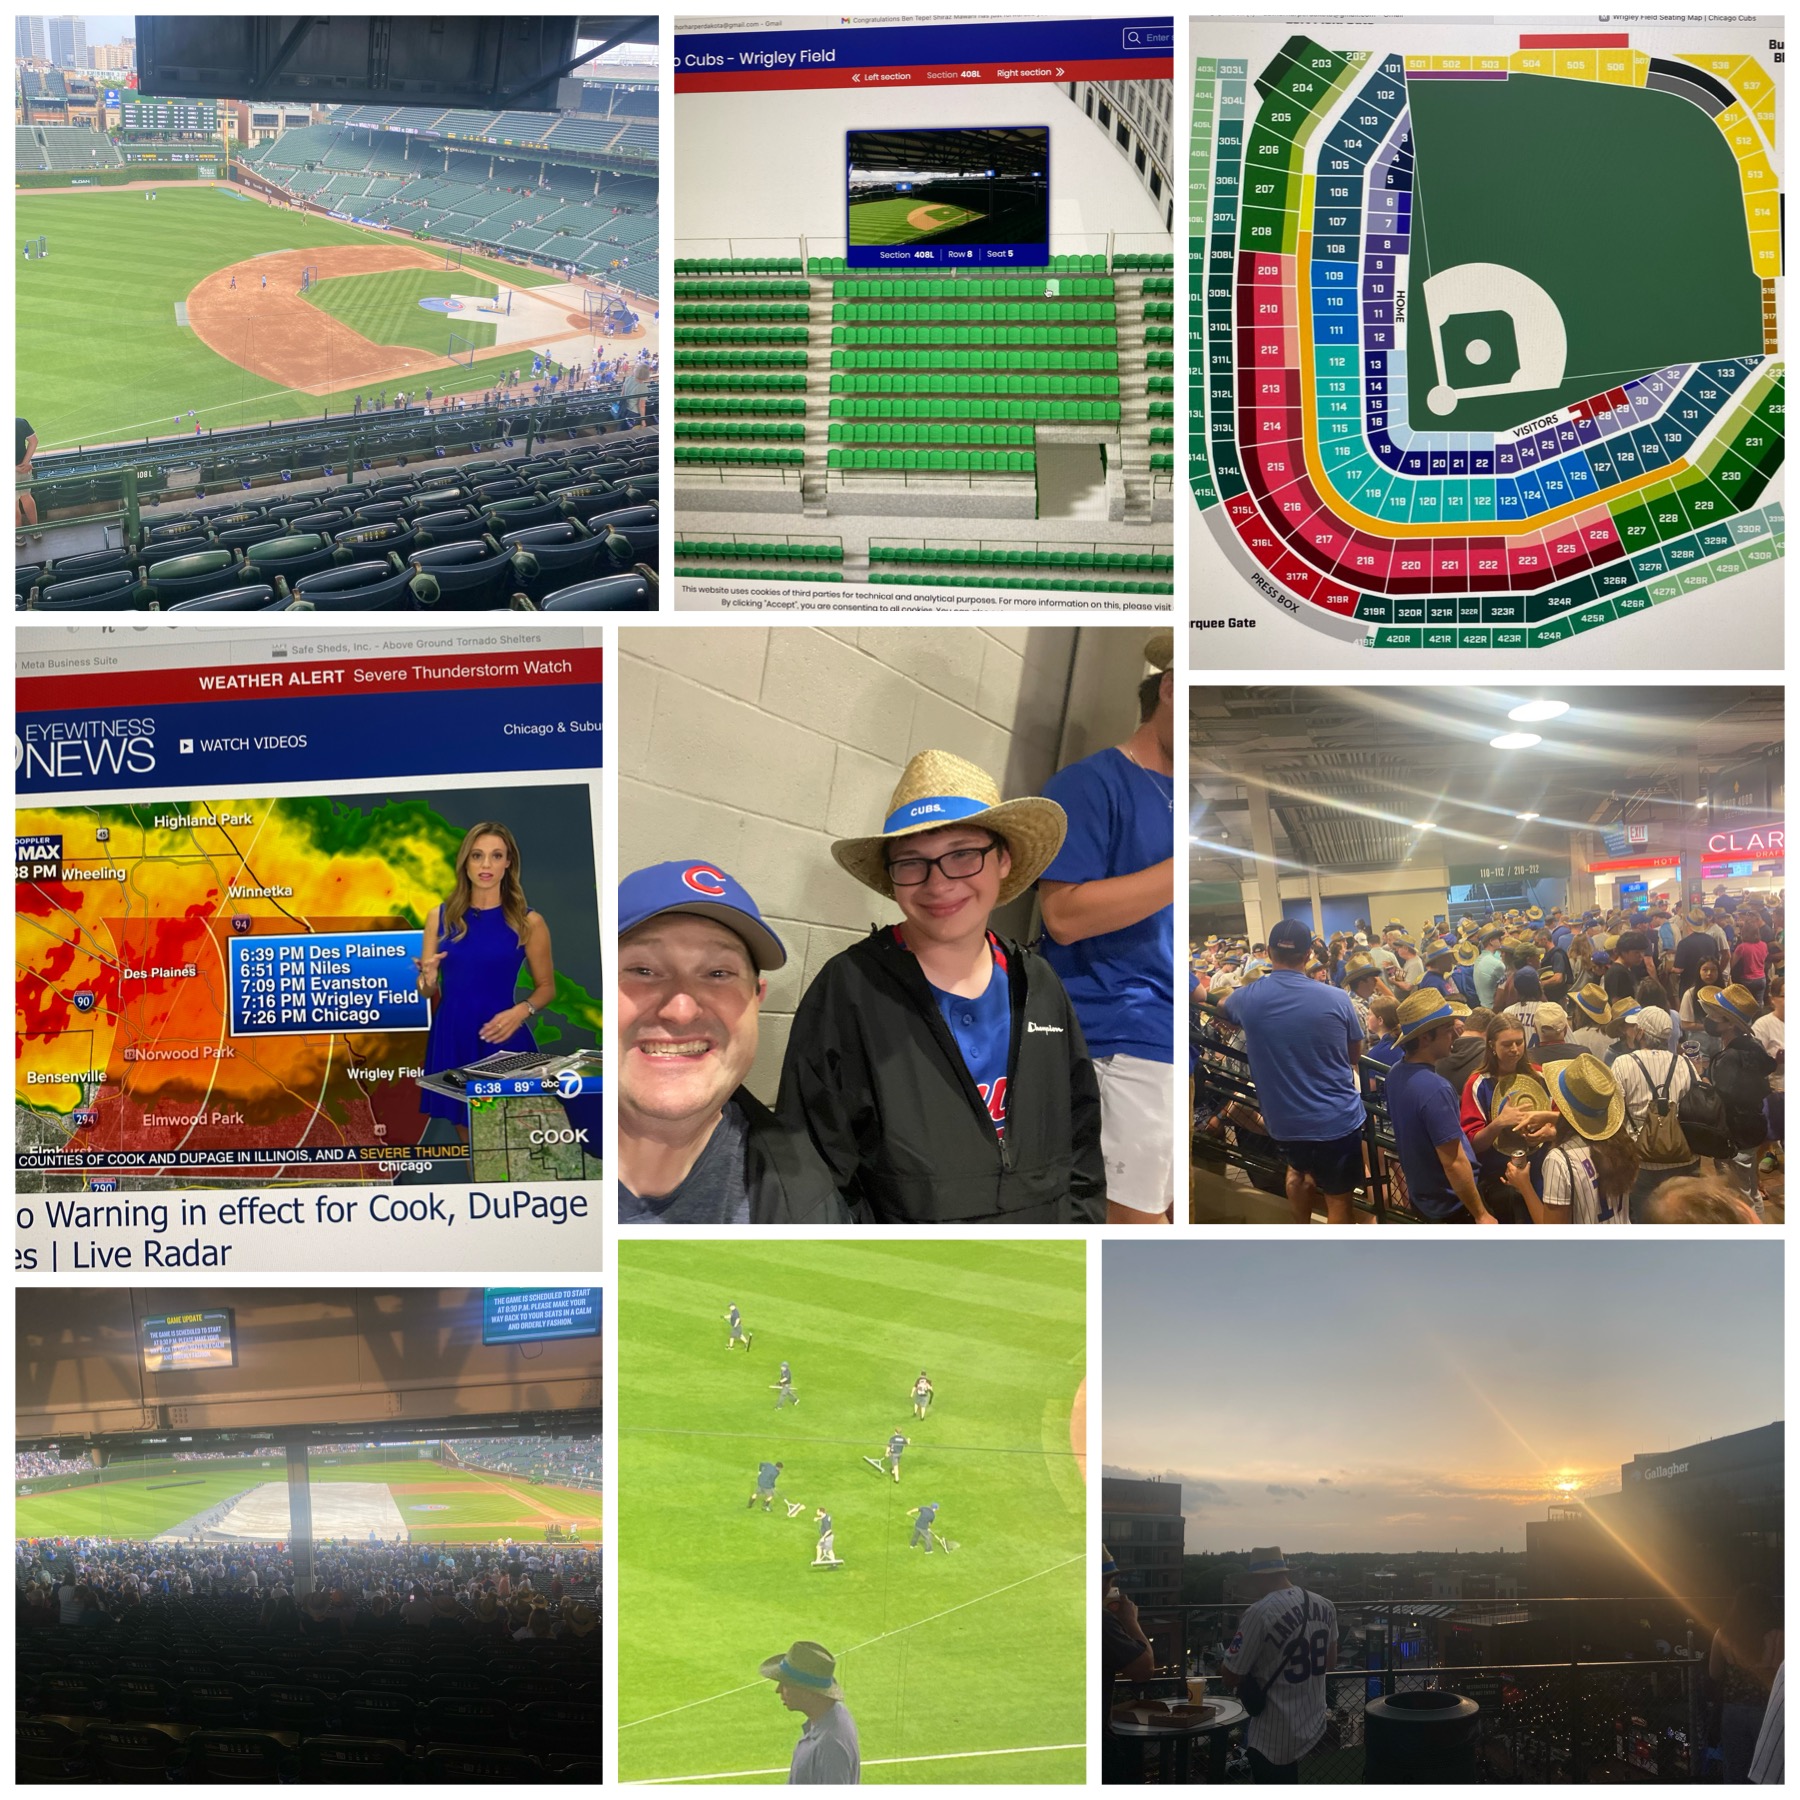
We found our way to our seats (2nd to the top row, along the 3rd base line). It didn’t seem like there was a bad seat in this ballpark. Our seats were under the cover/overhang, providing some nice shade and since we were up high, it also allowed for a nice cooling breeze.

After taking in the views, we decided it was too hot and not much action was happening yet. So, another trip to the food stand got Nick a baseball helmet ice cream and me a souvenir cup with Diet Pepsi.

We watched batting practice for a while and took in the sites. With my phone battery low, we tried out a phone charging station and walked the stadium. Along the way, we grabbed a soft pretzel and Nick found a pressed penny machine.

Unfortunately, the game was delayed due to inclement weather. We watched the grounds crew roll out the tarps, and collected my phone just in time to shelter in place for a Tornado warning. It was a little crazy with huge amounts of rain and 90 minutes of hanging out on the steps with our fellow Cubs fans.

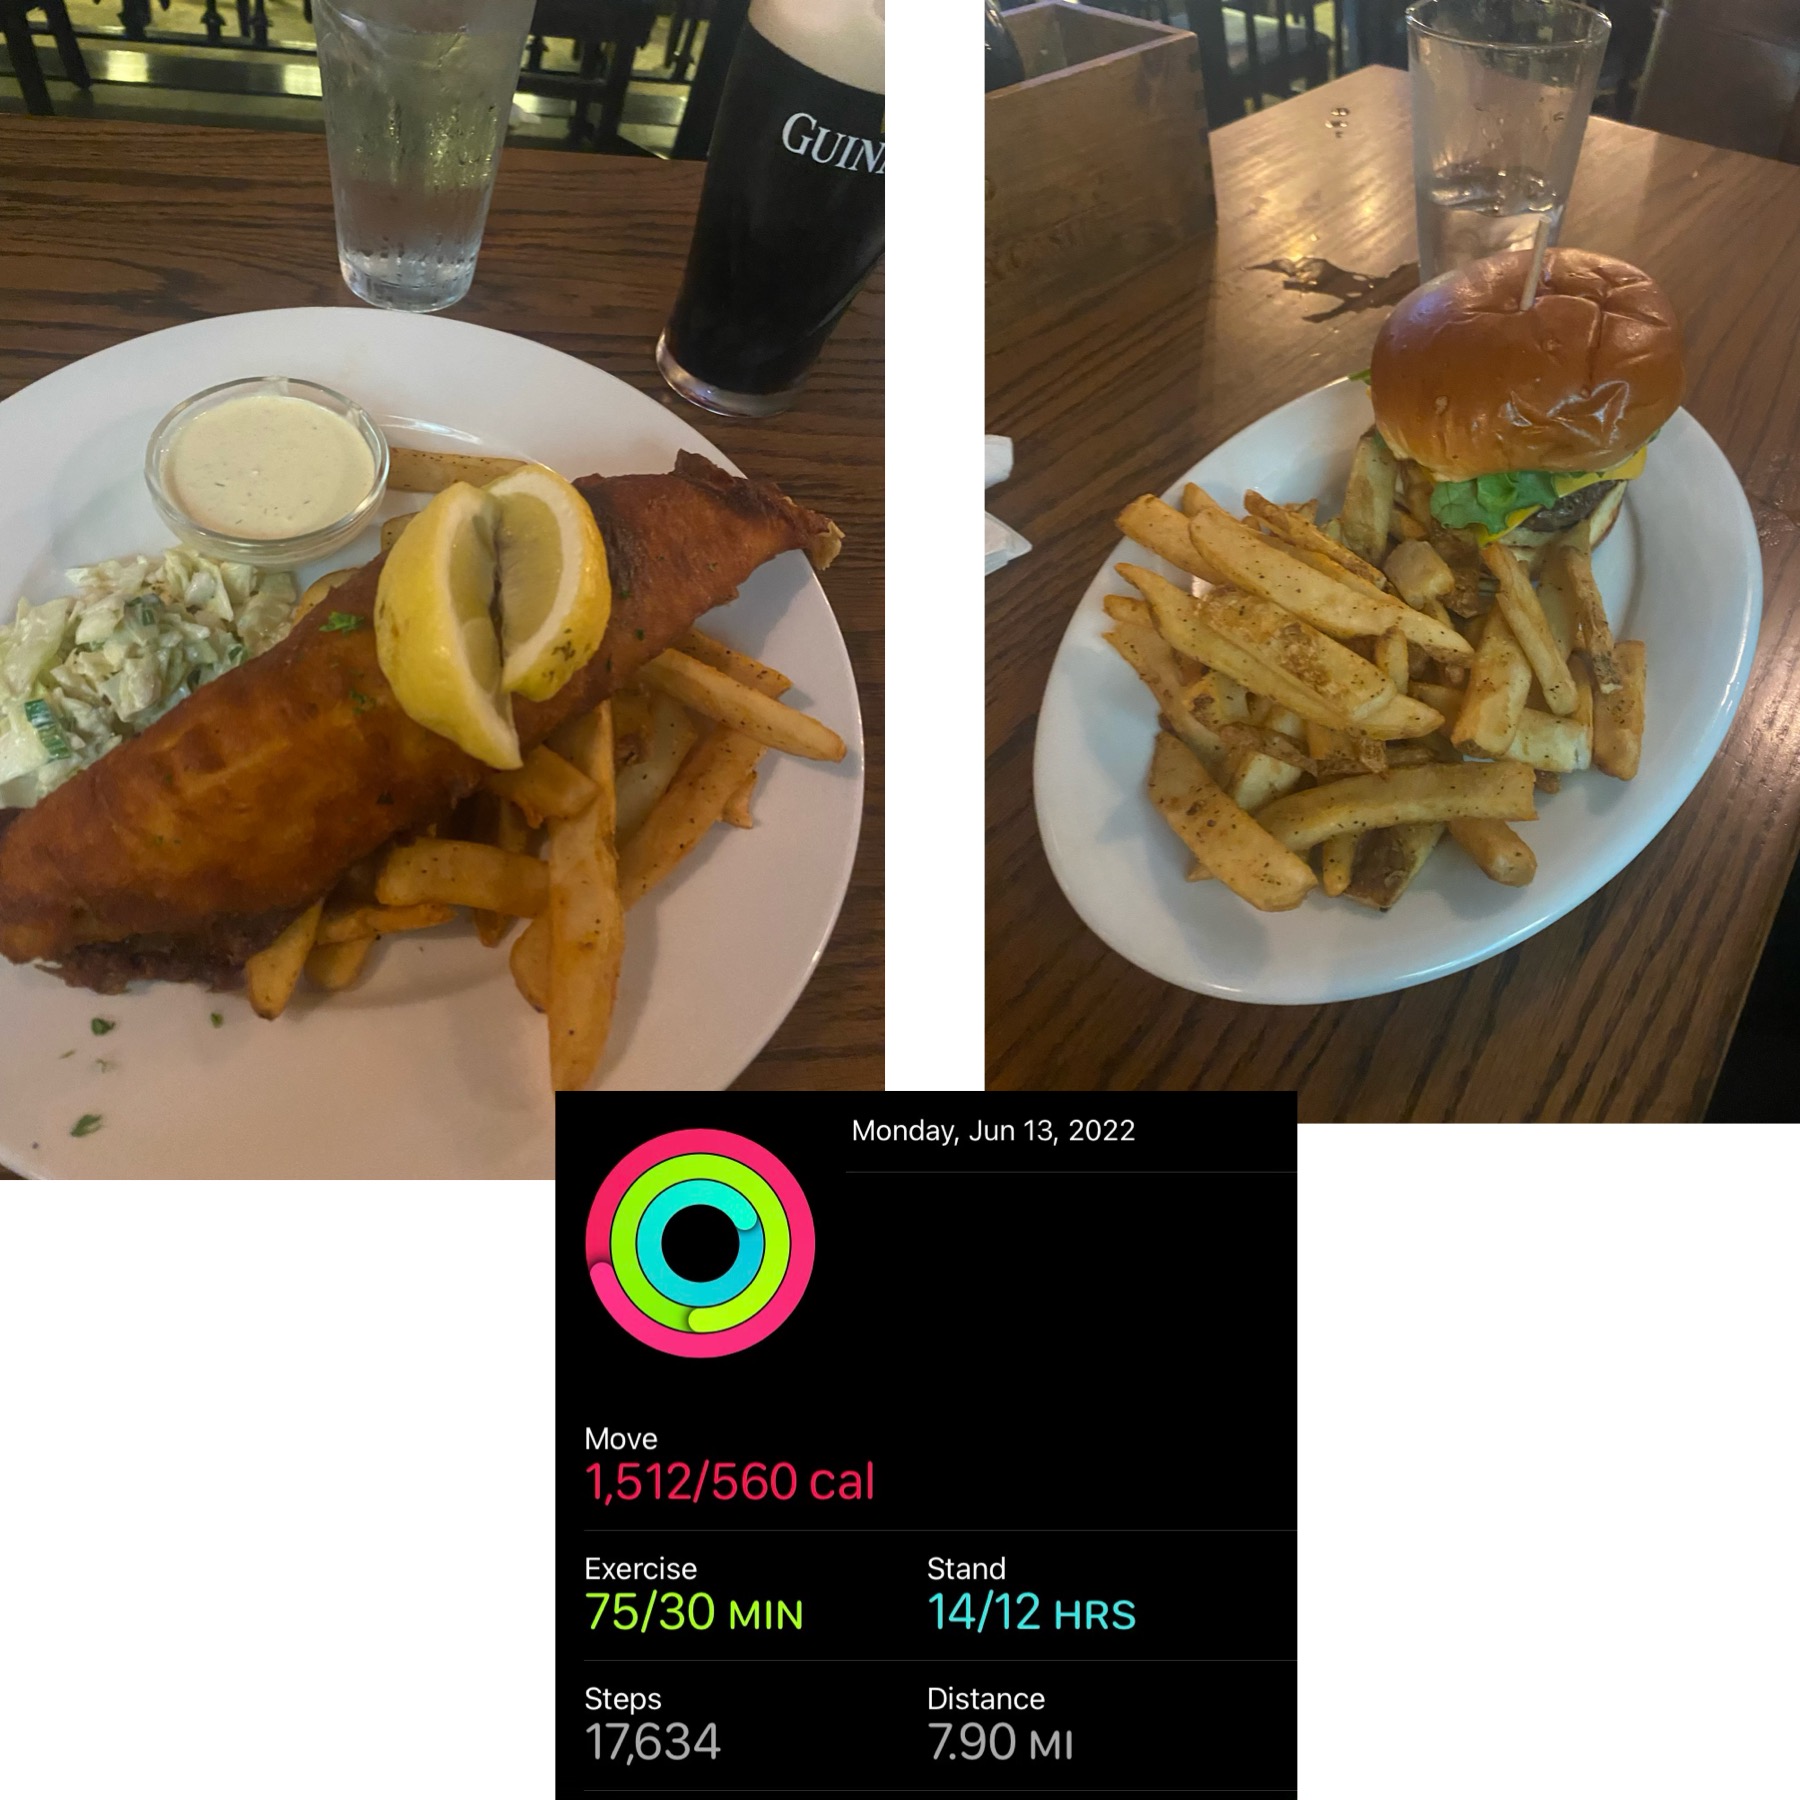
The weather passed and the game restarted at 8:30 PM. Nick got Pizza and a Gatorade before returning to our seats. With the long delay, the stadium was only half full when the game restarted. We made it through about an inning before Nick was ready to go. To his credit, the first inning ended around 9 PM. We took an Uber back to the hotel, and while it seems like we shouldn’t be hungry at this point, we both were, so we stopped at Elephant & Castle to get Fish and Chips for me and a Burger for Nick before grabbing showers and crashing for the night.

Posted in: Exploring Illiniois, Food, Hiking, Museums & Tours, Sightseeing

Exploring Chicago: Day 2

(NOTE: Click on images to enlarge.)

We got up at 6:45 AM to beat the crowd at Wildberry Pancakes & Cafe. We rolled out of the hotel around 7:30. A fog hung in the air still, which gave the cityscape a different look from the day before. On the walk to breakfast, Nick suggested we stop at the Bean and get pictures. Yesterday Millenium park was crazy with a festival, but this morning it was empty. In fact, the whole city was nearly empty at this hour on a Sunday morning. It made for easy pictures.

We got immediate seating at Wildberry which was a great surprise since many reviews called out wait times over 2 hours on a Sunday. Nick got the Oreo S’more pancakes. I got the egg white veggie omelet with a side pancake (Key Lime pie). Everything was delicious. I couldn’t even finish my whole omelet.

Nick wanted to do the Architectural boat tour, so I put him to work booking us tickets. We took a short 1.25 mile walk to the boat. The end cost for a 90-minute tour was $121 ($116+$5tip).

The boat was the Ft. Dearborn, named after the fort that started Chicago. Marshal was our docent (tour guide) on the boat tour. Captain Carol drove the boat. We explored all 3 branches of the Chicago River. It was very educational and neat to learn the difference between “Modern” architecture (Modern architecture has a flat roof and no ornamentation) vs. the other styles. We did learn an interesting fact about the Chicago flag as well.

Chicago borders Lake Michigan on the East. Chicago’s name comes from the smelly wild onion plants that used to blossom on the shores. In the Native American language, it sounds somewhat like Chicago. Willis Tower was constructed with a tube construction (9 towers bundled together to fight the wind). They dubbed the area around the rivers as “From warehouse to our house.” (Conversion of river warehouses to upscale apartments and condos).

Next, since we were close, we walked to Navy Pier. It was pretty lame. But on our way out we shared our first Chicago dog from Relish ($6). It comes with jalapeño, pickle, celery salt, mustard, relish, tomato, cucumber, and of course the all-beef hotdog. We both liked it a lot. Which was strange for me because I don’t normally like mustard, relish, jalapeños, or pickles. Who knew I would like it when you shove them all together?

On our way to the Magnificent Mile, we detoured to see a beach at Lake Michigan. People had donned wet suits and were swimming in the lake. It was 60F and windy. These are some tough people.

We wandered the Magnificent Mile. We stopped at the Starbucks Reserve Roastery, which was an insane 5-story Starbucks that we had to wait in line to get into. We didn’t buy anything because it was nuts inside, but they did have a tempting flight of Starbucks-themed martinis and a silk-lined blazer made from coffee bean bags for just $525. Unfortunately, they didn’t have my size.

We souvenir shopped our way back to the hotel area, picking up a Cubs hat for me and postcards.

We stopped at the Buckingham Fountain for the quintessential Chicago picture. Nick noted that the horses look like they are vomiting and are surprised about it. Strangely I agree.

We walked over 9 miles before stopping back at the hotel to rest before dinner. When I told Nick we were over 20,000 steps, he said, “No wonder my feet hurt.”

~Ben

Posted in: Exploring Illiniois, Exploring Ohio, Food, Sightseeing

Top 10 Tips for Amtrak Travel

Amtrak is a great way to travel!

I can see why writers wrote on trains. It is a ‘romantic’ way to travel and the perspective change gives different insights. Something about going a little slower, the changing scenery and interacting with so many different people creates a spark of creativity. This summer I got the opportunity to take two train rides on Amtrak. We traveled the mighty Cardinal through the Midwest.

Here are my top 10 tips to make your Amtrak trip outstanding this summer.

1.    Be patient. Trains in the USA get delayed. Just expect things to move slowly. If they aren’t delayed, you will be pleasantly surprised. On both of our trips this summer the train was delayed. One for just 30 minutes, the other for nearly 2 hours. The more flexible you can be on your destination commitments the less stress you will have.

2.    Bring your own food. The food on Amtrak is rough. The menu is limited and they are reheating the food. Mostly anything you bring is going to be better than what they serve.

3.    Charge your phone, bring a battery backup and bring your charger. Each pair of seats has a set of 110V outlets that are great for keeping your device fully charged. However, see tip #1. If you find yourself stuck in a terminal, it’s no fun to fight with your fellow passengers for a wall outlet. (We have used this power bank* for years for hiking and school, and love it. It holds the charge well and will completely charge your phone.)

4.    Bring a pillow and blanket. The seats are large, comfortable and adjustable. However, a little extra padding goes a long way in avoiding neck pain in the morning.

5.    Plan to socialize. Amtrak is a very social environment. Unlike flying, people tend to be friendlier and want to talk. If you are an introvert I highly recommend bringing some big headphones*.

6.    Bring a friend. If traveling in coach by yourself, you will be paired up with a seat partner. It is always best to make this choice for yourself by bringing a friend. We were able to snag a great companion fare BOGO at Valentine’s Day. Look out for those sales.

7.    Use the bathroom before boarding. The bathrooms on Amtrak are kind of gross. They meet the minimum, but would get old over days of traveling. They use a vacuum assist flush and my travel buddy said they seem like RV toilets. I think he means that they have smaller seats. We were reminded by the conductor to make sure we lock the door when we use it because he said, “there is always one that doesn’t on every trip.”

8.    Download the Amtrak App. I found this super handy for keeping my tickets and seeing maps of the train terminals.

9.    Go higher than you expect if you want to “win” on BidUp for a roomette or room. I was not successful. My bids were rated as fair and poor when I submitted them.

10.    Experiment with the seat prior to quiet hours. The seats are generous. About 2x the size of a coach airplane seat and have several comfort adjustments: foot rest, leg extension and reclining. With unskilled hands, the seat can make a lot of noise and react violently when adjusted. It is quick to learn, but that first time can be loud and embarrassing.

Hopefully these tips help you have an amazing train trip. If you have other helpful tips, please share them with me and others in the comments.

Safe travels y’all!

*Amazon Affiliate link.

Back to Top

(click to enlarge)
(click to enlarge)

(click to enlarge)
(click to enlarge)