We were finally able to get our bathroom fan repaired. MaxxAir had sent us a computer board and a motor, as either one of those items could have broken. We were able to find a mobile RV Tech who came out and replaced the computer board for us. As we were talking, he recommended a RV shop that he thought we might like: Sands RV.
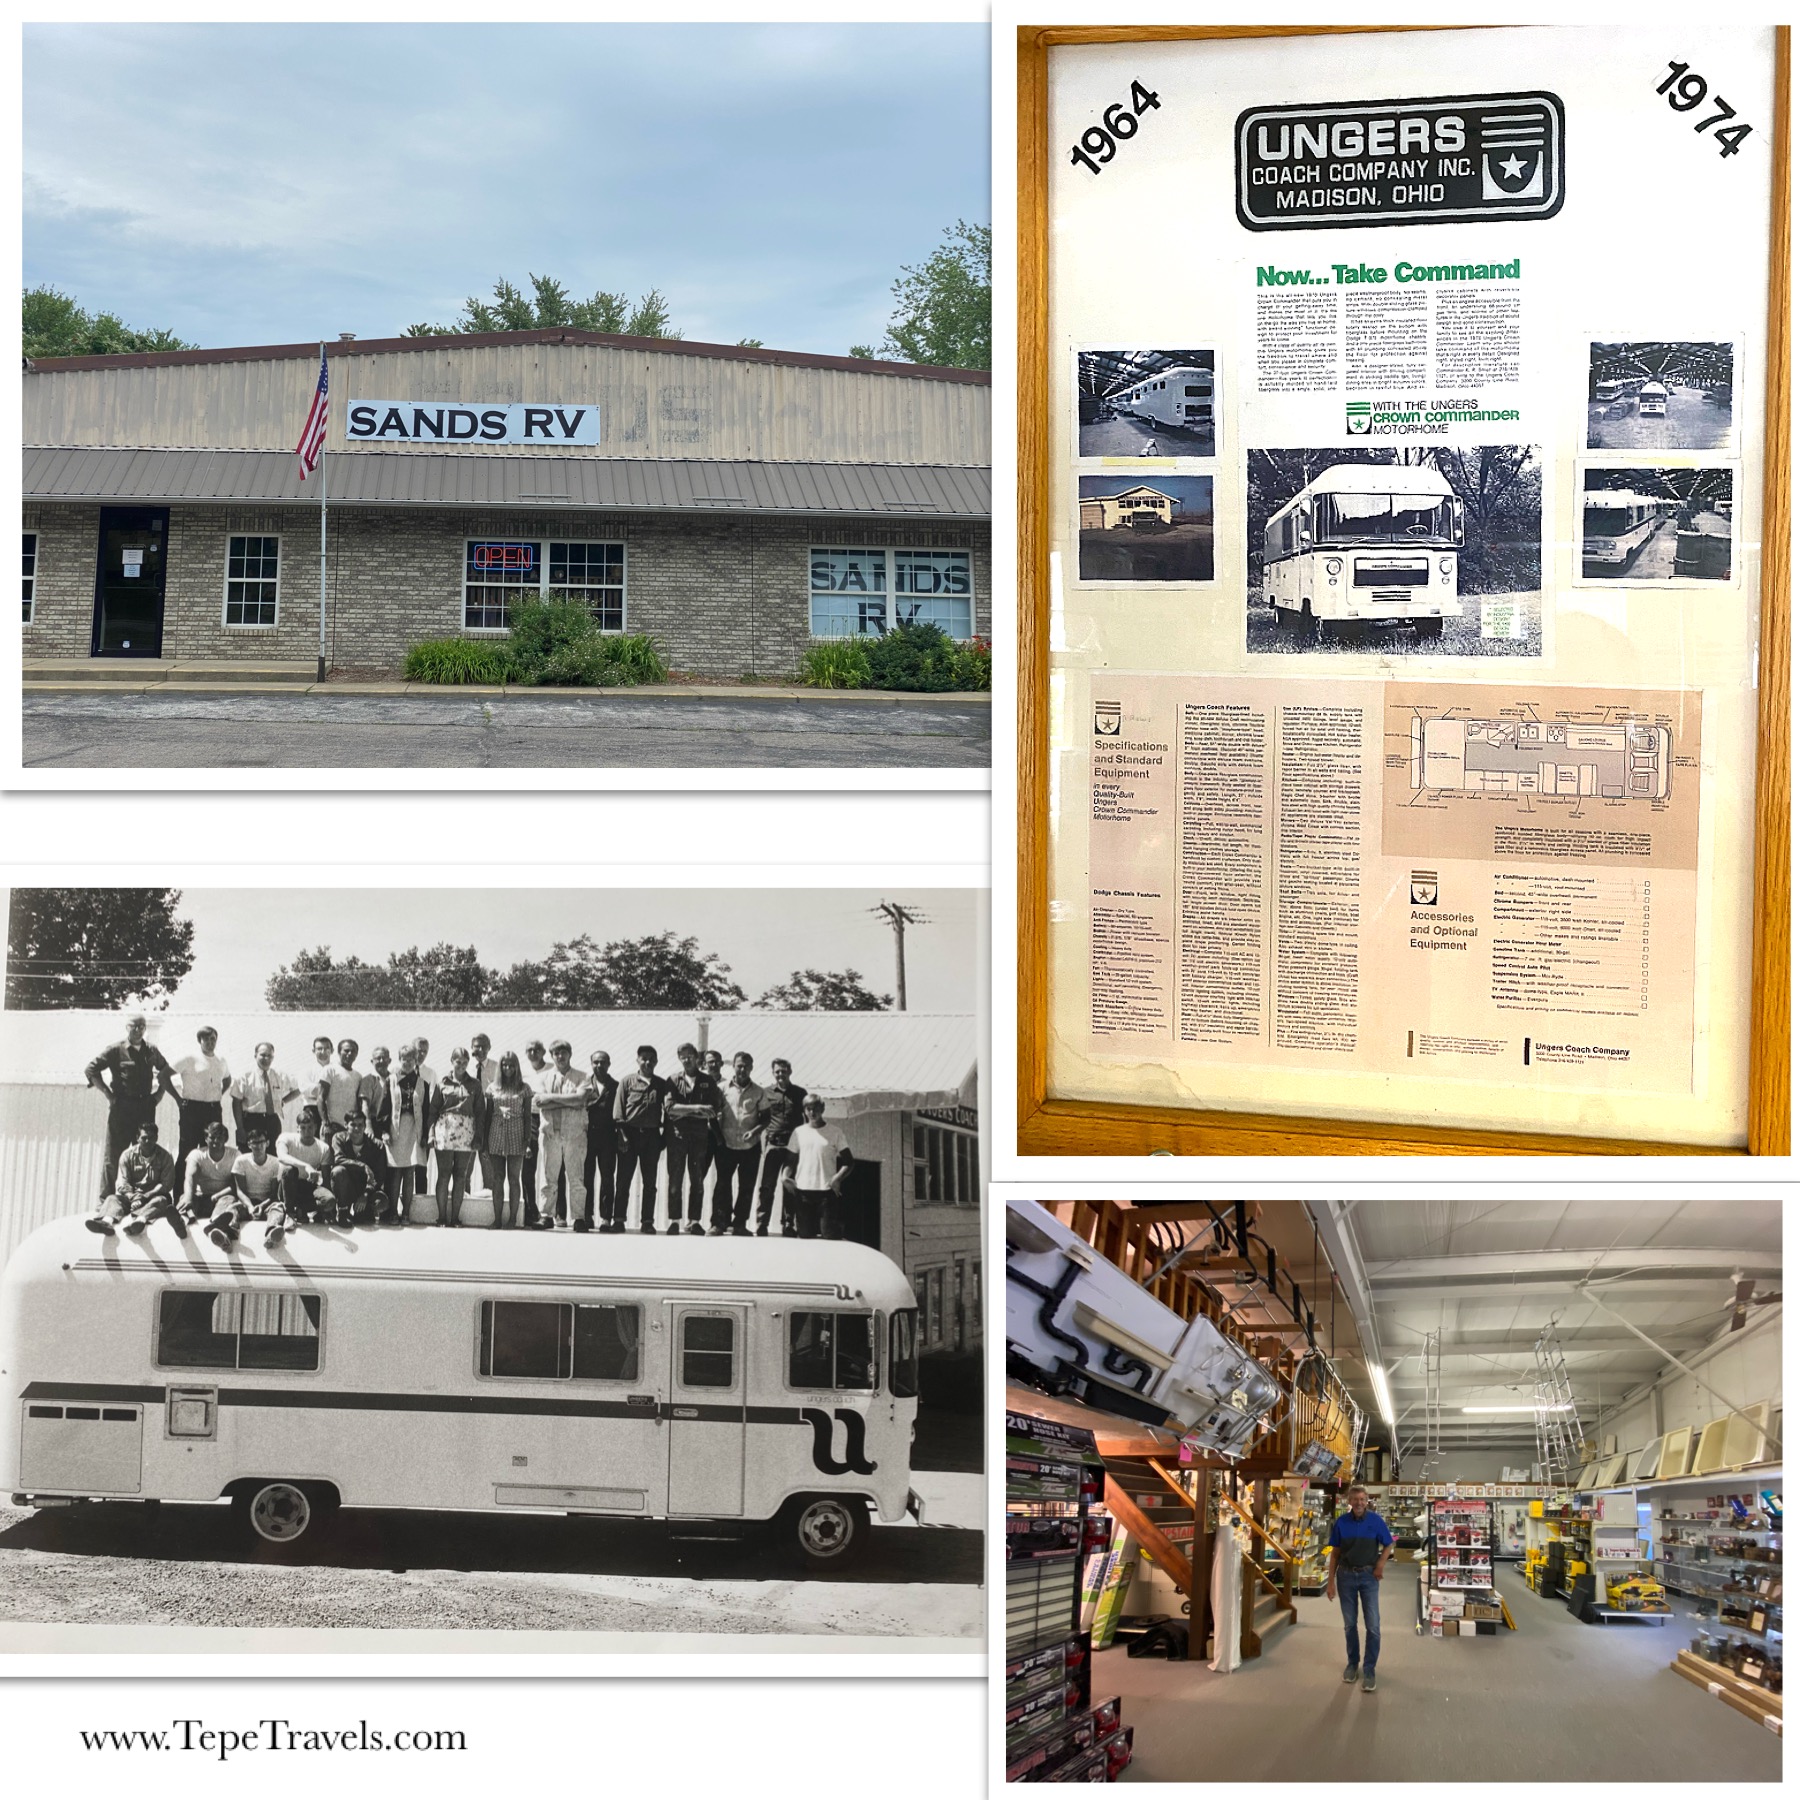
We stopped in a couple of days later. This store was really neat! It had a little bit of everything: curtains, furniture, toilets, fenders…
The store was owned by Bob, who also worked on the Ungers RVs. The picture below was 1968 and Bob is the one on the far right.
Click to enlarge
As we were leaving, they also gave us a flame color changing stick for the fire. The boys got a big kick out of it at our next camp fire. It did work really well and lasted a long time (much better than the packet we had bought at a campground store).
We had a great time exploring the store. Everyone was very friendly. If you are in the area, I would definitely check out this store. It was like a RV treasure chest with something for everyone! We did a quick video walk through of the store (link here).
On our move day to Vermont, it had been going pretty well. The sun was out, the kids were occupied, I had some music playing. I’ve made it a habit to check the truck and the RV TPMS sensors during our drives.
We were about two hours from our campground when I noticed the rear passenger tire was at a lower pressure than the others. It was in the shade, so at first I was hopeful it was just the sun making a difference (which it has before). I kept my eye on it and noticed it was slowly, but steadily losing pressure.
The shoulder of the highway was pretty narrow and we really didn’t want to pull off on the side of the road. We managed to find a nearby exit that had a Bass Pro with a larger parking lot. It even had a Walmart next door. Ben was amazing and was able to change the tire with the jack from the truck, our separate scissor jack, and our trusty Lynx orange leveling blocks*.
Once we were in Vermont, I brought the tire to a tire store to get checked out. We didn’t want to drive to our next campground without a spare tire. When I called the store, they had one matching tire in stock and would hold it for us. The boys and I headed over. Once we arrived at the store (Tire Warehouse), they checked the old tire first to see if it could be fixed. It turned out that the rim was the problem! You couldn’t see anything wrong looking at the tire/rim, but when a soapy solution was applied, you could see bubbles forming on the rim itself. They did not have the right sized rim in stock, but were able to get one for us. It was a white rim, but it was more important for us to have a spare than to have them match.
As it happened 1 day after our year anniversary of buying the RV (bought 6/4/20 and tire happened 6/5/21), the dealer said it was not covered under their warranty. I was told to contact Keystone and they told me to contact the tire company (Load Star) to see if it was covered under their warranty. I’m still in process of dealing with the tire company to figure this out.
We bought our TPMS sensors through TechoRV.com. I would really recommend having these sensors for your RV!
So, good news…we didn’t have any other leaks after tightening the toilet…at least for a while.
Bad news, now it will sometimes keep running and unlike some home toilets, there is no overflow system, so it just gets into the RV. Based on online searches and a call into the manufacturer, we think it is the water valve. There have been a few times lately where there was water at the base too, but it wasn’t from the kids.
Unfortunately, you have to take the whole toilet off to replace the water valve. Will was my assistant for this project. The tight bathroom space did not make it any easier. It seems like there a lot of YouTube videos that are on replacing/repairing the toilets, but it took a little while to find our toilet. We have a Thetford Magic Style II, which used the valve replacement part #42049. There is a serial number in your toilet and if you call the manufacturer they can tell you which part you need.
I finally found a video that was really helpful. The parts did come with written directions, but I found the diagrams less than helpful.
It took some doing, but we finally got it out back together. The test run didn’t have any leaking, so fingers crossed this solves the problem. We also managed to get the pin put back in the toilet seat lid, so that was fixed as well.
Below is a rough outline of the steps to replacing our water valve. Each toilet and set up are different, so please read your instructions. I really found the YouTube video helpful as well.
Turn off water and flush toilet to drain as much water as possible. Place rags around the water line for drips.
Disconnect water line. For our toilet, standing over it looking down, I had to turn the connector to the right to disconnect the water line from the toilet.
Remove bolt covers and bolts.
Remove toilet and set on a garbage bag.
Remove existing/old seal.
Clean toilet. (Yes, this is gross.)
Follow directions on replacement kit. (Make sure to test foot pedal at the end before reinstalling toilet! My first attempt had the pedal falling off because it wasn’t clamped on all the way.)
Place on new seal.
Place toilet back on screws
Thread on bolts and tighten down. To help it seat, sit on the toilet. Check the bolts to see if it needs to be tightened again.
Reconnect water line. Leave rags in place around toilet.
We sent one of the kids out to empty the grey tank, as we routinely do. The other one* decided to close it (*nameless to protect the guilty). I’m not sure what happened exactly, but the handle cracked. It didn’t break off, so we duct taped it together.
Ben started the drive out to Camping World to see what was available for repairs. I was online searching for help thinking, “great, now I have to replace the valve section”. Our owner’s book didn’t really describe how to repair a broken handle. However, one of our neighbors saw me staring at our valves and asked what was wrong. He informed me that most of the time, you can just replace the handle! Yay! I called Camping World to make sure they had one in stock since Ben was already on the way. (Spoiler: They did.)
The valve handle does screw off; however, to remove the handle, you have to use pliers to hold the metal shaft in place, otherwise it will just spin. They also recommended using a thin cloth between the shaft and the pliers. Ben bought the metal replacement (similar to this one*), hoping that it will last longer. He also applied a little bit of Loctite to it (do NOT use this on plastic).
It didn’t take much time, other than driving to get the part, to get it replaced. I am so thankful that we didn’t have to replace the whole valve piece, just the handle, that I thought I would share our newfound knowledge in case anyone else has that problem.
There are a ton of campgrounds out there and it can be overwhelming trying to find the “best” one to call home! They range from independent places, chains (like KOA and Thousand Trails), city owned, state owned, and federally owned. Some only accept military/retired military, some only accept Class A’s, and some have age limits on the RVs or the people they let in. A lot of places also have dog restrictions based on breed.
We have a few things that we always look for in a campground: location to sightseeing, internet, full hook-ups, and a laundry room. Our biggest one is a good internet connection for school and work. There are a few different websites that I visit to check reviews: campgroundreviews.com, GoodSam, and Campendium are my first ones. After those, I will go to Yelp/Google Map reviews (make sure to type RV Campground or RV Resort, not just campground as you will get results that will not work with RVs or may not have hook-ups), and then to Facebook for the RV groups to see if anyone has stayed there before.
Our favorite RV Campground Review Sites
I always check multiple review sites, especially for internet issues, but sometimes you still don’t get it right. For example, the Garden of the Gods RV review stated that our 3 providers worked. However, when we checked in, there was a note with our paperwork saying AT&T did not work in the park. This wasn’t mentioned on the campground’s website at the time. (This is just one of the reasons why we have three internet providers!)
I also try to read about the general campground conditions (sites, roads, etc.). If a lot of reviews with bigger RVs say that sites or internal roads were tight or not well maintained, I will pass on that campground. We’ve even double checked the reviews on the way to a campground and changed our plans last minute based on the current conditions. Conditions of campgrounds can change frequently. For example, when we booked one Texas site, it had decent reviews. On the drive there, we were reading the reviews from the last week and it was filled with reports of sewage problems throughout the campground (eww!), so we frantically searched and found a new campground to stay in. The most recent one was a change due to a review saying the T-Mobile signals were weak. T-Mobile is where most of our working internet comes through. We have some hotspot data through our cell phones, but the T-Mobile hotspot is the workhorse.
Campground amenities can also be a big indicator for the nicety of a park, although not always. There doesn’t seem to be a regulation on who can call themselves a RV Resort vs a campground, so reading reviews are important! We had one Thousand Trails claim to be a resort and they only had a laundry room and a walking trail. Nothing else was available or was broken and the sites and roads needed some upkeep. On the other hand, we had a Thousand Trails in Orlando that lived up to the resort title with many amenities and things to do.
An on-site laundry is also a requirement for us, as we do not have a washer/dryer on our travel trailer.
We have learned to always check (recent) reviews across the different review sites. It can be worth spending the extra money to get a nicer campground, especially for longer stays.
Nope, these weren’t bodily problems, but the bathroom decided to kick up a little fuss this past week.
First a quick rundown on RV toilets. Turns out most RV toilets are gravity flushed: there is a foot pedal to open the slide, which when pressed will open the slide and a small amount of water is released to help gravity do its thing and slide everything down the pipe to the black tank. (Hence why we have a water jug in the bathroom. Sometimes with a lot of paper, you need to add more water to encourage things along. It also helps with the black tank not getting clogged with poop pyramids and it helps things dissolve well in the holding tank.)
RV Gravity Fed Toilet
It started with the toilet overflowing. A small amount of paper had not gone down all the way and kept the slide from closing all the way, so the water kept continuously running. However, that same toilet paper also kept the water from draining and it overflowed onto the floor and spread to bathroom wall, the hallway, and then our room. Luckily, it was just water and had only made it a couple of inches into our room and we were able to clean everything up.
Several days later, we noticed water around the base of the toilet. It hadn’t overflowed, the boys hadn’t missed as it was just water. It didn’t look like it was leaking from the water connection points, but it could very slightly be wiggled. From what I read, it turns out that there is a gasket holding the toilet to the floor. It is mostly pressure fitted, so we took the screw covers off and tightened it down. No more wiggling! I’m hoping this solves the problem, since I really don’t want to have to replace a toilet. NOTE: Ours used a 1/2″ nut.
Then, as I was getting ready for bed, I noticed the shower floor was wet. No one had been in the shower since the morning, so it should have been dry. There was a small drip in the bottom left corner near the handles. Great. We did some research and took the handles plate off. We had to be pretty careful, since it is directly connected to the water supply pipes (which did not look like they had a good access panel to get to). Our shower is pretty small to start with, so it was a bit of a challenge to get to anything. I was able to reach in and tighten the hot water connection. I then had to remove and replace all the caulk and add the screws back in.
We’ve been lucky so far to just need regular oil changes and a few maintenance things. Most locations have been easy to find a quick oil change place.
This was our first diesel vehicle. Diesel trucks require a few more things than a gas-powered truck/car. Diesel oil changes are generally more expensive, as it was recommended that we use synthetic oil. DEF (diesel exhaust fluid) is another routine adder to the truck. Diesel trucks also have fuel filters, which our gas-powered cars did not have. The fuel filters that diesel trucks require are $100-$200 to replace. California and Colorado seemed easy to find someone who could replace the fuel filters, but South Carolina was a struggle. For example, the Jiffy Lube in California would replace a fuel filter, but the one in South Carolina would not. I had to call several places before I found one that would replace it.
Oil Change at Jiffy Lube and All Pro Tires
In South Carolina, we noticed the back wheel of the truck was starting to lose pressure frequently. We checked over that tire but couldn’t find any nails or anything stuck in it. When we took it in for the last oil change, I had them look at it. There was a nail in, but the head had broken off and you couldn’t see it easily.
Our maintenance so far:
7/7/2020 check up and oil change before we left Ohio (Barnes, $144.45)
We get a lot of questions when we talk to people, so we thought we would address some of them! If you have any questions, please feel free to email them to us ([email protected]) and you might just get your answer!
I picked laundry as our first topic, as it happens weekly and is something everyone has to deal with. I will say that one of the things I miss the most is having my own washer and dryer. Some of the Class A’s and 5th Wheels have a washer/dryer combo installed. Our travel trailer did not come with the built in hook-ups for a washer/dryer unit and we didn’t think we had the room to store a portable washing machine*.
WHERE: When I book a campground, I do look to see if they have a laundry room listed. I also check to make sure it is open. Due to COVID, we have come across a campground or two that have closed their laundry facilities; however, almost all of the campgrounds we have stayed at have been open. Most of the campgrounds have had laundry rooms, although we have gone to a couple of laundromats as well. You never really know what you are going to get with campground laundry rooms. We’ve had some with really old machines that were a little rusty and broken (that’s when we go to the laundromat). We’ve also stayed at places that have had really nice high-end machines. Most of the places have taken quarters (which was fun during a national coin shortage), although some have only accepted credit cards or tried to push an app on your phone.
HOW MUCH: The costing of the washers and dryers have varied, sometimes significantly. It may seem like $0.50 isn’t a lot, but we normally have 2-3 loads a week and that difference really adds up. The cheapest we have had were $1.25/load for washers and $1/load for dryers and the most expensive were $3.25/load washers and $2.50/load dryers. I would say it averages around $2 per load. I’ve learned to always keep my quarters with me because you never know when the dryer won’t actually dry the clothes, or the laundry pod will not dissolve, or the washer will kick the pod onto the door frame and the detergent pod won’t actually go through the wash with the clothes and get the laundry clean. TIP: I would buy your roll of quarters when you are able to, whether it is at a bank or the campground. Some of the campgrounds do not have change machine or will not sell quarters.
LIQUID DETERGENT VS PODS: At home we always used the liquid detergent. However, with a tiny space and a weight limit, I switched to the pods for a while. For the most part they worked great. When we moved down South, the pods started not dissolving all the way during the wash cycle. I thought it was the campground, but it happened at 3 different ones. Maybe we got a bad batch of pods? We switched over to the liquid again when we found a smaller bottle. We were tired of finding pieces of laundry pods stuck on our clothes. There are also laundry sheets* that some people rave about, but they are pretty expensive (per load of laundry vs other detergent) so I haven’t tried them yet.
So far, we have spent about $300 in laundry (on average $10/week), not including detergent or dryer sheets. We were very lucky that we had a washing machine that we could use for free in Florida for several weeks!
In high school one of my favorite English teachers had us read Things Fall Apart by Chinua Achebe (a Nigerian Novelist). It was a short but powerful book that I would still recommend. Although google tells the adult version of me that the novel dealt with how the prospect and reality of change affect various characters, the most vivid memory I have of this book was the delight the high school version of me had at discovering the publisher stamped “Things Fall Apart” on the inside binding of the cover.
Our adventure has a lot of parallels to the book. Each member of our family has dealt with change differently along our journey. We have each had ups and downs as we have adapted to our 400 square foot space and completely different, changing landscape. There have been arguments, tears and plenty of pouting and that was just me. In the end though, the good have greatly outweighed the bad and our laughter carries us through the tough days.
One thing that remains consistent is the amount of things that actually fall apart on a travel trailer as you bounce your home along the road at 60 mph. Going into this experience, I knew things broke easily on a traveling home. We had seen it in enough videos, but I was not prepared for just how quickly things actually broke.
June 4th: Buy RV and get it home. Modified the bunkroom and resealed the storage door. The caulking wasn’t great and we could see gaps. We checked the caulking on the outside and touched up a few spots. Boys slept in their beds and broke the aluminum mini blinds the first time sleeping in them. Sarah later upgraded these from Aluminum mini blinds to custom fit black out curtains that velcro in place.
June 9th: Move RV to Waynesville. After several water dripping, shampoo barely our of our hair showers, we replaced the shower head with an Oxygenics*. This was more of a mandatory upgrade rather than a repair.
July 1st: The kitchen faucet got stuck on the shower/spray setting. This was the second time, but now we can’t get it to go back to the steady stream. Sometimes more features just mean more problems.
July 5: The left hand small drawers in the kitchen came loose and were hanging crooked. When we took the drawers out to see why, it looks like they were only held up by the drawer tracks and two screws at the top. There was no bottom support at all. I got it reattached at the top and also put in a bottom support. We discovered some more storage space when we removed the access panel to reach the back of the drawers. Repurposed the panel to protect the water lines, but it is now moved back and attached to the new bottom drawer support. We have our bread in a storage bin under there now. (The cupboard was too warm and the bread was growing mold quickly.)
July 9th: After traveling to our first stop (boondocking), the trim around the main door was popping loose. Reattached it with the staple gun. We also learned that normal highway driving knocks the half moon shower doors out of their track. We close and lock them, but the left side keeps popping loose.
Not really broken, but maybe forgotten? All the blinds in the RV have some sort of hold back (cords attached to the wall, or hooks to attach the bottom of the blinds). The master bedroom blinds by the bed do not. We have gotten pretty level, but the RV still makes small movements when someone walks/turns in bed. Sarah attached sticky velcro to the wall and to the bottom of the blinds to keep them in place. It is now so much quieter when we are sleeping!
July 18th. One of the small kitchen cabinet doors ripped out. I reinstalled it, but it ripped out again. Problems of having short people (aka kids) putting away dishes. They are hard to open cabinets and I think he was just pulling downward too much instead of outward.
August 11th: Upgraded to a fancy new bike rack over the trailer hitch jack, the Jack-It*.
August 12th: Realized we damaged the passenger side rear stabilizer strut while installing the new bike rack. Still not fixed for lack of the right materials. Need to source materials not found in normal hardware stores.
August 12th: New bike rack also reduced the truck to trailer turning radius resulting in damage to one bikes tire rim and dents to the truck while backing into a tight RV space. Touch up paint and a new bike to the rescue (benefit of a cheap Walmart bike).
September 12th: Trim around main door popped off towards bottom again but on both sides this time. Closet door in master bedroom, left door fell off/screws came out. Learned from the kitchen cabinet doors and was ready with the upgrade and better installation. Based on the design, I bought enough bolts, washers and nuts to replace every cabinet door hinge in the travel trailer.
October: We didn’t move and coincidentally nothing broke. Easy living in California! We did finally upgrade the CO2 alarm to a less sensitive model. The model that came with the travel trailer would alarm daily (normally at 3:00AM, 4:00AM, or 5:00AM). The sensor sits immediately outside the boys bunkroom and the alarming frequency increased based on Mom’s dinner menu (strong correlation between beans and alarming). Once we upgraded to the Kidde Carbon Monoxide & Explosive Gas Detector Alarm* our late night wake up calls went away.
November 7th: Barely clipped gas station bollard while turning out of a tight Diesel refueling area pulling the travel trailer. Luckily just cracked the electrical cover plate. This could have been much worse. Until we get a new cover, we have resorted to a makeshift plastic bag and have been blessed with very little rain.
General:
The finish on the bathroom door is peeling off by the doorknob.
The floor grates are not designed for everyday traffic even though they are in high traffic areas. Sarah sourced and replaced the most offensive grates in the bathroom and master bedroom with a heavier grade.
Command strips are strong enough to pull off the wallpaper. We have had to do some cosmetic repairs when the Command strips won the battle.
Although things continue to inevitably fall apart, we are grateful it hasn’t been anything significant. On the positive side, we have had many opportunities to practice our engineering, visit hardware stores and my apprentices have started to learn how to repair things on their own. Things change, we can either go with it or let it break us. Maybe I have spent too much time with my surfing buddies in California, but we are just going with the flow dude.
The truck’s Replace Fuel Filter came on. Of course, having had all gasoline cars before, this was our first time with this particular warning light. I wanted to get this fixed ASAP since we would be driving in the mountains and moving again in a couple of weeks. Now, according to Google, it should have been good until 30,000, but we are only at about 15,000 miles.
I looked on Yelp and Google reviews. The first place I called couldn’t get us in for a few weeks. He did recommend another place to try and I gave them a call. Chuck’s said to come over and he would squeeze us in.
They didn’t have an inside waiting area, but did have a picnic table outside. It was in the sun and the boys got very antsy after awhile. We walked up a couple of blocks to Cheese Haus and got honey sticks and cheese curds. Nick loved the cheese, but Will wasn’t a huge fan of either. Apparently the honey was too sweet. Huh…honey is sweet? Who knew?!
We walked a little farther up the hill and stopped at a candy store. We got a few pieces of taffy for the kids to eat while waiting and I got a turtle. Walking back down the hill, we finished waiting for the car.
I was so relieved to have one thing fixed and off our plate when the truck was done. It was cheaper than the first place had quoted us too, so that was another win!
While we were gone, Ben had reserved us time at the RV park’s pool. There was a nice covered section that we could sit out of the sun. The pool was also nice and warm (it’s heated, plus sits in full sun). We took a few minutes to explore the arcade as well.